About a year ago, I got into matcha. I knew it had a good caffeine kick and felt like a fun afternoon switch from coffee. A creamy, caffeinated sweet treat! I started grabbing them from Starbucks in Howard Beach on my way to the Island, when I go to visit my mother. That led to buying the powder and experimenting with making my own at home. I use sweetened almond milk. It’s not as creamy as I’d like. I’m working on my little ongoing barista project.
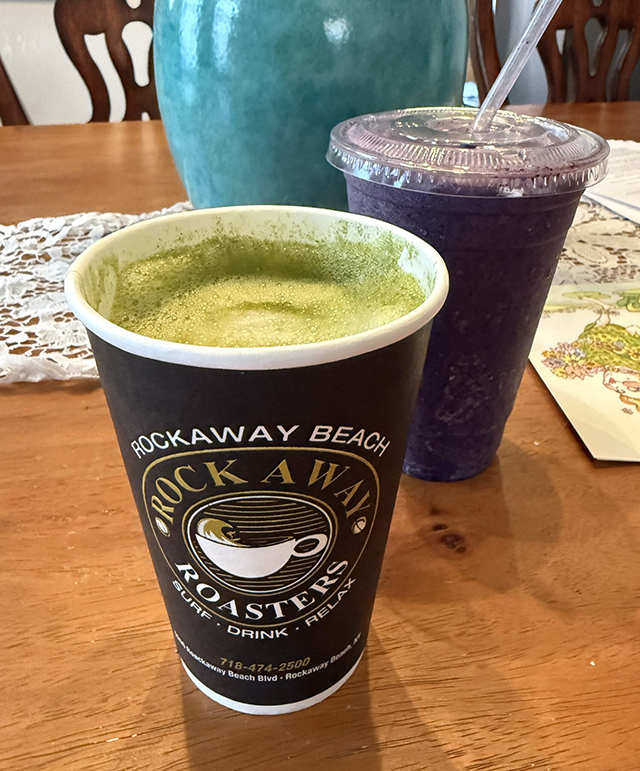
Lately, I’ve been getting matcha from Rockaway Roasters (@rockaway_roasters) —partly for the drink, partly for a reason to leave the house. I have a new work-from-home life, and I’m trying to take breaks from the screen.
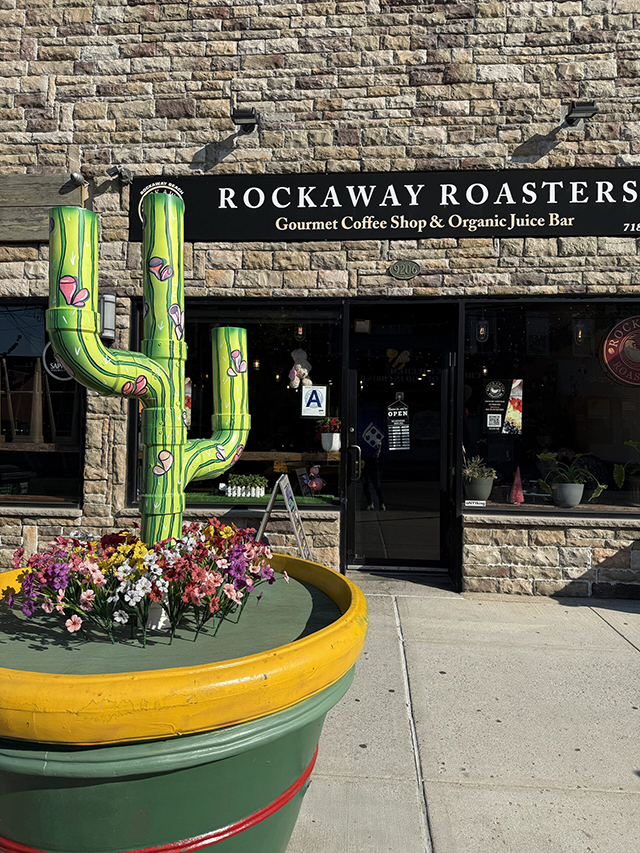
The Rockaway Cactus!
Props to Roasters for consistently creamy, good matcha. Owner, Victoria Cori Stroh, took my order one afternoon and suggested a squeeze of honey as the sweetener. It’s my go-to now! Also, I need to say how great it is to see an owner of a business at their shop, and not only that, but also serving the community.
And on that note, of great local business practices, how about that planter out front (92-06 Rockaway Beach Blvd.)! I’ve watched it seasonally morph from a cup of Christmas, hot chocolate with a large candy, into a few other holiday cups. And now to a summer coffee-cup cactus. Very crafty. Very Rockaway.
In all this matcha tasting and dabbling, I realized I knew very little about what I was drinking.
The internet tells me matcha is a finely ground powder made from specially grown green tea leaves. Unlike regular green tea, where you steep the leaves and toss, with matcha, you’re drinking the whole leaf whisked into water or milk.
Slightly sweet, a little grassy and earthy.
This is interesting about the process. I learned the tea plants are shaded for a few weeks before harvest, which boosts chlorophyll (the bright green color) and changes the flavor to less bitter and smoother. After harvesting, the leaves are dried and stone-ground into the soft, neon powder.
One of the reasons people love matcha is the kind of energy it gives. It has caffeine, but also L-theanine, an amino acid that promotes a steadier, calmer focus. Less spike and crash.
On the flavor front, it’s slightly sweet, a little grassy, and earthy. The taste is pretty mild with a touch of bitterness. And I like the smooth creaminess of the drink, which is more gentle for my stomach.
Matcha goes way back. It was first developed in China during the Tang and Song dynasties. It took root in Japan, where it became central to the traditional tea ceremony called Chanoyu. The Zen Buddhism ceremony is set in a tranquil environment and centers on mindfulness, respect, and being fully present. Yes, this is the opposite of my energy-driven intentions of drinking matcha and the drive-through culture of Starbucks. That’s a pretty wild transformation. Maybe I can use this new bit of matcha history as a reminder to slow down, to turn my matcha breaks into an actual break.
For more food discovery, follow me on IG taste-testing the town – @theglorifiedtomato.
by Paula D.
on June 16, 2026 6:16 am in Rockaway
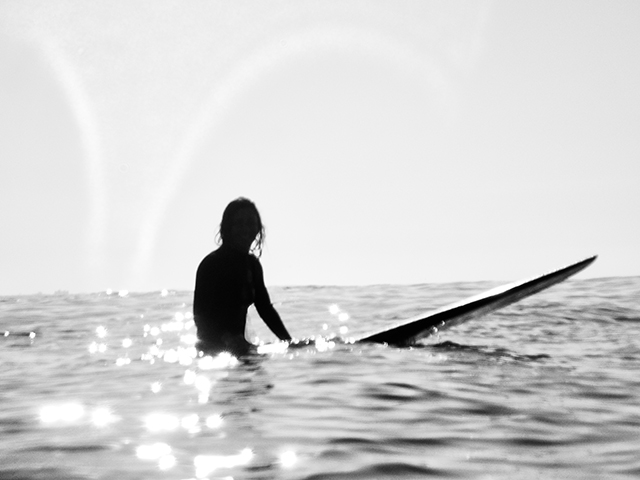
Photo by Jena Cumbo
I used to have a friend down the block who gave me that extra push, the cheery text I needed at 6:30 am to suit up when it was still chilly, and the thought of pulling a 5’4 over my weak, winter body had me hesitating and rationalising the, nah. The boots, whatever. The gloves… UGH. “Just for an hour,” She’d say and pump up the positive talk. And we’d stay for two.
That is no more, and now it’s all up to me to get myself in the water. And you know what? That’s how it should be. I want to show up and shred for myself!
I got in this week, with mostly clean, rolling three-foot peelers. Still winter-weak, yet the sessions were fantastic. Not because I caught a ton of waves, but because surfing wakes up my body. I have that good sore feeling. Strength is building. Surfing wakes up my mind too. It connects me to nature; I need that. And it’s so fun! There was that long right at 92 also!
PSA, it’s not cold anymore. That’s my “big” prob with winter surfing. I’m always so cold. We’re past that now. The water is essentially the same temperature as the air, 45–50 degrees, and with the padding of the wetsuit, you might even feel warm. I see hoods off. It’s only going to get warmer.
While I was on a surfing trip in El Salvador this past February, I realized I might not ever read a book again. I know. If I can’t pick up the pages on vacation, it’s hard to imagine when I will. So I got home and downloaded Audible. I’m obsessed! My brain feels fed. And guess what? I’m “reading” Rockaway by Diane Cardwell.
Writing and surfing, here we are. I’ve noticed how Diane tells her story, weaving the past and present together. It’s nonlinear, and that’s partly what makes her book engaging. I want to figure out how to do that! What’s interesting and a little cosmic eerie is learning about my neighbor’s path to Rockaway and surfing, and how the surfing part mirrors in ways my own surfing journey. I’m halfway through, it’s great. And the book is a motivational push to paddle out!
Go, get in the water!
If you need surfing inspo, read Rockaway by Diane Cardwell, and I have a few musings of my surfing adventures here. Find me on the boardwalk with my board, Instagram: @theglorifiedtomato.
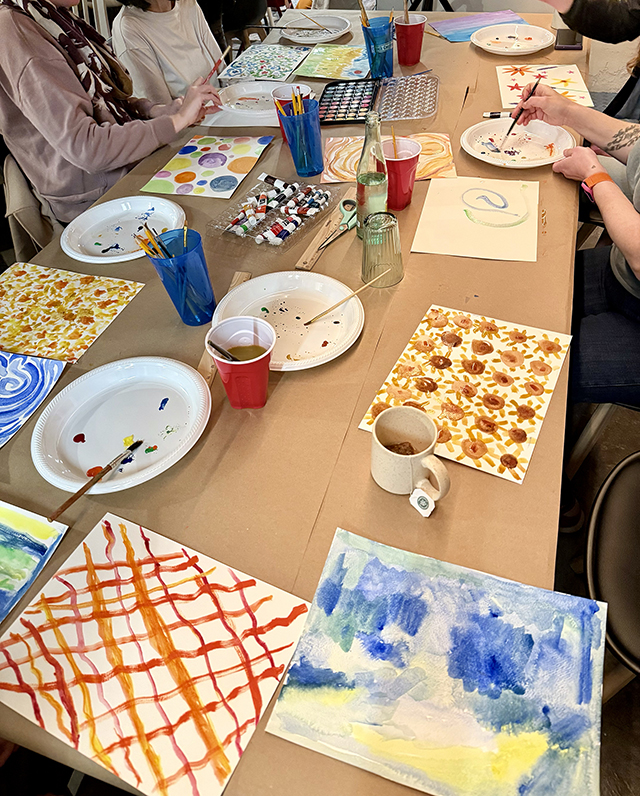
I’ve taken two art classes with the Rockaway Art Room, and I’d like to share my experience because I’ve become a big fan!
The first was a watercolor and weaving class with artist Bekka Palmer. Something kind of magical happens when you weave two different images together. An unexpected third subconscious creation starts to appear. Beeka is a fine artist with a focus on textile design and basket weaving. Her work is inspiring! Take a look: bekkapalmer.com
The second was a found objects workshop, building a relief mandala with instructor Camila A. Morales (@camilamorales). She began with a wonderful presentation on art, ecology, and sustainability in our community. Camila, a professor and artist herself, aims to bring art education to the peninsula with FIELD NOTES, a free public arts and science program coming to Far Rockaway this spring. For the art-making, she set the tables with buttons, moss, and all these little treasures. This one pushed me out of my comfort zone, and that’s a good thing.
Both classes were so engaging. And it was just people showing up, making something with their hands, talking to each other, having tea, and being creative.
These workshops took place at the new and delightful Jupiter Club—a members-only surf storage and co-working space in Arverne (69-62 Almeda Ave, Arverne, NY 11692). Owners Gina Jurlando and Tim Reckel envisioned it as a community events hub too, and it’s already become home to some Rockaway Art Room’s classes.
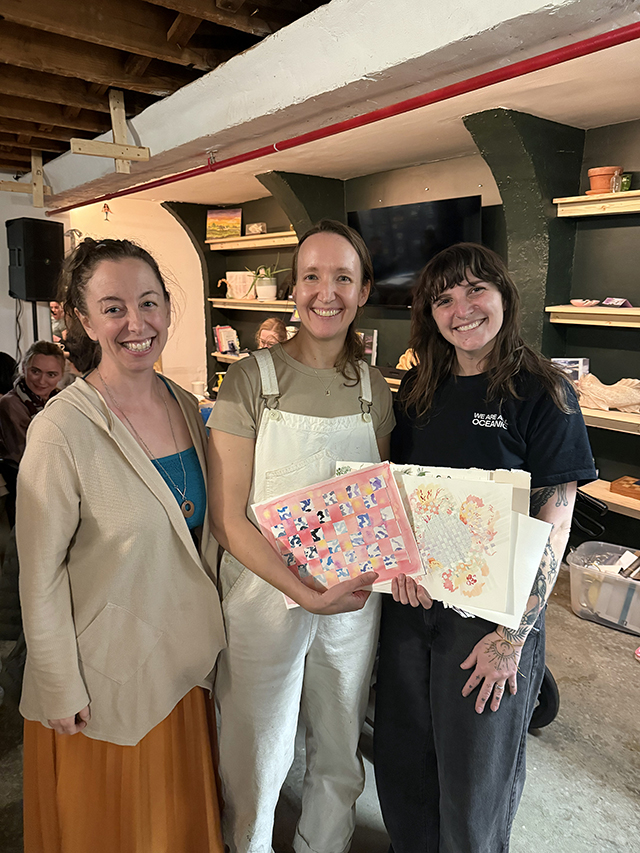
(L-R) Jamie Soltis, Rockaway Art Room Founder; Teaching Artist, Bekka Palmer; Gina Jurlando, Owner, Jupiter Club.
Waves of watercolor.
The Rockaway Art Room was conceived by Jamie Soltis. Jamie and her husband, Ednmand Ducey, found their way to Rockaway by way of waves. They’re surfers. Jamie works in the nonprofit world; she is an actress performing off and on the peninsula, and she is a mother to an exuberant two-year-old. Jamie and her crew felt they wanted more creative calmness and wellness in their circle. She took the leap and began the hard work to build the polite program for the Rockaway Art Room.
I say thank you.
We are lacking many things on the peninsula, and an organized, creative outlet for so many of us who are creative people is one of them. The long-term goal is to open a brick-and-mortar art school. Teaching artists get paid, and students, art-curious folks, and all ages are welcome to attend art classes for free. This concept for the Rockaway Art Room is something Jamie feels strongly about. She shares on the GoFundMe page two goals:
- Free art classes for everyone in our neighborhood
- Create jobs by making sure the artists who teach are paid fairly for their time and expertise.
Jamie, like many of us, feels the race of life—work, family, chores, obligations. The Rockaway Art Room is a way to ease all that, a place where relaxation and art meet, and where you can connect with like-minded people. It’s an outlet to discover something new, take a pause from the regular routine, use your brain in a different way, get off our screens, smile, and have some fun!
The aim for the next phase of Rockaway Art Room is a five-week oil painting series that would start sometime in the early summer. Also on deck, open drawing meetups around town, drawing our urban natural landscape, and the people that inhabit it.
Here’s the GoFundMe – Donations go toward paying teaching artists, buying supplies, outreach, and taxes. The ask is low; I feel the dollar amount should be at least tripled. Let’s do this, Rockaway! Please consider supporting this fantastic program by making a contribution or sharing this article and donation link.
Follow the Rockaway Art Room on Instagram for updates on summer programming: @rockawayartroom
by Paula D.
on April 22, 2026 7:29 am in Art / Memories
You smell the incense before you see it. It’s sweet, piney, copal warmth. It’s moving at the perfect pace with the breeze. And to catch that scent, out in open air means it’s burning heavily, rolling through the streets like the volcanoes that frame the sky of Antigua, Guatemala.
The cobblestone streets are lined with families. Makeshift push carts of nuts and cotton candy move past you. Fresh slices of papaya are offered by traditionally dressed women, seated along the curbs. They are slicing at their ground-level kitchens. It almost feels like a carnival yet softer, slowed, and swaddled in a spiritual aura.
Then, from a distance, you see the clouds of holy incense and through that the procession, followed by the sound of dramatic music, louder with each swaying step.
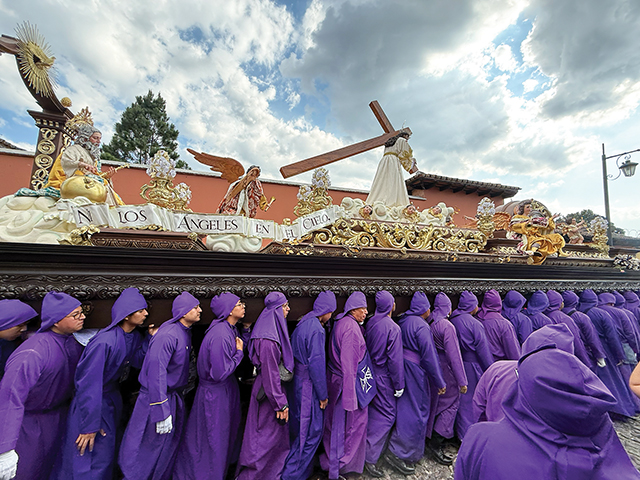
Every Sunday during Semana Santa (Lent), Antigua honors the season with elaborate processions that last through the night. Community, priests, and church folks carry statues of Jesus bearing the cross, followed by the Blessed Mother, followed by a full-on marching band. There’s an order to it—men carry the float with Jesus, women follow and carry Mother Mary. And it is an honor and a devotional display to do so.
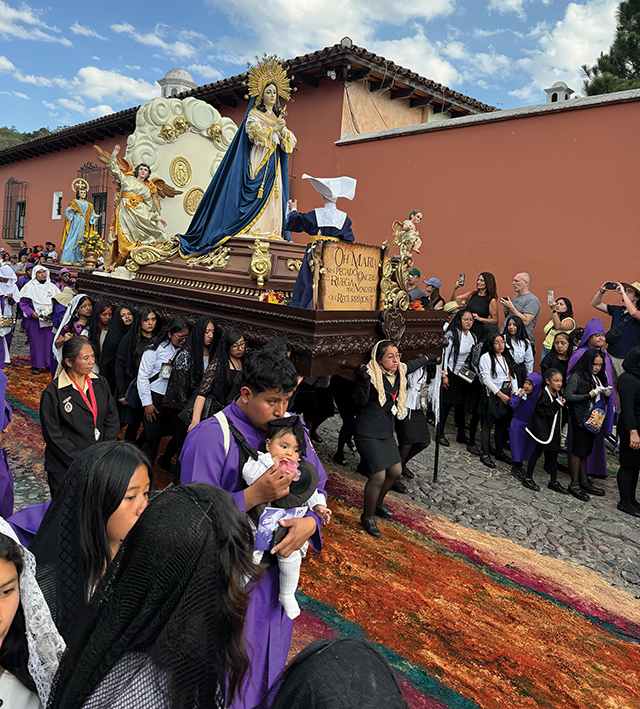
The men wear hooded purple cloaks, the mood is solemn, and the pace is steady. The women, dressed in black with lace, like widows, shoulder the weight of their massive float with grace. Seeing these women, shoulder carrying, reminded me of the heavy weight of the cross Jesus bore and the weight of my sins.
It struck me to see so many young people (teens through their 30s) wanting to be there; it wasn’t a church obligation. Catholicism is part of who these people are. It made me think about my relationship to the church and what it can look like.
The Lent processions in Antigua, Guatemala, trace back to Spanish colonial rule in the 16th century, when Catholic traditions were introduced by missionaries. These processions were designed to visually teach the story of Christ’s passion to Indigenous populations, many of whom did not speak Spanish. Over time, what began as an imposed ritual became more layered, adapted, and reinterpreted through local culture.
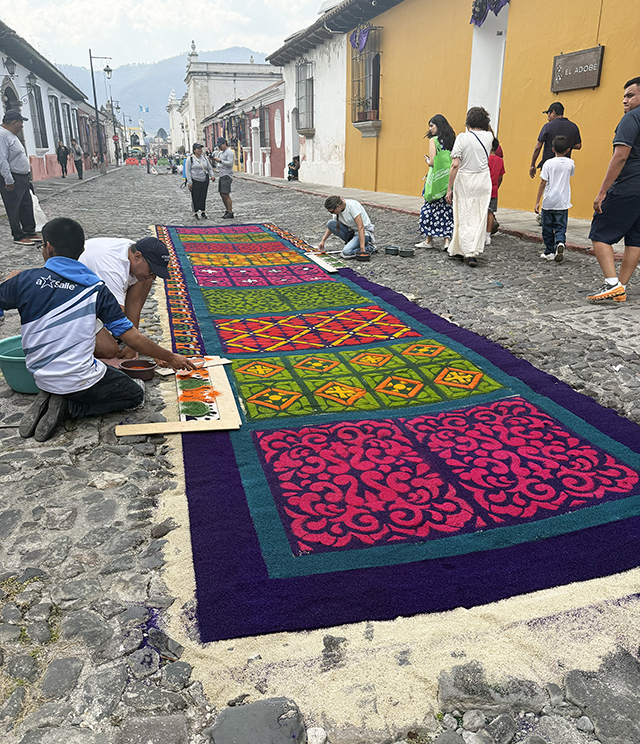
Mayan Indigenous influence is most visible in the creation of alfombras—intricate carpets made from colored sawdust, flowers, fruits, and other natural materials. Originally, they honored sacred Mayan spaces and were created for royalty or deities. The offerings drawn from the earth, rooted in a deep connection to land, color, and symbolism that long predate colonial religion.
Over time, that tradition merged with the rituals of Holy Week. Now, local families, businesses, and church groups spend hours, days, and sometimes all night creating the sawdust carpets. They are offerings. Gifts to God, laid carefully on the ground.
I was in awe of these artworks. Before the procession begins, there’s an eerie window of time when you can walk the carless streets (on Lent Sundays) and take in the intricate street carpets as they’re being made. You witness the care and intention, knowing they will be slowly, deliberately walked over by the procession. When I watched the details dissolve underfoot, it was a heart-opening, wow moment for me.
This is a ritual of impermanence. It’s a blessing to have the procession pass over the carpet your family, business, or church created. For me, I thought of Ash Wednesday and one of my favorite bible quotes: “Remember you are dust, and to dust you shall return.” (Genesis 3:19).
That first week of Lent, I texted my family group chain from Guatemala and typed out, “I’ve been in touch with the spirit.”
Happy Easter to you and yours.
For more photos and videos of the Guatemalan Lent processions and alfombras, visit my Instagram: @theglorifiedtomato.
Source: growingupbilingual.com, https://en.wikipedia.org/wiki/Sawdust_carpet


