I was looking for a bowl on the bottom shelf of my mother’s closet to make a salad, and I saw an old, faded blue box. Reaching, I pulled it out and brought it to my mother. “Whose is this?!” I asked. “It’s your grandmother’s,” mom said.
My mother doesn’t bake, so I’m guessing that when Grandma Mary passed away in 2012, it went from her kitchen to my mother’s kitchen and hasn’t been touched since.

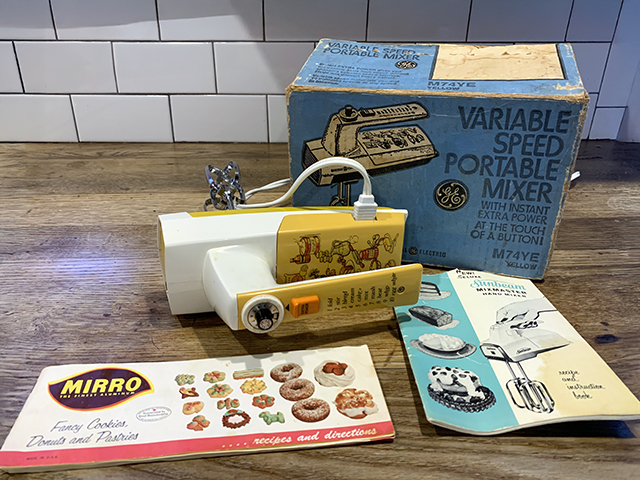
I carefully opened the box with frayed corners. It revealed a mustard yellow mixer. It instantly brought my heart back to Grandma’s kitchen with her yellow, ornate wallpaper. Of course, she chose the yellow mixer over the pea green – to match. I do the same with red. What makes this vintage appliance unique are the little illustrations of pie, butter, jam, and cake on the body.
It’s heavy by today’s standards and that’s funny because the marketing on the box boasts how lightweight it is. The handle showcases a bright orange “extra power” button perfectly placed where your thumb naturally rests. The speed switch is more of a dial—the higher the number, the stronger and faster it goes. It’s loud!
It was made by General Electric, and the brand is the Sunbeam Mixmaster, New DeLuxe, 1960. I know the year because my grandmother saved the user booklet, which doubles as a recipe book with over 20, now vintage recipes to explore. Alongside it, in this treasure box, I found a Mirro (the “Finest Aluminum”) Fancy Cookies, Donuts, and Pastries recipe pamphlet.
It’s fascinating, really—just 65 years ago, discovering new recipes came from exchanging them with neighbors, friends, and family. Or you’d get a new recipe book for Christmas and actually use it, or find recipes on boxes of food in the supermarket or included with new cookware and kitchen appliances. Now, Instagram feeds them to us. Only 65 years, and it’s a different world.
I mentioned in my column last week how funny it is to hear General Electric as the maker. Today, when we think of GE, we picture air conditioners, oil and gas, and military aircraft—not Grandma’s trusty baking mixer! And trusty it is. I’ve used it three times now, to make besciamella, banana bread, and last week’s ricotta cookies. She’s a strong and powerful machine, something we all should aspire to in 2025!
This mixer will now live another lifetime. I’m happy to give it that new life as I experiment, grow and learn more about the art of baking. All the while having my Grandmother’s memory in hand.
Follow my baking misadventures on Instagram: @theglorifiedtomato.
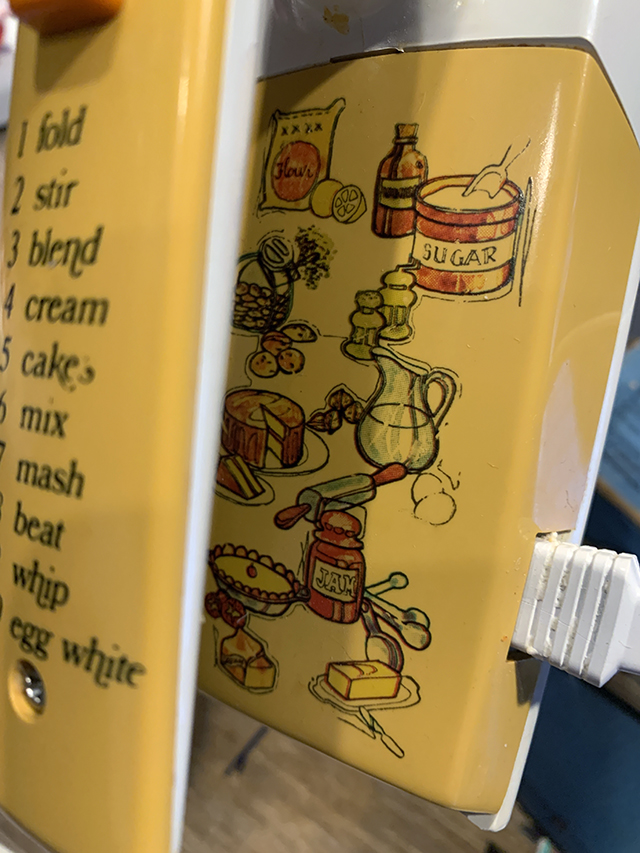
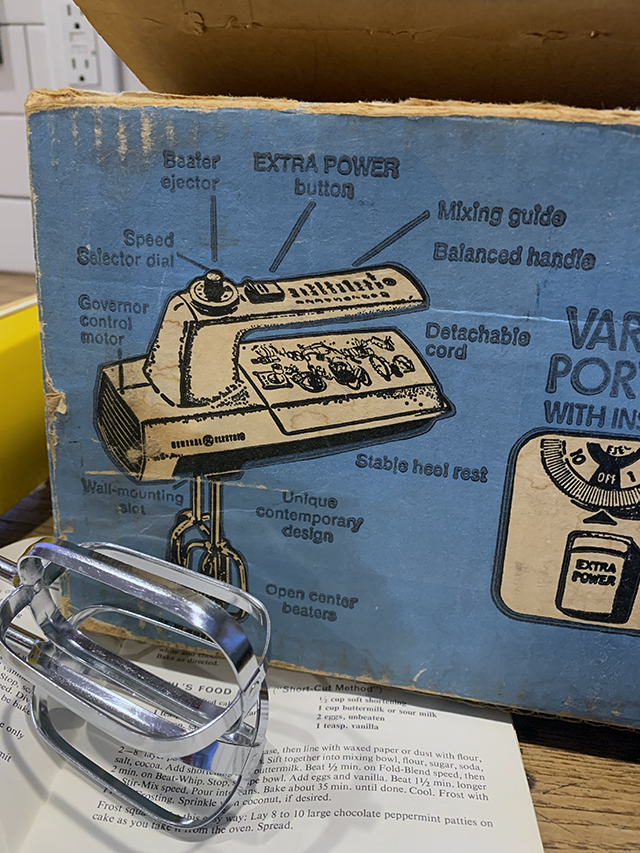
The hand mixer was invented in 1953 by the Sunbeam Corporation, which, strangely, began as a manufacturer of sheep shearing machinery (Chicago Flexible Shaft Company). Over time, the company expanded into the lawn sprinkler market. Sunbeam’s long and wildly diverse duration ultimately ended in a massive accounting fraud scandal. Oops.
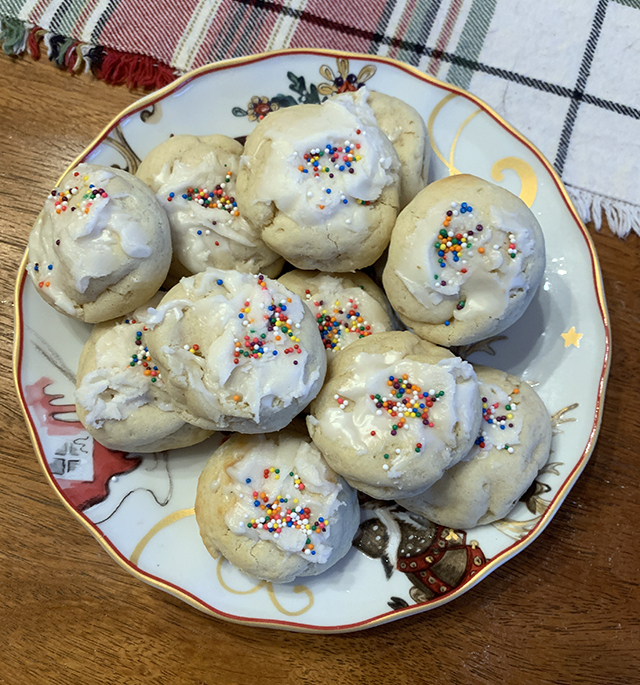
I’m glad I was able to fit one batch of cookies in before Christmas and if you can only choose one, it is Ricotta Cookies.
Us Sicians are thrifty, ricotta (and the cookie) origins trace to Southern Italy, where ricotta — a byproduct of cheese-making — was used in desserts to avoid waste. Ricotta means “recooked.” Some of the most classic Italian dishes we enjoy today are the result of humble resources transformed through culinary creativity.
Italian Ricotta Cookies are soft, cake-like treats with a subtle, creamy flavor from the ricotta cheese. Their light, airy texture makes them melt in your mouth – yum alert. The sweet glaze on top adds a touch of sugary richness, accented with a hint of almond. I feel the glaze isn’t even needed, though. I prefer a less sugary cookie, but the mini sprinkles add a festive touch that makes them a Christmas classic.
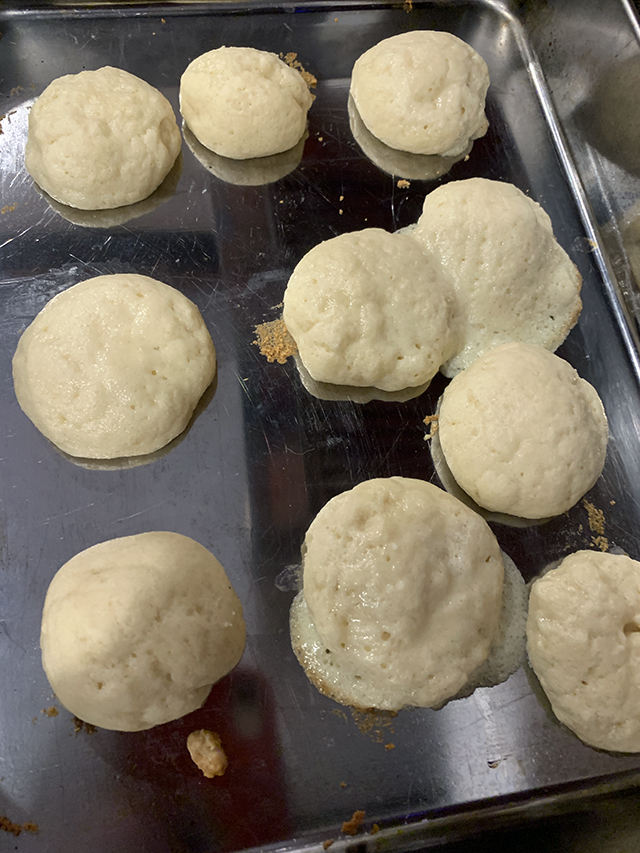
When our food pics aren’t perfect, we call it ‘Italian rustic charm’.
My batch got a little messed up, just like me. But kinda cute and sweet – also just like me. Here’s the recipe!
Ingredients for the Cookies:
- 2 sticks butter
- 1 ¾ cup granulated sugar
- 2 eggs
- 1 small container ricotta cheese 15 oz.
- 2 tablespoons vanilla extract
- 4 cups all-purpose flour
- 1 teaspoon baking powder
- 1 teaspoon baking soda
Ingredients for the Glaze:
- 4 – 6 tablespoons milk
- 1 ½ cups powdered sugar
- 1 teaspoon almond extract
Instructions:
- Preheat the oven to 350°F.
- In a medium bowl, cream the butter and sugar. Add the eggs, ricotta cheese, and vanilla extract; mix until well combined. In a separate medium bowl, combine the flour, baking powder, and baking soda. Add the flour mixture to the ricotta mixture; mix well. Roll the dough into teaspoon-sized balls. Place on an ungreased cookie sheet about 2-inches apart.
- Bake for 8-10 minutes or until lightly browned. Allow cookies to cool on the baking sheet for 3 minutes before transferring to a wire rack to cool completely.
- In a medium bowl, whisk the milk, powdered sugar, and almond extract until smooth. Dip the tops of the cookies into the glaze and set upright back on the wire rack. Immediately top with sprinkles. Repeat for remaining cookies.
What I learned: If the cookies turn out too soft, draining the ricotta a bit beforehand will help. I didn’t do this but found out later that it’s a good step for firmer cookies. I also had some trouble with the glaze—it wasn’t drippy enough and was hard to apply. To fix this, you can slowly drizzle in more milk, and mix to loosen the glaze up. Warming it in the microwave for a few seconds also makes it easier to work with.
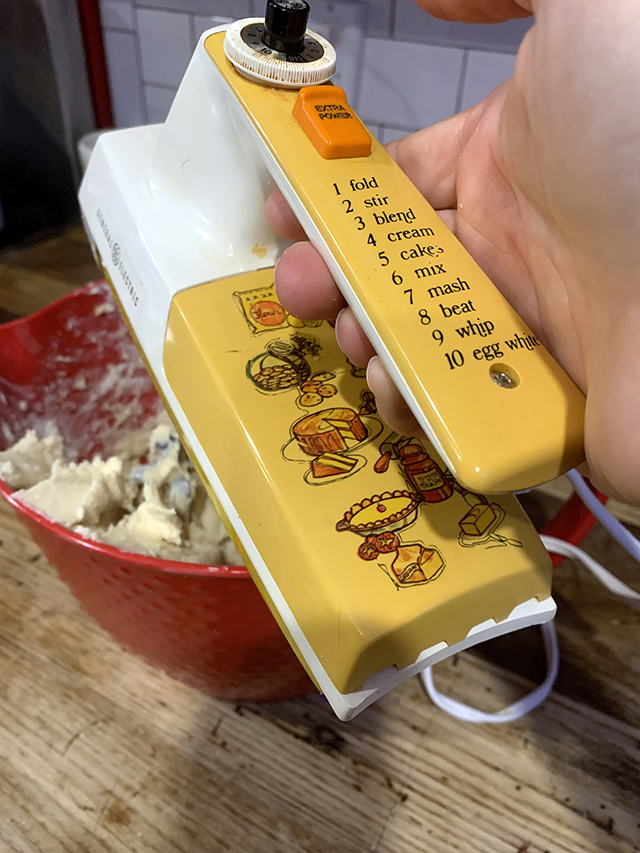
What made this baking session extra fun was using a hand mixer I found in the back of my parents’ pantry a few weeks ago. (Look, Joe!) It was my Grandmother Mary’s—General Electric, Sunbeam Mixmaster, New Deluxe! Made in 1960. Nowadays, when we hear “General Electric,” we think air conditioners, oil and gas, and military aircraft—not Grandma’s trusty baking mixer! I’ll have to write a whole column on this gem, but for now, I just had to flex!
Follow me for the day-to-day in the kitchen on Instagram – @theglorifiedtomato.
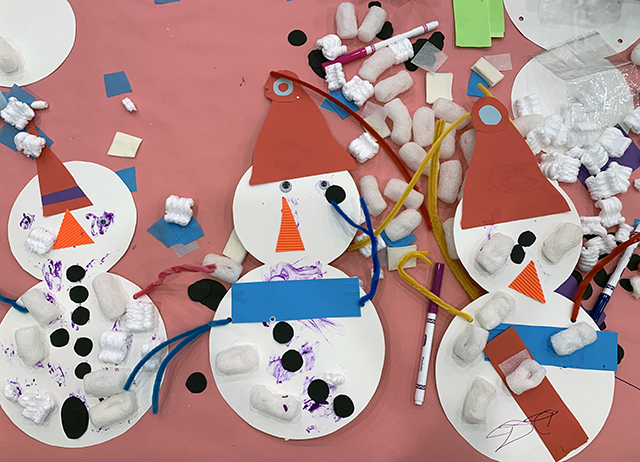
Last week in my class at Rockaplay Social Club, we had a blast building snowpeople! The idea sparked when Emily Arikian’s son Harrison saw packaging peanuts at his home, he said, “Let’s make a snowman!” Recycled materials are always first thought for me (and Harrison!) when creating art. Keep costs down and our eco footprint low. As I was planning and gathering the rest of the materials for the sensory craft project, I wondered, “How long have humans had the urge to build snowmen?”
The answer? A very long time. The origins of building snowmen trace back to the 14th century, and it is believed – though there is no evidence – that cavemen built snowmen. Why is this funny to me?
Fast forward to the Renaissance: Unlike my thrifty process of upcycling snowman craft materials, Michelangelo was commissioned in 1494 to sculpt a large, opulent snowman for the Medici family in Florence – because Aristocrats had so much wealth, it was amusing to watch it melt away.

Flash forward 400 years: Before Frosty the Snowman stole the show in the 1950s, the classic snowman was already a cultural staple, thanks to W.C. Fields in the 1920s. The comedian’s round face, big nose, and classic top hat—seemed to inspire the style of the snowman we recognize today. Around this time, snowmen entered pop culture through holiday cards, advertisements, and decorations, which gave the snowman comedic personality and charm. And through the centuries, snow figures have been sculpted for all sorts of purposes: political statements, protests, satirical, community bonding, fun and recreation, competitions, artistic expression, cultural and religious symbolism, tourism—you name it. Snowmen have shown up for it all.
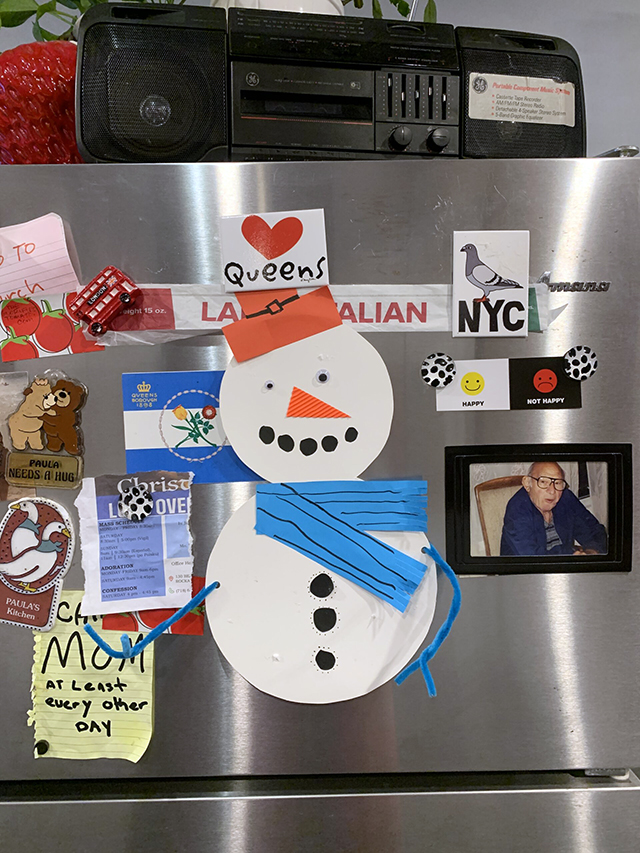
Look Mom!
As for my snowman in class, it was no Michelangelo, but wow, it felt so good to make. It brought me back to my childhood. Working with simple cut-out shapes and limited materials, bright colors and a straightforward idea was a satisfying process. Sometimes, the simplest creations bring the most joy. I have my snowman displayed on the refrigerator, just like my mother would have done if I were five years old. It’s a reminder for me to embrace childlike joy and freedom!
Building a snow person is kinda like an old-school selfie when you think about it. Humans have always desired to create effigies. Give us snow… And snow is like God dropping an art project on the world. I wonder if he’ll give us the opportunity this year?
Follow me on Instagram: @theglorifiedtomato for daily doses of weird fun, and flavor!
Source: Cracked.com, All That’s Interesting, CuraLife
by Paula D.
on December 23, 2024 4:59 pm in Gardening
My thought was that winter would be weird, lonely, and slow. I’m not sure about the weird and lonely part yet, but it’s definitely not slow. I’m slammed with graphic design work, which is awesome (cha-ching) but also very, very stressful. Freelancing is a cycle of feast or famine. I’m at feast.
On top of that, I’m doing numerous other things, like being an art teacher at Rockaplay; being a columnist; trying to be a good daughter, visiting my parents weekly; selling a car, helping friends cat-sitting; remembering to shut off the outside water so the pipes don’t freeze; wrapping my fig tree so it doesn’t die; trying to exercise my body; attempting to decorate for Christmas—but that might not happen until December 23rd; trying to thoughtfully buy Christmas gifts; eating; you know… juggling it all. Like all of us.
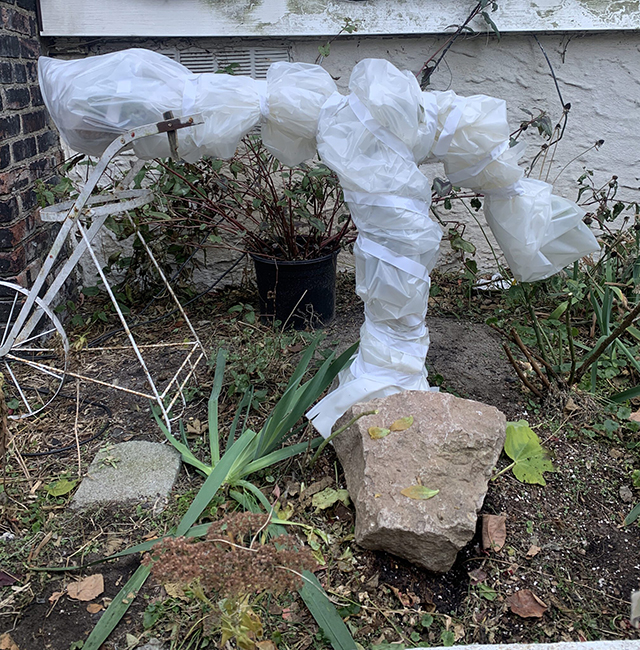
This is pretty much representational of what my mind looks like right now but alas, the fig tree is wrapped!
I struggle with managing all the hats I wear these days and I overthink everything. When the pace of life is normal, it’s manageable, when it’s accelerated like now, it’s not good for me. I wonder often how my friends with toddlers or my friends who work 5 days a week 9 p.m. – 7 p.m. handle it all. And then I wondered maybe one day when I’m old and I need help getting down the steps of my house, I’ll feel like I took this all for granted – I was annoyed all the time, too stressed, too angry, or too sad.
I saw a story on Instagram from Sean, (@seanypizza) last week that stopped me in my tracks. The screen was all white with just the text: “Take your time.” I took a breath and came back to planet Earth. You can only make one pizza pie at a time. I need to remember this. And maybe you also need this reminder as we enter the busy holiday season.
Time is precious. We don’t know what tomorrow will look like, or what 80 years old will look like. This IG message from Sean was a meaningful reminder that we can only do so much and we need to decide what is a priority and how to balance those priorities while keeping ourselves ok. Nothing will get done if you’re not in the right frame of mind to do your work, smile at your children, or care for your mom.
On this note, I will not overwrite my column just to hit 500 words. I will end it short because I feel I’ve made the point and it’s time to move on to the next thing.
For more musings, follow me on Instagram as I go about my busy winter days. – @theglorifiedtomato.


