by Paula D.
on March 25, 2026 7:47 am in Food / Recipes
Turns out it’s super simple and worth making for a creamy, rich, sweet flavor and smooth texture. It’s way, way more delicious than the store-bought spray can or frozen container versions.
There is one thing: some recipes say you can use whipping cream. Also sometimes called “heavy whipping cream.” I’ve always been so confused by the million different types of dairy, especially the ones in the tiny, cute milk cartons. And the others, whole milk, reduced-fat, low-fat, skim, no fat, cream, lactose-free, organic, raw, unpasteurized, not homogenized, oh my.
The internet cleared things up a bit and told me the difference between heavy cream and whipping cream basically is the difference in fat. Heavy cream is richer at about 36% fat, so it whips up sturdier, holds peaks longer, and is better for creamy sauces because it’s less likely to separate. Whipping cream is lighter, 30% fat. It still whips, just softer and less stable. And here’s a fun fact: Cool Whip isn’t even milk; it’s a frozen, vegetable oil-based sweet topping.
And Reddi-wip will forever remind me of the 2023 Beach 91st Street Community Garden Pie Party—the year it absolutely poured, and I had to move the whole fundraiser at the last minute to my house. It was still a great event, and we sold a ton of pies.
One of the “fun” activities I’d planned was pie-in-the-face… which is really just a pie tin filled with Reddi-wip. I was kinda fascinated that people weren’t into it. I guess getting something thrown in your face is actually pretty aggressive and a sticky dairy assault. I ended up with ten cans of Reddi-wip in my fridge, and I (not slowly) ate it straight from the can with the fridge door open. Ah, memories.
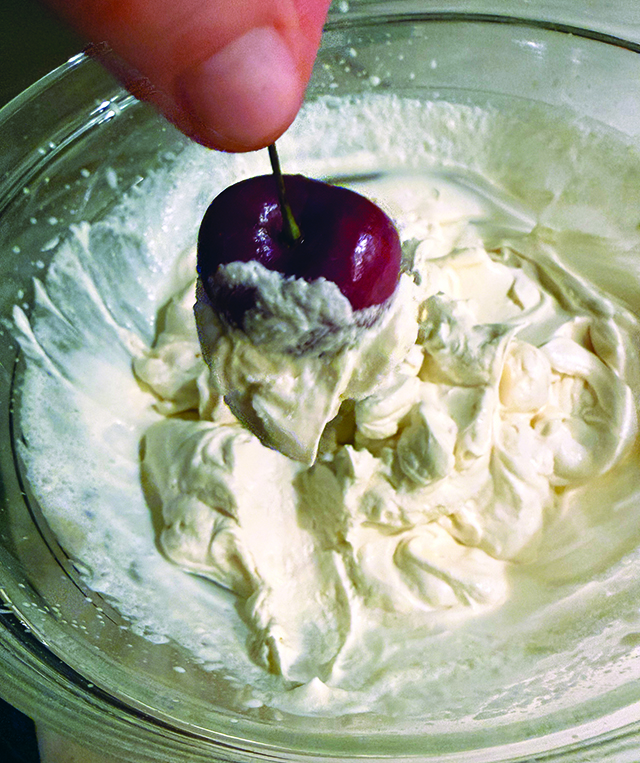
Homemade Whipped Cream
What you need:
Hand-held or stand mixer with whisk attachment
Mixing bowl
1 cup cold heavy cream
2 tablespoons confectioners’ sugar
1/2 teaspoon pure vanilla extract
Directions: In a large bowl, use a handheld mixer with a whisk to whip the heavy cream, sugar, and vanilla on medium-high until you get medium peaks, about 3,4 minutes (Medium peaks stand up at attention). If you go a little too far and it starts looking curdled and heavy, don’t worry, add a small amount of heavy cream and gently fold it in by hand with a spatula until it smooths back out. Use right away, or cover tightly and refrigerate for up to 24 hours.
Homemade whipped cream is perf for desserts, ice cream, fruit, and the best box brownies— it makes everything taste like you tried and will elevate all!
For more on food (and all of it) visit follow me, day-to-day, navigating Rockaway and the world on Instagram: @theglorifiedtomato.
Source: sallysbakingaddiction.com/homemade-whipped-cream
It was a warm Modelo before ten in the morning. I was hiding, drinking it in the basement. The day before, I’d gotten back from a weekend trip to Florida for my friend’s 40th birthday, where I drank day and night straight. I felt so sick. It was the only alcohol in the house and the only thing that eased the pain in my lower back, the nausea, the shaking, the anxiety. And the shame.
That was my last drink.
Before I relapsed 3 months and 17 days later.
That was at least a delicious bottle (or so) of Pinot Noir — really the last drink.
I’ve been sober 4 years now. February 10th is my day.
I try to piece together how I went from the popular, athletic, fun, “everybody loves Paula” girl in high school, to the woman riddled with fear, and guilt on the cold tile floor of my basement, drinking that warm beer. The lowest place in my house, and lowest I’ve ever felt.
It doesn’t happen overnight, I can tell you that, but I felt it inside of my being at a young age, maybe 7 or 8 years old. Not having the words, but it was a feeling of restlessness and a needing to be calmed and soothed.
I drank my first drink at 14 years old, in my own childhood home with my best friend. We were the “clean-up crew” at my sister’s party. You know, clean up and drink the leftovers or whatever the high schoolers would give you. I was born into popularity, before I understood all that. Those days were free and fun. I couldn’t see beyond the present.
I remember bringing orange juice and vodka in my lacrosse water bottle for the 8th grade GO Dance. I brought it in the morning, and we picked it up from my locker that Friday night. Clever, right. I got very good at being an alcoholic at a very young age.
Drinking was normal in my high school — it was praised, in fact. Most of the parents let us hang out in their houses and drink, or there would be huge parties in backyards and the cops would come but do nothing. Par for the course. We’d set up camping trips, binge drink, cook over fire and swim — 15 kids sometimes. We’d drink and smoke weed on the streets. In cars. At Jones Beach, on that guy’s speed boat. We’d drink at the movies. If you’re familiar with Long Island, you know about the sumps. We’d bring kegs in the sumps, over fences and train tracks. We skipped prom and took a bus to a rave. I went to many raves, what a time.
I knew by my senior year of high school that I liked drinking. A lot. I liked that it calmed me. And I’d feel excited, and social. I liked feeling adult, too. I felt like I was beginning to develop a sense of self and community. I knew nothing else.
I remember one instance, drinking beer on a school night with my older sister, on the bed just watching TV — our shared room was in the basement. Ironic? We were drinking just because we could, I guess. It felt good.
The next day, though, I didn’t feel great — and I had lacrosse practice. Something that morning registered, but I couldn’t quite place it. The blackouts started around this time, too. I was 17 years old. I was always the one who wanted one more glass. I never wanted the party to end. I was never satisfied. Starting to sound familiar?
College was almost tame compared to my high school years. I felt like a seasoned drinker and a seasoned New Yorker — compared to my out-of-state classmates, already having been to the Limelight and The Tunnel, and to art shows in Williamsburg. I understood the sacrifice my parents made for my Pratt education and dorm (only 30 minutes away from where I grew up). They gave me everything I asked for and more. So there was a sense of responsibility I gained in college — not to say I stopped partying.
In my 20s, post college, I held it together: working in the city, partying at night, and jumping back on the LIRR in the morning, feeling shitty but not too bad. It was a lifestyle for me and many of my friends so it didn’t seem like a big deal.
The shift came in my early 30s. It got harder to drink and get all of the adulting done. But worse, I started to feel this sense of guilt — like I was doing something wrong. Drinking didn’t feel as fun anymore. It became something to manage.
Thinking back, I can’t believe I planned my drinking around my job. “Well, if I get it all done on Friday, I can drink Sunday and not have to worry about anything on Monday.” And by “worry,” I mean I had a day to recover from a weekend of binge drinking — and God knows what else. My addiction became a priority.
I tried a few things at this point. I limited my drinking to weekends only, but that just meant I went harder those two/three days. The one time I actually tried to stop, I managed two weeks. I didn’t really want to stop yet, and I didn’t know how. I did know my drinking was a problem and it wasn’t going to get better.
I just wanted to be normal and drink like everyone else. I didn’t want to be the one who had to be carried home. It was sloppy and embarrassing. Some family and friends tried to bring it up with me at this point. Blackouts were so bad, they caused me terrible anxiety, “OMG, What did I do?” But even still, I could not stop drinking. I was addicted physically and mentally. I couldn’t imagine a life without alcohol in it. “How do you go to a wedding and not drink?”
My addiction resulted in a monumental shift in my life. At 41, everything secure — everything I felt I’d built — my identity, my world, disappeared in one single moment. I felt myself slip away, like a ghost exiting my body. The world calls it divorce.
At first, sobriety was a last-ditch effort to save my marriage. I thought, “If I get sober, everything will go back to normal.” But it was more complex than that.
In 2021, I was sober, living alone, not eating, panic attacks on the bathroom floor, smoking cigarettes, not working, not breathing — the time never seemed to pass. I know what it feels like to be alive and dead at the same time.
I had my sisters, my mother and father, those few friends who are my family and a walk-in recovery clinic in Far Rockaway. That’s how I got through the first few minutes, hours, days, months and finally years of not picking up.
When I started to emerge, I was petrified to see people and have to interact. One of the first places I had to go was to get food. I still get weird flashbacks when I’m at Key Food. It’s wild. Funny thing, my anxiety was worse at this time than when I was a hungover drunk.
Soon enough, I’m hit with the first baby shower — without a drink. Hell. “How do you do Christmas Eve without red wine? What will my cousins say.”
Then it was pretending to have a drink in my hand at music shows in Brooklyn, still trying to hold on to a part of the old me. I was embarrassed and scared to tell those friends I was sober, so I didn’t. I thought I would lose them too. I had lost so much already.
The cravings and the crying. Zero self-esteem. Fitting in nowhere because alcohol is everywhere. The “ethical” princesses that swore they loved me and then judged my behaviors and disappeared. The worry of money, losing the house, lawyers, divorcing my world — I was in and out of states of panic attacks that first and second year and I didn’t pick up one, single, drink.
Rockaway didn’t recognize me, 30 pounds lighter (no booze and no appetite). Friends and neighbors commented on how great I looked, but all I saw, naked in the mirror, was a brittle skeleton of my past life. “Thanks, I started surfing. It’s great exercise!”
And somewhere within that mess, I decided I never wanted to drink again — to save me, and nothing else. Things slowly, and nonlinearly, started to pivot. I was healing, working again, and feeling joy. I was re-learning how to be a person in this world without my friend Pinot Noir.
Sobriety, for me, is a rediscovery of who I am — and I am so many things. Sometimes I feel like I have superpowers and a sixth-sense intuition. I feel emotions at hyperforce, for better or worse. I still have cravings sometimes. I feel everything and at times it is very hard.
I feel the relief of not having to depend on a substance, and that’s an indescribable joy. I feel free. I like this version of me. And I thank God, because these past 4 years — with its heartbreak and triumphs — have been a tremendous gift.
I’ve done countless crazy and risky things as a drinker and that will always be a part of who I am. But you know what has been the most outrageous, punk-rock thing I’ve ever done?
Getting sober.
If you feel your relationship with alcohol has become a struggle, it might be time to do the craziest thing you can ever imagine. It’s beautiful on the other side. Reach out if you want to talk: @theglorifiedtomato.
by Paula D.
on February 3, 2026 6:43 pm in Food
When I’m cooking spinach, I think of my father. Strange? Well, I was a skinny kid and pale, with dark, long hair. My father called me Olive Oyl back then! You know, Popeye’s leading lady. I guess the tall feature didn’t matter to Dad. My father was right about the resemblance. I remember looking in the bathroom mirror. I had to sit cross-legged on the fake-wood countertop to see myself. I’d hop on the toilet to get up there, and I’d stare, thinking the skin under my eyes was translucent.

Dora Paskel (1872–1953) of Chester, Illinois, E.C. Segar’s hometown. The muse for Olive Oyl. And Popeye was inspired by Frank “Rocky” Fiegel. A tough, pipe-smoking sailor from the same town, who worked as a bar bouncer and got in fights all the time. What a pair!
I loved my special nickname, and it stuck for years. I learned later that Olive Oyl is a bit chaotic, a bit anxious, and headstrong, just like me! And it’s cool too, because I love olives and olive oil.
Where did her name come from? Olive Oyl is a silly little pun, and her older brothers’ names are Castor Oyl and Crude Oyl! Not as culinary appealing. “Oyl lifts” is an Olympic weightlifting exercise. She is slight, yet strong in body and will!
What I didn’t know when I first met her as a cartoon in the show, Popeye The Sailor Man, is that she started as a comic strip called Thimble Theatre, created by cartoonist E.C. Segar, in 1919, and Olive was the original main character—Popeye, Olive’s lover, didn’t show up until ten years later.
The interesting love story goes like this: Olive was engaged to a loser guy named Harold Hamgravy. He was a slacker who chased rich women and had many “get rich quick” schemes. In a later comic strip, Castor Oyl and Ham Gravy hired a sailor named Popeye to man his ship for a treasure hunt. As Popeye’s popularity went viral in 1930, Ham got ghosted by Olive Oyl, and Popeye became THE man.
The Spinach: During the Great Depression, E.C. Segar gave Popeye his famous superpower food: a can of spinach – so he can fight the bad guys! There are many theories around “why spinach.” The most believable one is: Segar was sending kids and families subliminal messages to eat more of an affordable, vitamin-packed vegetable, at a time when American diets were missing so many nutrients.
It worked! Popeye is credited with helping boost U.S. spinach consumption in the 1930s by 33%!
A lot of us grew up hearing “spinach is loaded with iron” and will help us build muscles just like Popeye the Sailor Man. My father told me exactly this. The thing is, spinach does have iron, but not in huge, superhuman amounts. The USDA says that 1 cup of spinach is about 3.7 mg of iron. Still, spinach is a nutritional gem, rich in vitamins (especially vitamin K), folate, antioxidants, and more.
I read there was a rumor that spinach’s iron count was a clerical error (a misplaced decimal point) and that’s why the cartoonist used the vegetable, but that isn’t proven. As an artist-type myself, I think Segar just needed a pop of bright green to round out his color story.
Go eat some spinach to stay strong and healthy throughout this winter!
Source: en.wikipedia.org/wiki/Popeye, smithsonianmag.com/arts-culture/popeye
by Paula D.
on February 3, 2026 5:43 pm in Recipes
For about a year, I’ve been very into Diet Dr Pepper. I never drank it as a kid (or ever before this). My friend insisted it was delicious, and he was right. During the summer, I’d have an afternoon, icy-cold can of Diet Dr Pepper on the porch. It has to be diet. It’s way better than regular, and it’s not about the calories. The difference between the two is less of that “thick” syrup. It tastes lighter and more refreshing, and still has the deliciously different Dr Pepper Flavor.
Of cours,e the internet algorithm figured out that this is what I’m into now and started sending me a bunch of stuff: Diet Dr Pepper candles, Dr Pepper BBQ sauce, Dr Pepper beans (need all).
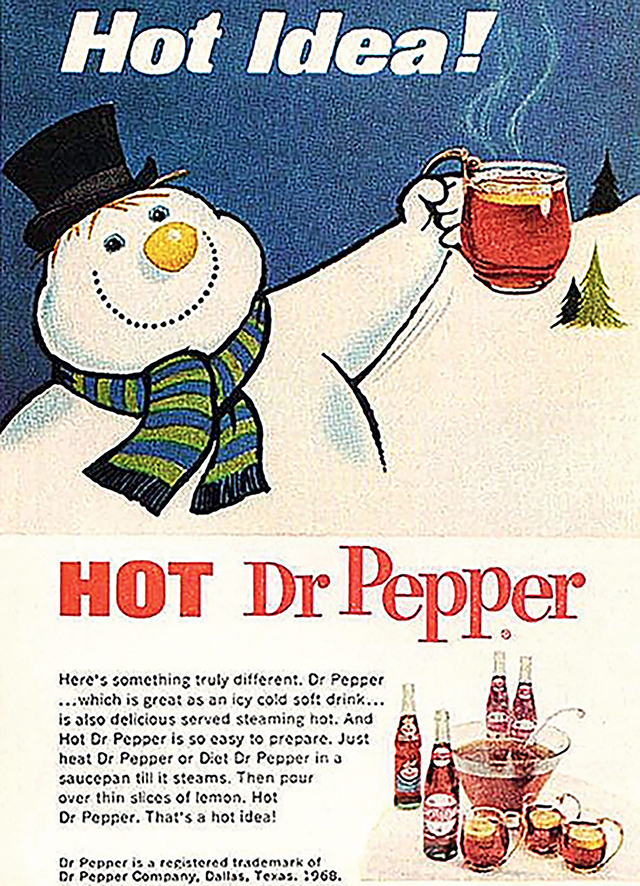
Then it served me a very interesting vintage ad and blurb on Instagram from the account @HistoryFeels: The story of the “winter warmer” goes like this…
“In the early 1960s, Dr Pepper had a problem—soda sales dropped sharply during the winter months. Cold drinks didn’t feel as appealing when temperatures fell, so instead of changing the product, they changed the way people were told to drink it.
The result was Hot Dr Pepper. Ads instructed people to heat the soda in a saucepan until steaming, then pour it over a slice of lemon. The campaign positioned it as a winter warmer—closer to mulled cider than a traditional soft drink. Print ads, billboards, and in-store displays pushed the idea across the U.S.
It worked. Hot Dr Pepper became a recognizable seasonal novelty and stayed in circulation for decades, lingering into the 1980s. It never replaced the cold version, but it kept the brand visible year-round and helped stabilize winter sales back when soda companies were still experimenting with consumer habits.
It even embedded itself in pop culture: in the 1999 film Blast from the Past, Christopher Walken’s character still drinks Dr Pepper hot after living underground since the Cold War—a direct nod to the once-common practice.”
Added facts: Dr Pepper was created in 1885, making it one year older than Coca-Cola. Along with the amazing, printed advertisements, there were TV commercials too, with Dick Clark! And
There’s a Dr Pepper historical museum in Waco, Texas – I want to go.
I had to try the drink, and you know what? It’s a wonderful, warm, slightly bubbly caffeinated treat. The lemon adds a nice acidic counter flavor to the sweet soda. It’s a fun drink to try, especially when friends are over. It will spark a cool, vintage conversation, and it’s perf for a cozy get-together. The recipe is simple, just be careful not to over heat, you will lose the fizz!
Dr Pepper Winter Warmer
Ingredients:
- 12oz can of Diet Dr Pepper (regular also works)
- Thin slice of fresh lemon
Instructions:
- Pour Dr Pepper into a saucepan. Heat over medium until it’s steaming hot (160 degrees). Do not let it simmer or boil. That can scorch the flavor and flatten the carbonation.
- Put a lemon slice in a mug.
- Pour the hot Dr Pepper over the lemon and sip.
- For a large batch, use a 2-liter bottle and heat in a crockpot
Optional: Experiment with cinnamon sticks, nutmeg, vanilla or other spices, but try it straight up first!


