by Paula D.
on March 2, 2022 9:43 am in Recipes
Last week my friend Olga generously gave me a bag filled with superfoods – several types of raw nuts, seeds, chia, hemp, grains, wheat flour and lentils. I was very grateful to be the recipient of this bounty and promised to make beautiful meals with my gifts.
My father taught me how to make lentil soup as a kid and the recipe is a family staple. Sometimes I modify that recipe, spicing it with curry, turmeric and ginger for an Indian flare. I thought I’d use the legumes first, as I was most familiar cooking with them. But then I realized, the only way I’ve ever cooked lentils is in soup form.
What other ways can lentils be used? I did a little reading and found a few interesting alternative uses.
As stuffing. This hearty fiber is perfect for fillings and it’s a great meat substitute. Use as the base for stuffed peppers or in a pita with mixed veggies. If you’re ambitious, try your hand at lentil stuffed samosas (yum).
Bake them. Make a variety of casserole dishes with lentils and beans along with your favorite vegetables and herbs. And yes, you can add cheese. There are many combinations to experiment with.
In salad. Toss cooked lentils with greens, carrots, tomatoes, and cucumbers. Add oil, vinegar and seasonings. Try lentils with beets, oranges and feta for a tangy fresh taste. There are countless combinations of lentil salad blends.
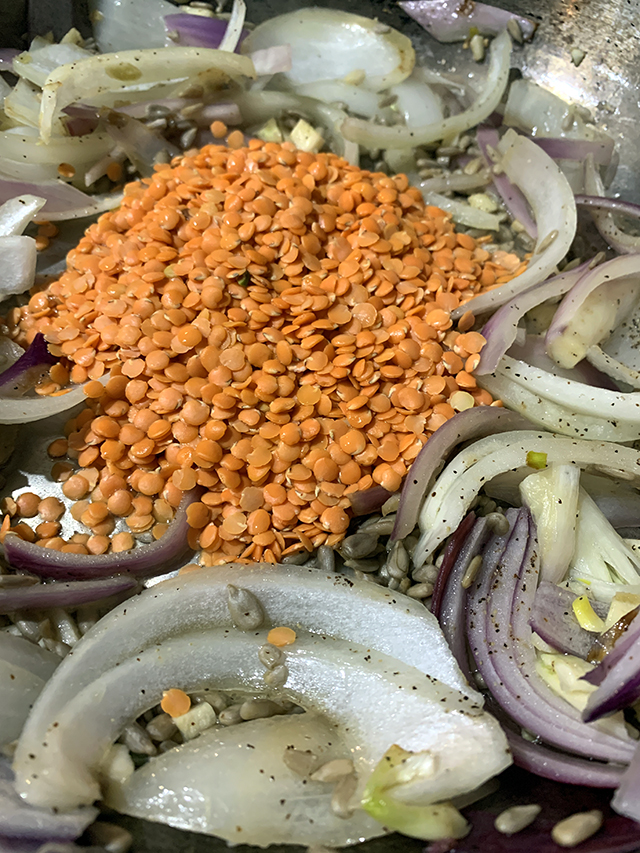
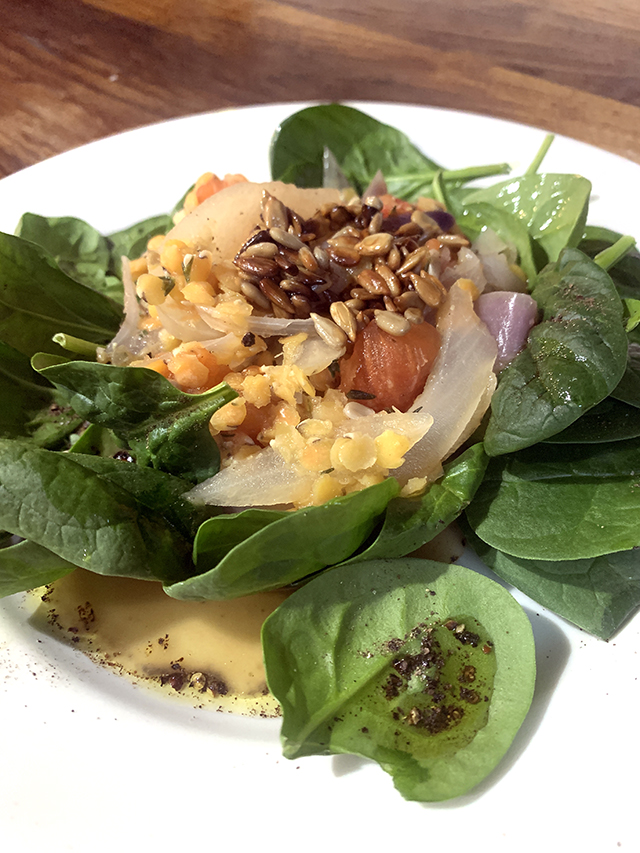
I decided to go with a take on the lentil salad option. I used what I had in the house – tomatoes, onion, garlic and the sunflower seeds my friend gave me. The tomatoes added a tartness that complimented the rich, warm flavor of the red lentils. I plated my creation on fresh raw spinach. The combination of the smooth lentils, crispy greens and crunchy sunflower seeds made for a sophisticated texture.The main player here is the toasted sunflower seeds, don’t omit them! Here’s the recipe. Give this superfood meal a try!
Red Lentils Spinach Salad
(Serves 2)
Ingredients:
1 cup red lentils
2 cups water
1 bag baby spinach
1 medium onion
1 large tomato
5 cloves garlic
½ cup sunflower seeds
½ cup olive oil
Salt and fresh ground pepper to taste
Directions:
- Loosely chop the garlic and onion. In a large skillet sauté the onion and garlic in olive oil until translucent (medium/low heat). Add in ¼ cup of sunflower seeds, mix and toast until lightly brown.
- Add 1 cup of lentils and 2 cups of water into the skillet. Chop the tomato and add to the mixture. Season with salt and plenty of fresh ground pepper, mix and cover. Cook for 15-20 minute until the lentils are soft. Don’t over cook! Mushy lentils are no good.
- In a small frying pan, toast the rest of the sunflower seeds in oil and set aside. These will be used to top the salad.
- Lay the spinach on a flat dish, sprinkle with salt, pepper and drizzle with olive oil. Scoop out the lentil veggie mixture and place in the center of the dish on the bed of spinach. Top the lentils with the toasted sunflower seeds. Served warm or at room temperature. Either way this meal is delish!
Follow me for the day-to-day on Instagram – @theglorifiedtomato.
by Paula D.
on February 24, 2022 9:52 am in Recipes
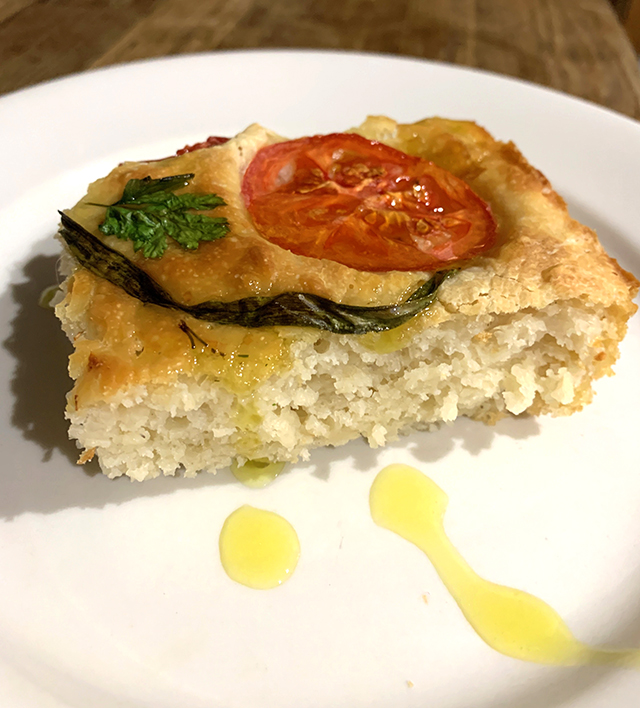
Chances are you’ve seen focaccia flower bread recipes popping up everywhere in your social feeds. My natural inclination as a “traditional cook” is to snub food trends. But I have to admit, this recipe looks pretty, pretty. Also… I love flowers… and I love bread. So I put my food snobbery aside and jumped on the bread wagon. Also, I’ve been meaning to venture into breadmaking and baking to challenge myself this winter. Here was the opportunity.
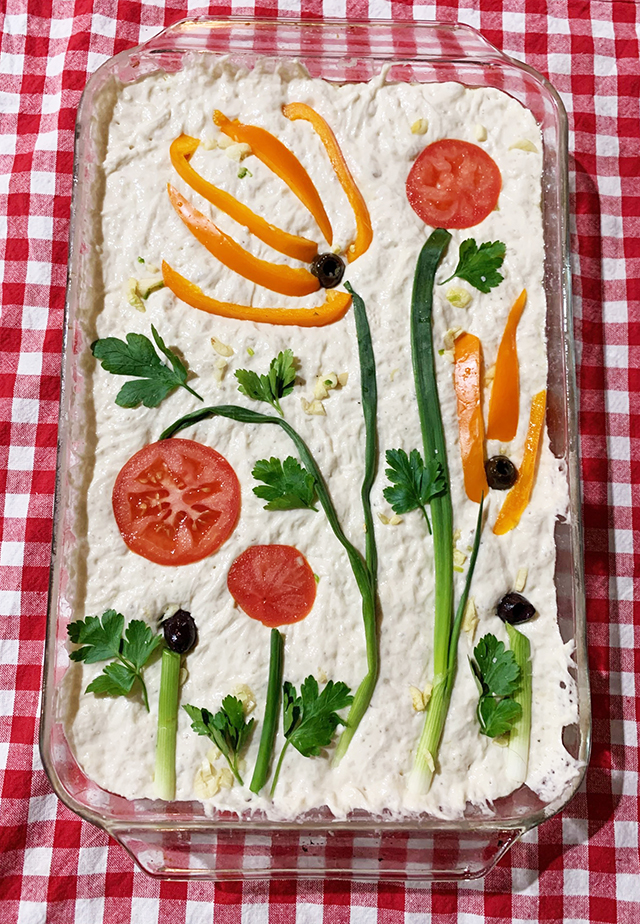
The incentive for me was adorning the bread with beautiful flower depictions made from vegetables. I spent a great deal of time on the blogs looking at floral inspiration. What I should’ve been reading about is “the hard part,” you know, how to actually make focaccia bread.
It’s been the precision of measuring, math and timing involved with baking that has always made me anxious. Therefore, I wanted to go simple. I found this recipe below from melskitchencafe.com. Following these directions proved to be straightforward enough.
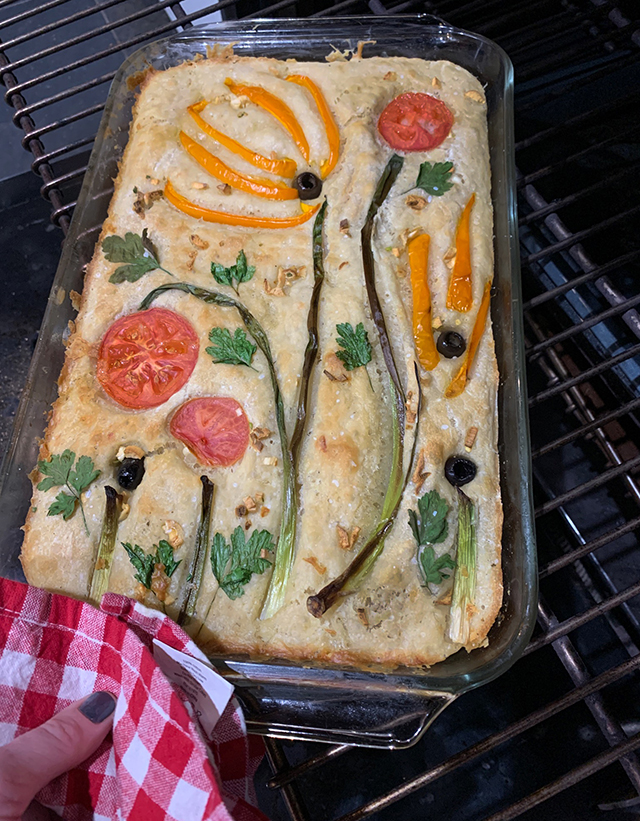
Most of my worry was for naught. The bread was absolutely delicious. But it wasn’t exactly authentic focaccia. The consistency was off and it was too thick. I’m thinking this was the case because it was a “no knead” dough recipe. Next time, I’ll try a more standard approach to preparing the bread.
They say always go with your gut, right? While designing the flowers was super fun and makes for great Instagram glory, it wasn’t ideal for overall flavor factor. I wanted more olives, tomatoes and chives in every bite. I feel traditional focaccia with evenly spaced garnish wins.
But give it a go regardless, it’s a creative spin worth trying. Get the kiddo’s involved too. Bring the focaccia to a dinner party or serve it to friends. It has that “wow factor” every host is looking to present on their table.
Focaccia Flower Bread
Focaccia Ingredients:
5 cups water
1 tbsp active dry yeast
3/4 cup extra-virgin olive oil
5 1/2 cups all-purpose flour
2 tablespoons kosher salt
2 cloves minced fresh garlic
Flower Art Ingredients:
1 Yellow pepper
Chives
1 Small Tomato sliced
Pitted olives
Fresh parsley
Note: experiment and use whatever veggies you like! Onions, cherry tomatoes, asparagus, rosemary and basil are other good options to try.
Directions:
– Dissolve 1 heaping tbsp of active dry yeast in 1 ½ cups of warm water. Stir and let it sit for a few minutes.
– Add 5 cups of flour, diced garlic, olive oil and 2 tsp of salt into a large mixing bowl. Add the yeast in water and the remainder (4 cups). Mix well until you have a wet, clumpy dough with no dry flour showing.
– Cover the bottom and sides of a 9×13 inch baking dish with 2-3 tbsp of olive oil. Transfer the dough into the baking dish, spread it out and cover with plastic wrap. Let it sit on the counter for 6-8 hours.
– After 6-8 hours, your dough will have doubled in size. Turn the oven on to 400°F. Use your fingertips to make small divots on the top of the dough.
– Top with kosher salt and design your flower bread with the veggies of choice. Drizzle with 2 more tbsp of olive oil.
– Bake for 40 minutes at 400° F or until golden brown. Remove from the oven and sprinkle with more coarse salt and a bit more oil. Let the focaccia cool for 10min., cut into squares and serve warm.
by Paula D.
on February 16, 2022 8:49 am in DIY
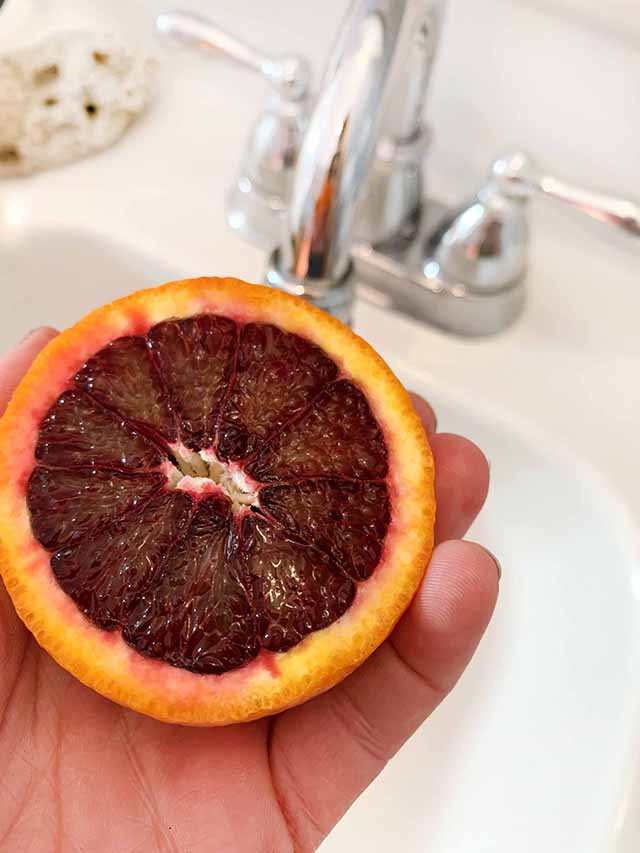
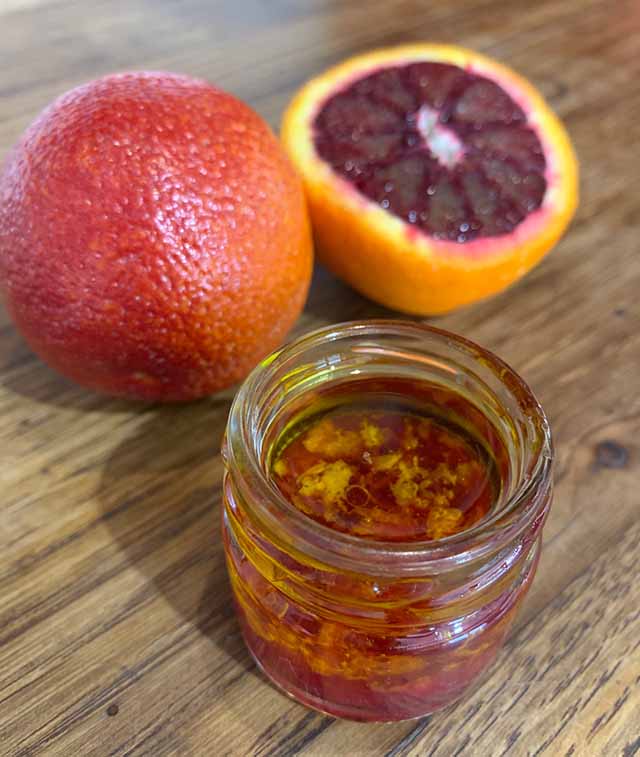
When most of us hear the word oranges, we think of Florida but I think about the hills of Sicily. Blood orange trees grow robustly around Mount Etna between Messina and Catania. This region is known as a microclimate. The soil is fertile and the weather is dry. But what makes this environment so unique is the volcanoes’ impact on temperature. It increases the air temperature during the day and in the evening, it drops just below freezing for one hour only. This sudden daily change is necessary to create the brilliant, crimson color of the sweet blood oranges of Sicily.
The pigment or anthocyanin chemical compound offers powerful health benefits. And this is why, high-quality blood orange fruit trees from this area are prized. So much so that it’s an EU protected geographical region. This distinction (PGI marked), is granted because the quality and reputation of the fruit can not be replicated anywhere else in the world. The taste and nutritional value can only be produced in this specific geographic location of Italy.
Since the 1600s, Sicilian women have used these exotic blood oranges, along with olive oil as the secret to their beauty. The fruit contains citric acid which is an exfoliant loaded with rich antioxidants that plumps up the skin. Olive oil contains vitamin E which has anti-aging properties that soften and moisturize. The result of using this mixture is a healthy, radiant mediterranean glow.
To make the salve, combine in a small jar, three teaspoons of extra virgin olive oil, the juice of one, small blood orange and one teaspoon of shaved rind. Cap the jar and shake well before every use. Massage the oil on your face, neck and chest. Let it absorb for 1-3 minutes – depending on your skin type. Then rinse with cool water and pat dry.
I’ve been using this treatment all winter and it’s prevented dry skin patches, which I normally get under my eyes from the cold winter weather. And my complexion seems vibrant! Besides these benefits, the experience of applying the ointment is relaxing. And the sweet and citrus aromas are soothing. This coveted Italian beauty ritual can make anyone feel like a Sicilian principessa.
Follow me for the day-to-day on Instagram @theglorifiedtomato
Source www.tlnint.com, www.theguardian.com
by Paula D.
on February 16, 2022 8:43 am in Community
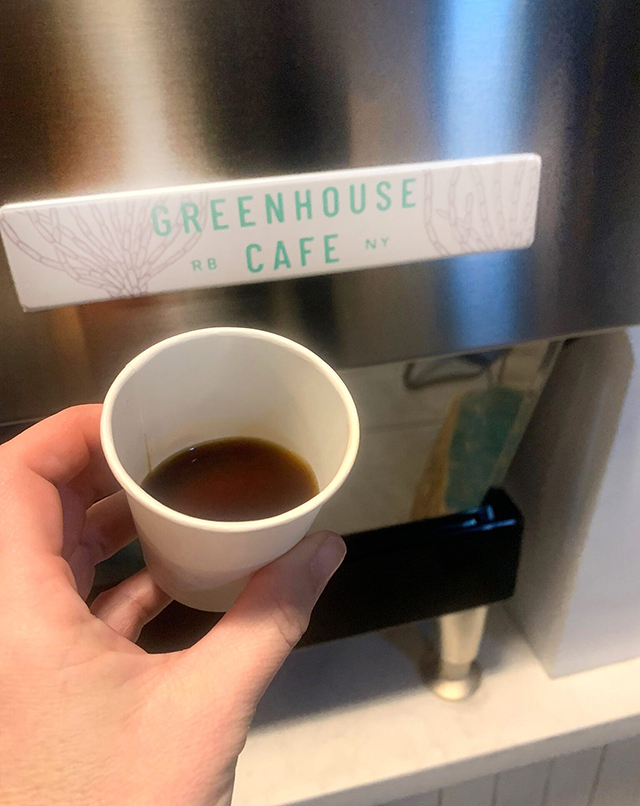
I’m a coffee drinker. I love everything about it – the smell, the taste, the cup in my hands and the jolt I need in the morning (twice)… and in the afternoon. So, when I learned that Greenhouse Cafe was hosting coffee classes, I signed up, stat.
I say I’m a coffee lover, but admittedly I know very little about my beloved beverage. The first class Greenhouse Cafe hosted was Introduction to Specialty Coffee. Fitting for an aspiring coffee aficionado like myself.
The class began with Lead Barista Michael Mainwaring introducing himself and asking each of us to explain our morning coffee ritual. I was a bit embarrassed when my turn came. I shared that I use a no-frills drip machine with pre-ground coffee from the supermarket (insert horror emoji face here). We all had a laugh though, and hey… I was at the class, making an earnest effort to up my coffee game.
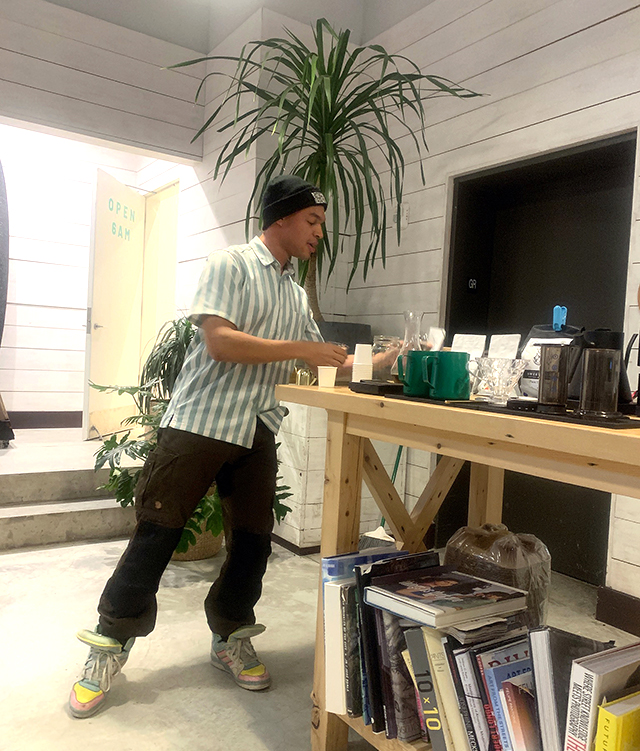
Lead Barista Michael Mainwaring.
Michael has extensive knowledge of all things coffee. We learned the many factors that determine the taste of coffee – the flavor profile, how it’s brewed, grind size, measurements, and shelf life… to name a few. The roasting date is normally found on the bottom of the coffee package. The best time to buy is 2-5 weeks after the roast date. Grinding daily is ideal for maximum freshness. There are many methods to brew which we touched on but Michael informed us of other workshops Greenhouse is offering in the upcoming months that will go into specifics of these brewing practices.
The next segment of the class was an interactive sensory experience. Barista Michael brewed two contrasting specialty coffees, one sourced by Coffee Project New York. It is from Menglian Yunnan, a region in China, and the other by Sweetleaf Coffee Roasters, a Peruvian blend from Cusco. The room was filled with delicious aromas. We smelled, tasted, and noted the mouth/feel texture of each. The intimate class setting was just right for an animated discussion on the differences between the flavor profiles. It’s incredible how distinctly different specialty beans are and the multitude of intricate flavors available. I began to understand that production and brewing is truly art form. I enjoyed this portion of the class immensely!
I asked Michael how the idea to host coffee classes came about. The cafe and classes are run by Yarden Flatow of Cuisine by Claudette. Yarden and Michael’s vision for the class were to share their passion for coffee with others while educating our community about the ethical and sustainability issues surrounding the coffee industry. As you’d gather, there’s a lot of information on this topic, but one point I’d like to share is that when you purchase specialty coffees from sustainable companies and cafes like Greenhouse, you’re directly supporting the farmers and farms where the beans are produced. And this, on a large scale, helps ensure this vital agricultural industry continues.
To learn more about all things coffee, sign up for Greenhouse Cafes coffee classes here. The workshops are on Tuesday and Saturday evenings at 6 p.m. The following classes run through May: Introduction to Brewed Coffee at Home, Introduction to Pour Over, Introduction to Aeropress, Espresso Extraction Theory, Milk Steaming + Basic Latte Art, Intermediate and advanced Latte Art and Introduction to Coffee Cupping.
Greenhouse Cafe is located at the Rockaway Hotel – 108-10 Rockaway Beach Drive, Rockaway Beach. The cafe is open at 6 a.m. for your early fix. Follow Greenhouse Cafe on Instagram to learn about these upcoming classes and more – @greenhousecaferbny.


