by Paula D.
on October 1, 2018 12:09 pm in Food

Hobnob v 1. to mingle, usually with the upper class of society.
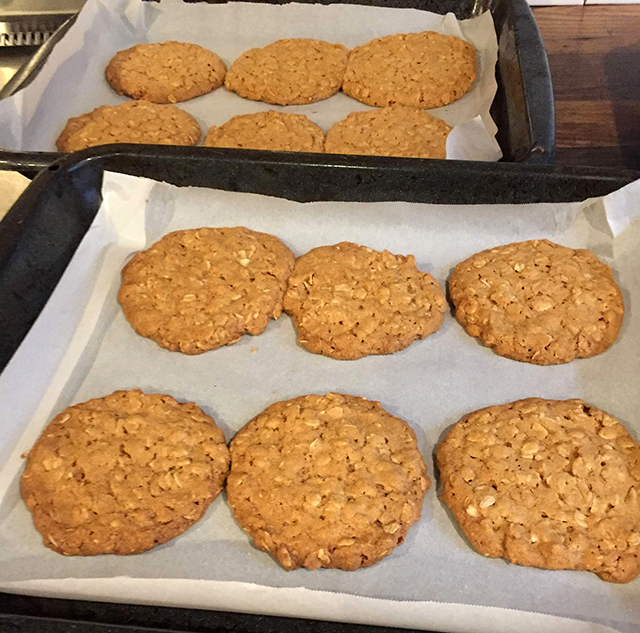
But more importantly, a Hobnob is the name of a cookie. Wait… I mean a biscuit. From the UK. They’re made from rolled oats, jumbo oats and often are sided with chocolate. They’re among the most popular of British biscuits.
But why do Brits refer to cookies as “biscuits”? What’s the difference? Here in the states we put poached eggs and bacon on biscuits, we don’t dunk them in our tea as our neighbors across the pond do. US biscuits are a variety of small baked goods with a firm browned crust and a soft interior. A biscuit in the UK is classified as a small hard baked product which can be savoury or sweet. The term “cookie” typically refers to only one type of biscuit – a chocolate chip cookie.
I’m still confused.
I bring this up because my husband has become obsessed with Hobnobs ever since his co-worker and our good friend Or Zubalsky brought the biscuits to their office. Or’s first encounter with hobnobs was when he was visiting his friend in London. He and his wife brought a bundle back from the UK. After running out of the addictive “cookie”, Or tracked them down at the Park Slope Food Coop.
But Matt needed his own stash so he ordered boxes in bulk from England. Shipping wasn’t cheap and it took a while to arrive. Only a month after the deliver he ran out (sigh). It happened to be our 9 year anniversary that week and — being the amazing wife that I am — I thought it would be “brilliant” to make homemade hobnobs for my husband as a gift! I followed the recipe so carefully. I wanted them to be authentic. Matt said they tasted more like a cookie than an English biscuit but he loved them nonetheless. The hobnob is meant to be dunked so enjoy them with your morning coffee or evening tea!
Ingredients:
1½ cups all-purpose flour
1½ cups old-fashioned oats
1½ teaspoons baking soda
1½ teaspoons kosher salt
2 sticks unsalted butter, room temperature
1 cup sugar
2 tablespoons whole milk
2 teaspoons honey
150g of milk chocolate
Directions: Preheat oven to 300°. Whisk flour, oats, baking soda and salt in a medium bowl to combine. Using an electric mixer on medium-high speed, beat butter and sugar until light and fluffy, about 3 min. Beat in milk and honey. Turn off mixer and add dry ingredients; mixing with a rubber spatula. Spoon tablespoonfuls of dough onto parchment-lined baking sheets, pressing down lightly to flatten and space 1½” apart. Bake the biscuits until golden brown, 25–30 min.
When cooled, melt the 150g of milk chocolate in either the microwave or in a bowl set over a saucepan of barely simmering water. Be very careful the chocolate doesn’t seize (the transformation of chocolate from a fluid state to a stiff, grainy one). This of course is what happened to me. Make sure the bowl and utensils are water free, keep stirring the chocolate and keep the temperature very low. Once the chocolate is melted, paint the tops of your hobnobs our dip and leave on a drying rack.
Recipe from bonappetit.com/recipe/homemade-hobnob-cookies
by Paula D.
on September 24, 2018 11:00 am in Community
Did Cynthia Nixon lose the primary because of #BAGELGATE?
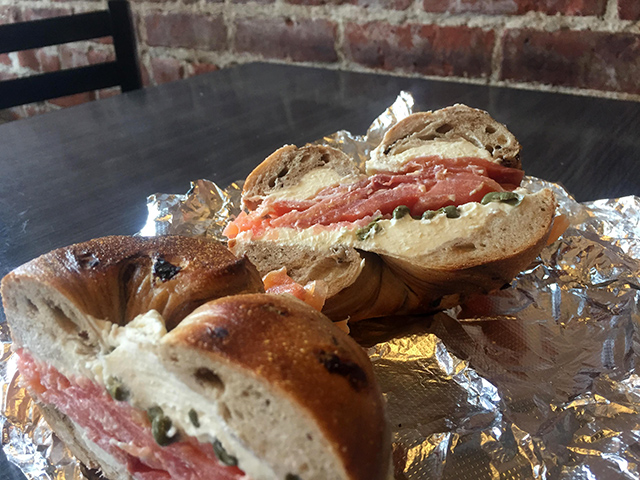
Bagels are SO New York and that’s why the controversial bagel order of celebrity-turned-gubernatorial-candidate Cynthia Nixon caused a frenzy on social media last Sunday, days before the primary election. At Zabar’s on the Upper West Side Nixon ordered, cream cheese, lox, tomato, red onions and capers on… a cinnamon raisin bagel?? New Yorkers and food critics were outraged and distraught over the native New Yorkers bizzare bagel. New York Magazine reporter Chris Crowley called the bagel “troubling”. Stephen Colbert commented “Now, I’m gonna go out on a limb here and say this is the worst Nixon scandal in the history of politics.”
Nixon’s own opinion on the matter. “I’m stunned. This is my bagel of choice for a few decades now. It’s never been public knowledge, and I really am fascinated that people are so emotional about it.”
As we all know our choices at the polls are influenced by our social identity, party affiliation, and policy issues. Can our votes be influenced by obsessions with TV shows (ahem, Sex In The City) or due to another candidate’s Italian heritage and the fact that he’s the Godfather to your favorite Piano Man’s child?
Or by bagel preferences? I didn’t want to chance any influence, so last thursday I intentionally voted before I headed over to Surfside Bagel (95-11 Rockaway Beach Blvd.) to taste test the Nixon bagel.
People put pineapple on pizza for god’s sake, How bad can it be? I had to know.
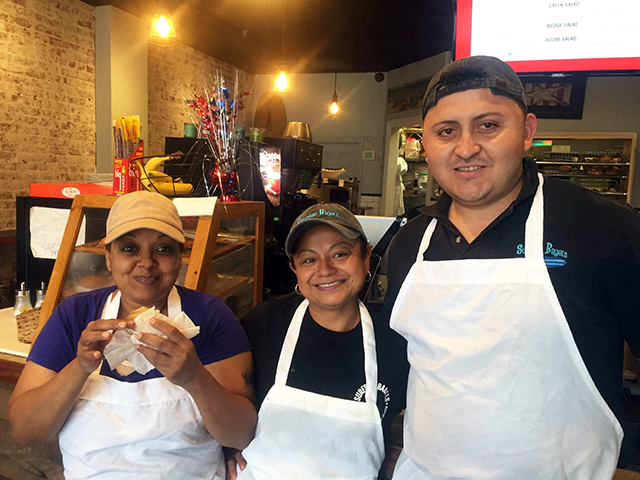
I went up to the counter and asked for the Cynthia Nixon bagel. There was a look of confusion on the employees face. I explained and she recalled her daughter mentioning the bagel, but I was the first person to order the controversial combo from Surfside.
I asked all three employees to take a bite, only Shfrana Alli was game. The others politely said they already had breakfast and were full (but were they really repulsed by the thought of eating it?). I also asked two customers to have a taste. The results:
“I would have been willing to try the bagel if it wasn’t for the capers, I’m not a fan of them.” said customer Melissa Mcloughlin.
Yasmin Bootwala visiting Rockaway from Phoenix said she would give it a try. “I usually like savory bagels but the sweet/salty combination here is nice. I like it.”
Surfside employee Shfrana Alli’s reaction to the unorthodox bagel, “It’s sooooo good. It’s a perfect combination and I’ve tasted lot of bagels working here!”
My first reaction was bipartisan. It wasn’t delicious but it wasn’t that bad. I ended up eating half of it. If the capers were omitted the bagel would’ve tasted better. There are too many competing flavors and anyway you try to spin it, the raisin / caper combination tastes outright strange. On the way home I had a weird aftertaste in my mouth which made me think that, realistically, I’ll never order the Nixon bagel again.
I still would vote for her in the future though.
by Paula D.
on September 21, 2018 5:20 pm in Gardening
Nature is bizarre and fascinating. Discovering new things in my small garden world is exciting and makes me think of all that’s still undiscovered in nature.
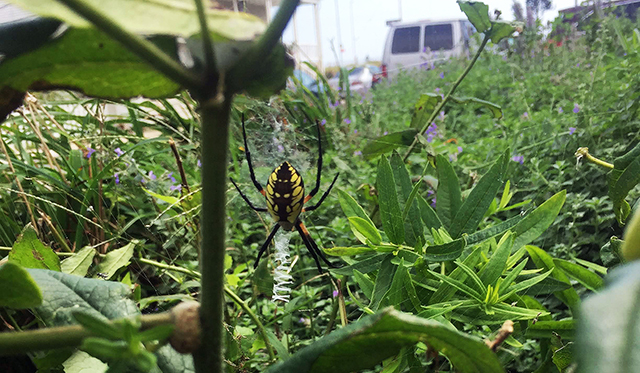
I came across two unfamiliar garden creatures this week. The first was suspended between the milkweed and a daylily stalk from my daylily plant in the front yard. It was a huge spider – about 2 inches long!
In the past four years that I’ve been manicuring the garden, I never came across a spider like this. I plugged her description in google: large yellow and black body, orange/blackish legs, white head. My visitor was a yellow garden spider (argiope aurantia). These beautiful but fierce-looking arachnids can be found throughout the United States, Canada, Mexico, and Central America. They spin their webs in sunny areas between plants and are said to be common. My garden sounds like the ideal summer resort, I wonder why this was my first encounter?
The yellow garden spider feasts on flies, bees and other insects. They will bite people if threatened but their venum only paralyzes smaller prey. I noticed the spider because of its distinct zigzagging web, which is called a stabilimentum. It’s unknown why the garden spider creates such a unique pattern. Some scientists theorize its to alert birds, so they don’t fly into the web and destroy it.
Male garden spiders are three times smaller than the female. They pluck the female’s web to entice her. The males are no longer needed after mating so they die. The females can live a long life up to 3
years in warmer climates.
Like the spider, I’m often weaving through the tall grass and giant hyssops to manage the weeds. I’m going to think twice next time, knowing that the enormous yellow garden spider can be nestled somewhere within.
The second more bizarre garden “creature” I found this week was an elegant stinkhorn. There is nothing elegant or graceful about this fungus. It looks like a… let’s just say nature really has a sense of humor! It’s orange in color with a slimy brown tip that’s covered in smelly spores. The odor attracts flies and other insects. Their presence distributes the spores as they fly away.
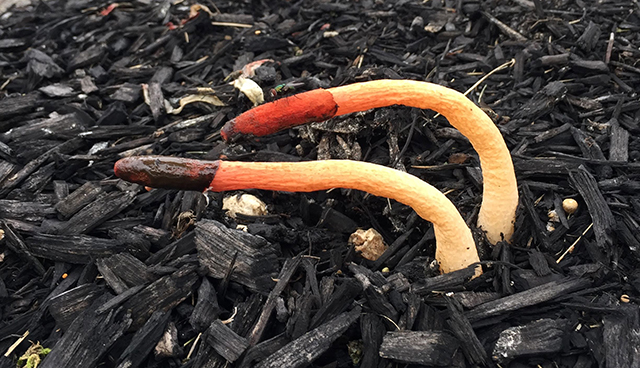
There are 22 different types of stinkhorns and they grow in damp areas, on forest floors and under leaves. In urban settings they will pop out from under mulched planting beds in late August and early fall. This is the first year I’ve mulched the yard so it makes sense that now they have appeared.
Want to eat an elegant stinkhorn? Give it a try. It won’t poison you (or make you take a ride on the yellow submarine) but it will taste terrible. But file that info away for the next time you’re starving in the woods.
Want a good laugh? click here.
by Paula D.
on September 9, 2018 11:17 am in Food
Two summers ago, we lent our beat up Hyundai Elantra to a friend and he was hit by a drunk driver. Our mechanic Nick Velardi* pronounced the death sentence for the Hyundai soon thereafter. Walking back from Nick’s we ran into our buddy Kurt Doiron, who noticed we were bummed. “What’s up guys, everything ok?” “Our car died, we’re in a real bind now.” Matt explained. “I got an extra car you guys can have! I’m paying insurance but I don’t even drive it.” Kurt said. What fate! And whata guy, that Kurt!
Thus began the era of the 1997 Mercury Sable. It’s a tad beat up but it runs pretty well. (Better than the Hyundai, to be fair.) The only issue is that, once in a while, we need to blast WD40 on the metal mechanisms on the door. Otherwise the battery will die. I don’t know why this is, but that’s what Nick says to do and it works!
Having a jalopy has multiple benefits: low insurance; a ding here or there doesn’t matter; soil and plants in the backseat are no problem. You don’t need to feel bad about leaving it a mess!
Matt takes the car mostly and he drinks A LOT of soda and seltzer. The cans stay in the car until we have a passenger deemed worthy of a can clean up or if we’re going to an event and it’s just too embarrassing to pull up to valet in a car that has 50 soda cans strewn about inside. A fun game Matt likes to play is “Who Gets A Can Cleaning?”, the object of which is to name a person, and then figure out whether Matt would clean out the cans if they were to ride in our car.
During a visit to my sister last month, my 7 year old nephew Niko asked, confusedly, “Why is your car so dirty and broken? Why are there cans everywhere?” Kids have no filter! Matt, thinking the whole situation was hilarious, responded, “Niko, you didn’t know? I’m the National Can Collecting Champion and I’m saving these cans for next year’s competition. You can win a million dollars!” Niko’s face lit up.
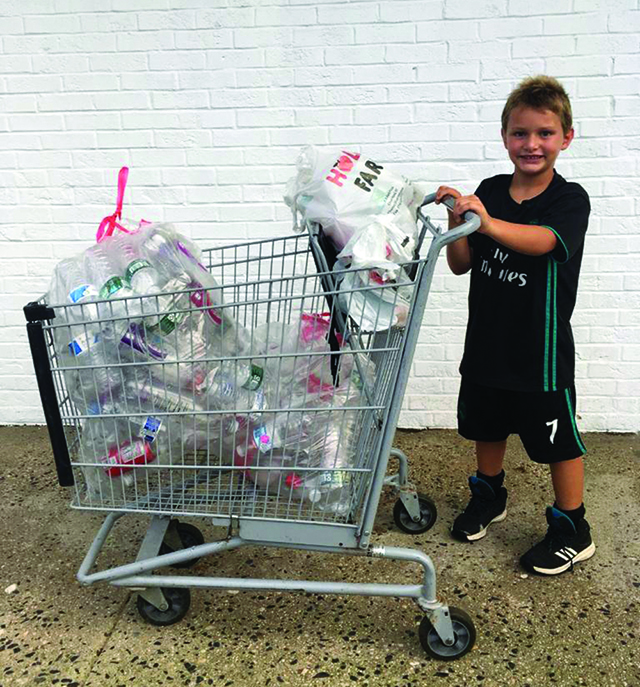
Next thing I know, my sister texts me a picture of my nephew with a huge bag of cans! He decided he wants to make a million dollars collecting cans and he was inspired by… Uncle Matt! Niko’s also planning his science project around his new ambitious job. He’s thinking of making an app for the project (with the help of Dad). Can providers can link up with can collectors, letting them know when and where they have a collection ready for pick-up.

I’m so proud of my nephew Niko for his ambitious work ethic, being environmentally conscious and for his innovative science project. I can tell he’s a go-getter, even at his young age. Keep up the good work Niko – and keep on collecting those cans!
*Nick’s Station – 7303 Amstel Blvd, Arverne, NY 11692


