Todd’s Dad’s’ Christmas Cactus
Last week I wrote about the iconic poinsettia many give to family and friends over the holidays. This week, I’m discussing the other seasonally appropriate gift-plant: the Christmas Cactus (Schlumbergera). Like it’s holiday competitor the poinsettia, you can buy a Christmas Cactus just about anywhere and since the holidays have passed — they’re on sale now!
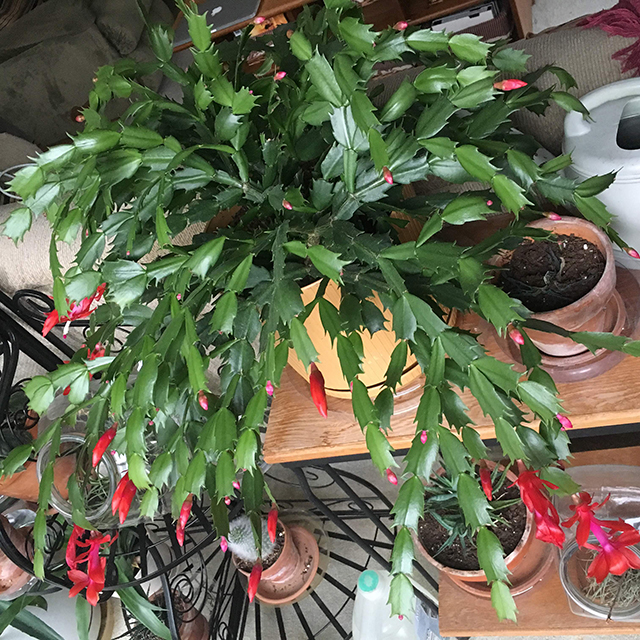
The plant is called a Christmas cactus because a drop in temperature is needed to produce blooms, therefore it’s most showy in December. It’s a welcome surprise to see the buds in the cold winter months when our gardens are barren and colorless. There are many cultivars, producing a variety of colored blooms at different times of the year. The most popular that we see in the stores, the pinkish reds are one of the oldest species, the Buckleyi. Adding to their beauty is the crab like flattened stems (not leafs!) which are linked together forming their unique shape.
Unlike most cacti, these plants thrive in humid climates. This cactus is more like a succulent plant in appearance. They’re native to southeastern Brazilian rainforest. The Christmas Cactus grows on other organisms such as trees, plants and rocks! Plants like this are categorized as epiphytes. Differing from parasites, they rely on other structures for physical support and do not negatively affect the host. You know, like Curzon Dax and Trill symbionts*.
The Christmas Cactus is easy to care for. Water every week or so when the soil completely dries out, Mist will encourage a very healthy plant. The cacti prefers sandy soil with organic matter and good drainage. Don’t worry about repotting your plant, it prefers a cramped root system. 65-75 temperature range is idea but it can handle up to 100F. To bloom, a drop of 50 degrees is needed. Also, its recommended to keep the plant in a room where the lights are always off in the evening. This will mimic its natural involvement and also help the blooming process. If cared for well, a Christmas cactus can live up to 30 years!
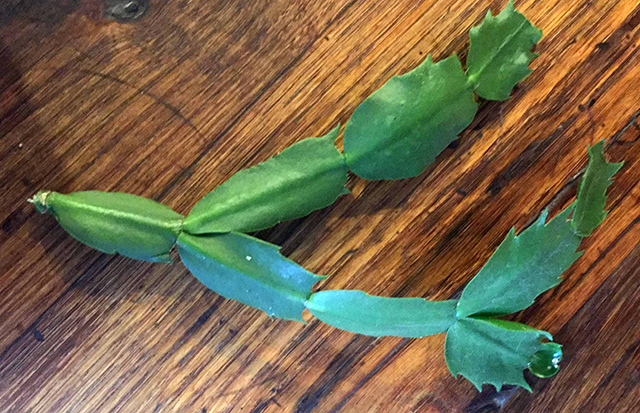
Propagating the cactus is simple. Clip a Y-shaped cutting from a healthy stem tip. The cutting should consist of at least 3 joined segments. Let the clipping sit for one day without water. Then take a segment of at least three and insert it a quarter of its length below the soil. Put in a few of these clipping to grow a full-looking plant. Place the pot in a well-lit area. Water the cutting sparingly at first to prevent rotting. After about two or three weeks the cutting should start showing signs of new growth which is usually reddish in color. Then you can water normally.
Here’s a great how-to video on propagating.
*Star Trek: Deep Space Nine, best show ever!
by Paula D.
on December 28, 2018 8:49 am in Holiday
How many poinsettias do you have in your living room right now? It’s custom to gift these lovely plants to friends and family during the holidays. You can find poinsettias just about anywhere this time of year – the supermarket, CVS, the hardware store, etc. Most of us throw them out when they start to lose leaves and look leggy. With some effort, you can learn how to care for this plant properly and enjoy it year round! I’ll share some tips and care instructions with you, but first, some history relating to this iconic Christmas symbol.
It’s interesting to me that this plant is a tropical native to South America, yet it’s know as a winter ornamental here in the states. The poinsettia (Euphorbia pulcherrima) grows wild on the pacific slope in Mexico and can reach a height of 16 feet! The lavish colored parts of poinsettias that most of us think of as the flowers are actually leaves. There are over 100 cultivated species today.
Why is this plant associated with Christmas? The story begins during the 15th century in Mexico where legend tells of a girl named Pepita or Maria who was too poor to give a gift for the celebration of Jesus’s birthday. An angel inspired the little girl to gather weeds roadside for a bouquet to present to the altar. The weeds blossomed and the plant was beautiful and red. In the 17th century a franciscan friar included the native species in a Christmas mass and from then on, they’ve been connected to Christmas. It is also said that the star shaped leaves symbolize the star of Bethlehem and the red color signifies the blood of Christ.

Thank you Susan and Eric Gottlieb for gifting me this beautiful Poinsettia.
Joel Roberts Poinsetta was an American physician, diplomat and amateur botanist. While in South America he became enamored with Flor de Nochebuena, the Christmas Eve flower. He brought the species back to the U.S. and by 1836 the plant was widely known as the “poinsettia” named after the diplomat.
Caring for a poinsettia is difficult but it’s a rewarding task. My father has successfully cared for his year after year. I haven’t’ had such luck but I will try again this year! Note that the leaves are toxic to cats and small dogs so keep them out of your pets reach.
The plant likes a sunny location, east facing. 66-75 degrees is ideal and avoid sudden temperature changes and even contact with cold window glass. Let the soil dry out in between watering, this is important to its survival. Mist often. It’s very tricky to get a to poinsettia to “bloom”. Here’s the best step by step I found from HGTV.com.
Let the plant dry out gradually starting in April. Water just enough to keep the stem from shriveling, and put the plant in a spot that stays about 60 degrees.
In mid-May, prune the stems to 4” high and repot in a slightly larger container (use potting soil with good drainage.). Move the poinsettia to a warm location with good light, resume watering. When new growth emerges, use a complete fertilizer every two weeks.
In July, pinch back the stems. Pinch again in mid-August. Poinsettias need 10 weeks of 12 hours or less of sunlight each day to show color. For Christmas flowers, keep the plant in complete darkness from 5pm to 8am daily, starting around Oct. 1.
Next week I’ll discuss the other plant commonly given around the holidays, the Christmas Cactus!
by Paula D.
on December 28, 2018 8:44 am in Community
It all started over some cocktails, poolside at my sister’s house on Long Island. “If we don’t find a new home for the palm tree, we’re going to leave it outside over winter and hope for the best, but it probably won’t make it.” Natalie said. Sip… three vodka clubs later… “As a certified NYC Citizen Tree Pruner, I can’t let this gorgeous species die! I will take the tree!”
Famous last words.
My sister made an impulse purchase three years ago, buying a palm tree from Florida for her new backyard pool oasis. It became a burden, though. It needs water every three days and pruning often, which requires a ladder to reach the towering palms. And most inconvenient, the 10 foot tall tree needs to be moved indoors every winter.
October rolls around and I get a call from Natalie. “We’ll have to make arrangements to get the palm tree to you soon, before the first frost.” It took me a minute to register what she was talking about. The vodka clubs. The palm tree. It came back real quick.
Of course, I didn’t mention anything about this at the time to my husband, so, I had to “ask” him. “It’s pretty big. I think we’re gonna need the pickup. The tree will die if we don’t take it!” Matt agreed with one stipulation — he didn’t want any part of the transport or logistics of getting it inside.
Two weeks ago I went to my sister’s house for my niece’s birthday party. This was as good as a time as any to take the palm tree home with me. My brother-in-law helped get it in the truck and secured it for my two hour drive back to Rockaway. I’d posted a message on Facebook for some help getting it off the truck and into our back bungalow, which has very high ceilings. No one responded. Matt had a recording session with Simon Chardiet and we had Greg and Ashley’s wedding at the Brewery that evening. There was only a small window of time to get it inside. The tree would freeze and die overnight if left out.
“I said it was a palm TREE!” Matt was totally freaking out, “10 feet tall?? I’m in the middle of a session. I don’t have time for this shit!!!” he yelled. I suppose there was a slight miscommunication on the actual size of the tree. “And… ummm.. I can’t find anyone to help bring it in…” His face turned red, I thought I saw steam flying out of his ears like Yosemite Sam. He interrupted his work and brought the ginormous palm tree inside. “This is not staying here, you better find a home for it.” Door slams shut.
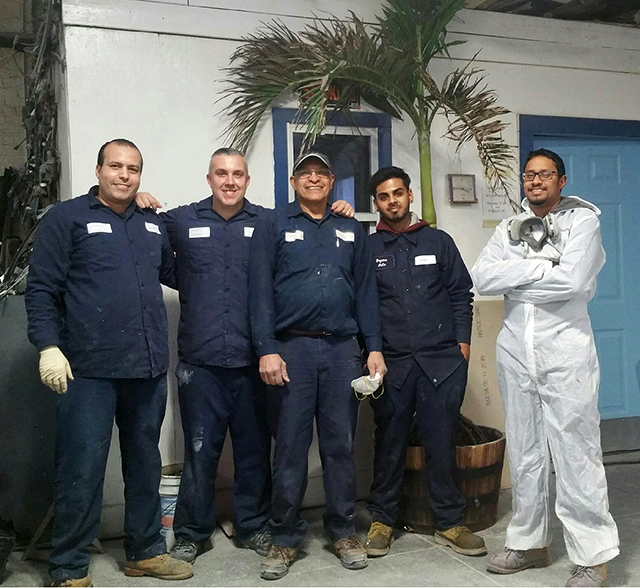
The next morning I woke up and my first thought was “the palm tree situation”. I started frantically texting friends, “Do you know anyone who wants a beautiful palm tree, it’s free!!? It’s just a little big, about 10 ft tall.” After a few hours I got a text back from my friend Melissa Draugsvold, “Bryan Bernath of Bryan’s Auto wants the tree!” I couldn’t believe it.
Bryan was happy and excited to take it and he has a huge garage to house the tree over winter. He sent Tow Joe over with his truck. He and his guy easily moved the tree out, onto the truck and drove away! I texted Bryan, “Tree in transport” and thanked him for saving my marriage and the palm tree. “Come visit it anytime you like!” Bryan responded.
If you’d like to see the beautiful palm tree or need an oil change, inspection or new breaks, visit Bryan’s Auto, 87-15 Beach Channel Dr, Far Rockaway, NY – 718.474.3032. Their good people!
There’s a party every weekend. Friday and Saturday nights I’m trying to find a sparkly shirt or dress to wear. Preferably not the one I wore last week. I’ve eaten more cheese and antipasto than normal, not to mention cookies and chocolate, which I don’t even really like. I had my own “kick-off to Christmas” party the first week of December, which was a shining success.
Balancing the parties, decorating and shopping with my increased seasonal workload is tough when you’re a freelancer working from home. Should I?
A: Wrap Christmas presents with a Hallmark movie playing in the background
B: Start designing the countless “the gift that counts” emails or the holiday menu ads and promotions mounting in my queue.
[Correct answer is A, by the way]
When I do have a minute in the evenings, I sit in front of my glowing Christmas tree, and my mind starts to wonder to the Christmases of yesteryear. Things seemed so simple then. That feeling of being a kid the night before Christmas will never leave me. My sister Maria and I shared a room and we would giggle under the covers with butterflies in our stomach. It felt like the morning would never arrive. But soon enough we’d wake up to a pile of presents displayed on the living room floor, ready for us to tear open.
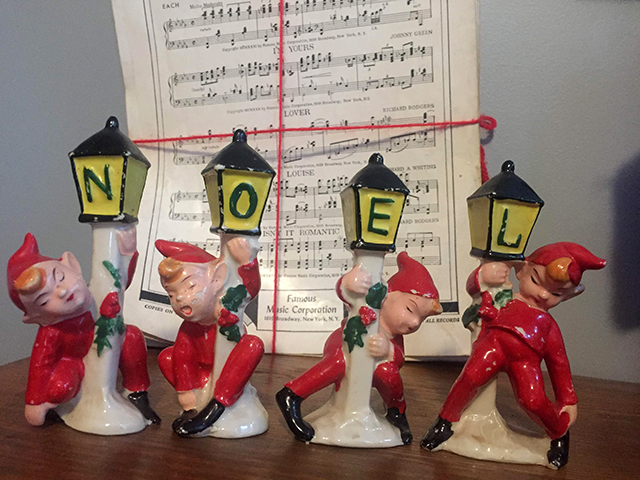
When I look around, I see ornaments that used to belong to my grandmother, another reminder of Christmas past, when things seemed less hectic. On my end table, sits grandma Mary’s ceramic drunken elves (Lipper & Mann 1956). Each one his hugging a lamp post, eyes closed, slipping down the pole!
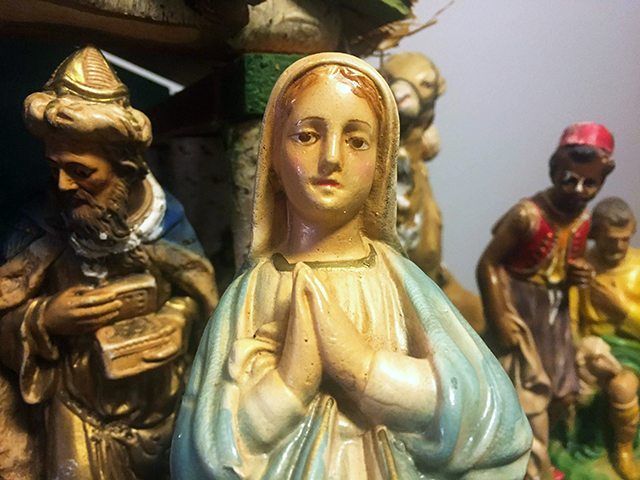
I inherited my grandmother nativity as well, which I really love. I recall being at my grandparents house as a child for Sunday dinners in December. I’d lay on her green shag rug with my head practically under her Christmas tree, where the nativity was. I would play with the sheep and the holy figurines, but this was no toy. It seems the set is handmade. It’s not marked with product stamps or stickers and its very unique to the eye. Mary and Joseph’s expressions along with the others are vivid and pretty strange actually. Made from plaster, I’ve had to glue some heads back on and a sheep’s tail since I’ve had it, but nonetheless, it’s priceless to me.

Having these little reminders around my house of Christmas past helps to keep me focused and reminds me to slow down and embrace the season for what it truly is about. Happy Holidays and keep calm for Christmas!