by Paula D.
on January 28, 2019 8:57 am in Events
Since I wrote about my mother’s fall two weeks ago, the streak of strange events has continued.
My mother was out of critical care and on the mend, so Matt and I decided not to cancel our birthday vacation to Jamaica. The day before we were leaving, I pulled out our passports and Matt’s was expired. I couldn’t believe it. I was so annoyed and upset. With all the commotion surrounding my mother’s injury, I neglected to get our travel plans in order.
I started to freak out. Matt told me to stop being a “stinker thinker” and call Delta. He was upstate driving home from a work thing – it was all on me. I learned there was a chance Matt could get a rush passport if he headed to the NY Passport Agency on Hudson St. the morning of our flight. It opens at 7:30am. Our flight was at 10:05am. I pushed back the flights to 12:00pm and then his again to 2:00pm. If he received the passport, we’d meet in Atlanta and catch the connecting flight to Jamaica together at 6:00pm.
The next day, my birthday, Matt popped out of bed at 5:30am and headed into the city. It was a waiting game. I took the chance and left for the airport without knowing if he’d get the passport renewal. He called as I pulled up to the terminal and said “It’s a go!”
I spent most of my birthday alone in Atlanta, drinking pina coladas at the airport bar. Matt finally appeared, gave me a big hug and we headed to our gate.
We arrived in Montego Bay, Jamaica that evening. We still had a 2 ½ hour drive south to Treasure Beach ahead of us. We made our way to the car rental in an exhausted haze. “In Jamaica we drive on the left ya mon…” said Alamo car manager guy. “Oh God, the steering wheel is on the right??” I said to Matt. We drove in fear for maybe 5 minutes, twice the wrong way down a one way, before blowing a tire. We hit a pothole masked in the darkness.

We gave up on the long drive and decided to crash in Montego. With the help of Andre, the really nice Alama rental guy, we got the donut on the car by the light of our phones alone, and drove to the “Hip Strip” as it’s called, which, if you like weird dudes loitering in dark parking lots, is the hippest spot around. Everything we found had no vacancy except for a place that got two recommendations — including from our buddy Andre — The Glorietta. Unfortunately, it appeared that two ladies of the evening were having a boisterous debate in front of the place. We didn’t care. We just needed to sleep.
Bright and early, we started on our very scary drive through the mountains of Jamaica. And guess what? We blew another tire!!! It was only noon but I decided it was time to crack open the Jamaican rum I had bought in the the airport!
Thankfully that was the last hiccup and we had time to enjoy the beach, the food, the culture and the incredible nature that surrounded us. The landscape on the south coast is semi-arid. Cacti grow wild everywhere! There were pelicans that fished in front of our cottage, spiraling down head first into the sea to catch breakfast. Crabs were camouflaged on the rocks. I saw a colorful jellyfish and a huge stingray, like the ones you see on Planet Earth documentaries.
The element of weirdness did continue though, with our visit to a tire shop where the locals were speaking patois*, kindly offering us ganja and where the Red Stripes was quenching everyone’s mid-day thirst. Then there was the karaoke bar – more grass, more beer and 80s soft rock re-cast as reggae. There’s not enough space here to describe all the weird, wonderful and beautiful things we saw.
Now I’m back at home, taking down the Christmas decorations in a polar vortex. What I wouldn’t give to be back on the side of the road drinking rum while Matt changes tires.
*English-based creole language with West African influences
by Paula D.
on January 28, 2019 8:53 am in Recipes
If you remember, a year ago I wrote about my decision to become a vegetarian. Since September though, I’ve introduced two portions of meat protein a week into my diet. I still hold the same feelings about industrial mistreatment of animals and the effects of meat processing on our global environment. When I do choose to eat meat, I buy the free-range, grass feed, humanely treated products. True vegetarians may see this as a “step back” but I’m trying my best to be accountable while managing my personal health.
The decision to reintroduce some meat into my diet was because of weight gain. I ended up packing on 7 pounds as a vegetarian – too much cheese and bread. Some weeks I was on top of everything, preparing meals ahead of time, other weeks I was eating a lot of Elegante Pizza. I struggle with self control when it comes to food (and drinks, sigh).
Another factor and challenge was meal variety. Despite many vegetarian recipes online, I found I was bored with what I was cooking. And some of the interesting recipes I did try, took too much time to prepare. My end goal is still vegetarianism, so I continue to look for exciting recipes that are satisfying and healthy.
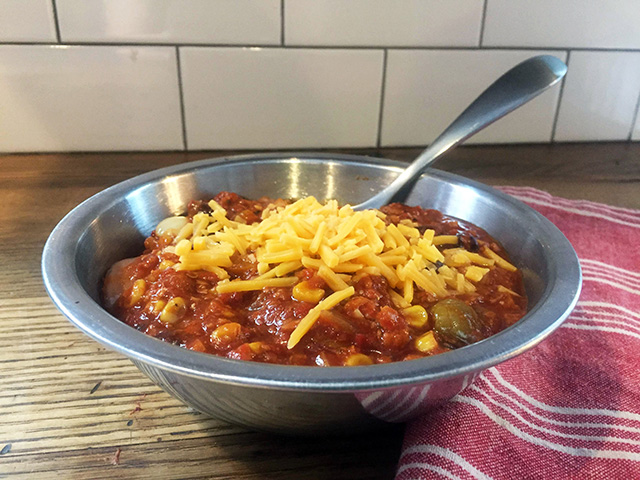
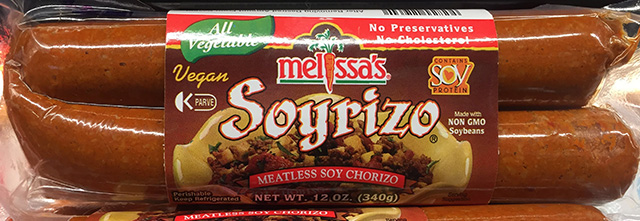
Last week, my husband ran to Key Food for a few things and picked up vegetarian chorizo. I’ve seen it before in the refrigerator section to the left, where you first walk in but always thought it looked kind of gross, so I’d pass it up. But it was now in my fridge, so I decided to make vegetarian chili with it — and guess what?? It turned out fantastic! The veggie soy chorizo had a rich, fatty flavor like meat which was satisfying. The texture worked well for chili and it had a nice spice to it!
I want to share the recipe with those of you who feel similarly to me and are struggling with vegetarianism and also with my meat-eating friends, because either way, this is a delicious winter comfort food recipe, enjoy!
Vegetarian Chorizo Chilli
Ingredients:
1 package of Melissa’s Soyrizo
2 red onions
2 orange peppers
1 16 oz can of corn
1 16 oz can of black beans
1 medium bulb of garlic
¼ cup olive oil (I use Colavita)
1 tablespoon of canned green chili pickled in oil
1 tablespoon of sugar
1 28 oz can of crushed tomato sauce (I use Sclafani)
Salt, pepper, oregano to taste (use a healthy pour)
Garnish with cheddar cheese and sour cream (optional)
Directions:
1 Dice the garlic, onions and peppers. Simmer those ingredients in the olive oil on low, until translucent.
2 Open the casing of the soyrizo and put contents into the simmering mix. Stir. Discard the casing.
3 Add all other ingredients mixing together. Bring to a boil and then put on low for an hour, occasionally stirring.
Prep time is only 15 minutes and you can make this in advance to have all week!
by Paula D.
on January 28, 2019 8:48 am in Family
The day started as most of my Thursdays do. I hit the gym, got showered and headed to Long Island to visit my mother. She had a doctor’s appointment, then we were going to get lunch at our favorite diner. As we were leaving the medical complex, my mother and I noticed a car double parked in front of ours. Annoyed, mom said, “Look at this guy, we have to sit and wait now. I’m hungry!” We were both distracted by the inconvenience. Then, in a split second my mother tripped and I attempted to break her fall but she hit the cement, hard. I yelled for help, got out my phone but before I could call 911 a nurse appeared, then a doctor, then the paramedics. A crowd developed, the EMTS were asking her all sorts of questions. My mother was screaming in pain. Next thing I know I’m tailing the ambulance to North Shore Hospital’s Emergency Room.
The doctors said she fractured her hip and needed surgery, stat. I was sick to my stomach because I knew the implications. My mom has advanced emphysema. General anesthesia requires intubation which could be life threatening for her. She was scheduled for surgery the following day. We needed to speak with the surgical team but only had the opportunity a half hour before, during pre-op. My sister Natalie is a physician and was advocating for us, thank God. The best option was a spinal tap but since my mother has a slight heart condition, Dr. Miller, the anesthesiologist said they’d need to administer an epidural instead, but warned it may not work, in which case, they’d have no choice but to intubate. “This is how old people die.” I thought. My whole family was terrified. While we waited, Dr. Miller had conversed with his colleagues. He came back a third time, “This is like a Grey’s Anatomy episode — I can’t believe it!” he said. The team felt the risk of the spinal tap affecting her heart was less than the risk of extubation. Meaning, when the vent is removed, my mother’s lungs probably didn’t have the capacity to “restart”. Dr. Miller was still worried about getting the spinal tap in due to the location of her injury. He informed us there was still a chance she might need general anesthesia / intubation. My sister Natalie insisted someone notify us if they had to do this.
We waited.
45 minutes later Dr. Miller came out. His smile was so big — I don’t think I’ll ever forget his face. He put his thumbs up and said “We got it”. My family started crying with relief. Natalie told us how rare it is for a doctor to scrub out of a surgery and then back in to tell a family news. Usually it’s a physician’s assistant. We met Dr. Miller for a total of 50 minutes that day and probably will never see him again. He was humble, reaching out to his superiors for input. He took a risk knowing the severity of my mother’s situation. He cared.
2019 didn’t start out how I expected. I felt like I lost three days of time in a foggy Twilight Zone waiting game. Now that the urgency has past, I’ve been thinking about what’s really important to me – my family and friends. A major event like this makes you realize the little day-to-day issues mean nothing. It was also a reminder that people care — even strangers — and that there is hope and goodness in our world, despite the doom and gloom we hear and read in the news. I’m going to keep these thoughts in the forefront of my mind as I continue on in 2019.
It will be a few months of rehabilitation for my mother but she’s on the mend. She’s a fighter! We have a running joke every time she has a health set back “Flo’s circling the drain but we plunged her out again!”