On New Year’s Day, I was invited to a cute craft party at my friend Carolin Wood’s home. We spent the afternoon sewing patches for a Rockaway community quilt—chatting and snacking. What fun!
Carolin Wood and her creative partner, Rachel Krieger-Garone, are the co-founders of Benevolent Objects, a small business creating beautifully unique aprons from vintage materials. By the end of the afternoon, there was talk of organizing something bigger—an event that could fit more community sewers and crafters. Now they’ve secured a winter location for the next sew gathering, and this one is public. All are welcome!
I asked the ladies how the inception of Benevolent Objects came together and I learned that Rachel and Carolin first met when Rachel was nannying for Carolin’s kids 9 years ago. What started as a working relationship turned into a longtime friendship. They’ve had each other’s backs through hard times, and they talk honestly about the big stuff—mental health, relationships, community, all of it.
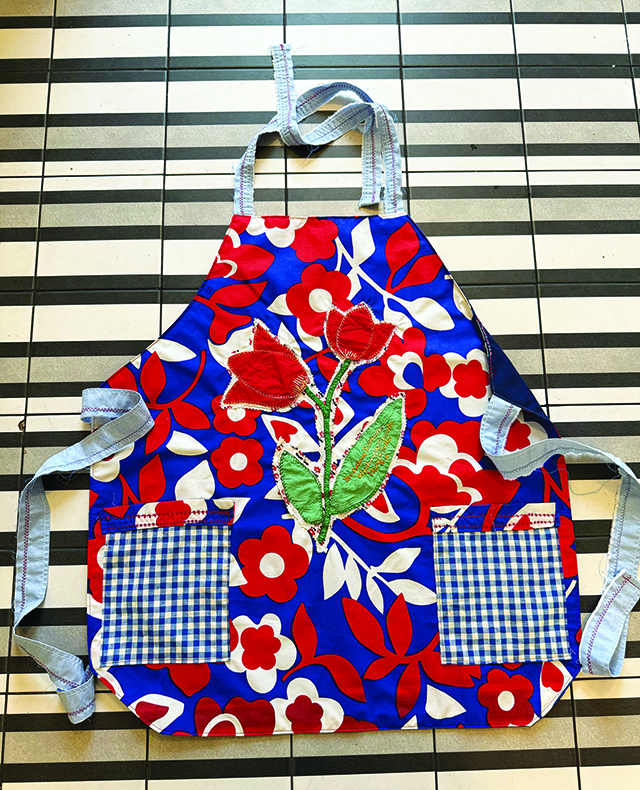
Carolin, an artist and new mom at the time, started making and selling aprons after her kids were born (before she ever moved to Rockaway). Sewing runs in her family—skills and fabrics passed down from her mother and grandma, along with that old-school mindset of using what you’ve got to make what you need.
Rachel comes from a clothing-manufacturing family and spent years in luxury retail and the service industry, so she brings a whole other side of experience to the work.
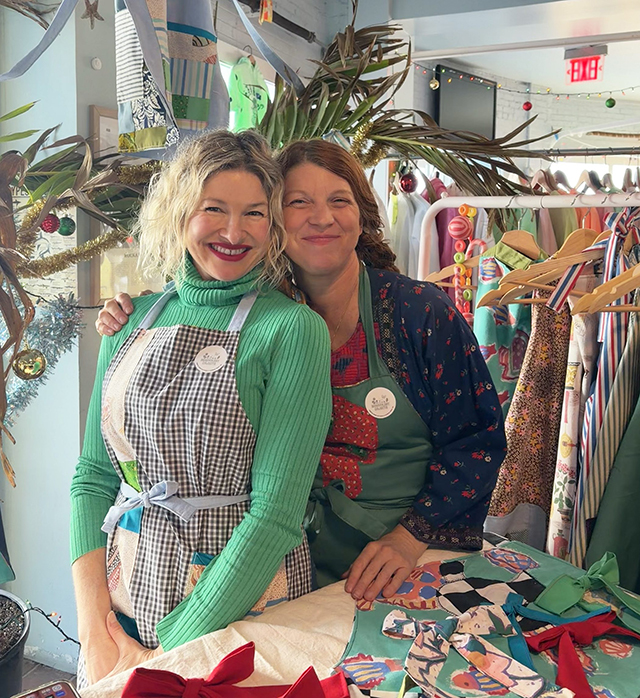
Most of the fabric for the aprons is straight from Carolin’s family treasure chest. They also source from vintage shops and secondhand stores. And if you have cool fabrics, Carolin and Rachel also happily take fabric donations!
Rachel shares, “I think we make great partners because we come from such different backgrounds and have different skill sets. I love to bring people together, and that translates to social media as well, so I’m responsible for outreach and marketing. I have a bit of a tendency toward perfectionism, which helps in production, design, and editing. Carolin knows how to produce—the work just spills out of her. She works fast and furiously. She doesn’t hesitate. It’s truly awe-inspiring.”
“We both care deeply about this planet and the future, and with all of the chaos in the world, it feels like if we can gather people, teach them how to repair items instead of throwing them out, and create a sense of care for our environment and the community, then maybe we’re doing something good.”
And that brings us to this weekend!
This Sunday, January 18, Benevolent Objects is hosting Sew & Repair at the Arverne East Coastal Conservation Center (190 B 44th St. at the Boardwalk), overlooking the Atlantic Ocean in a beautiful new community space, from 10:30 am to 1:30 pm. It’s a hands-on morning of basic sewing, embroidery, and repair, plus an intro to threading and using sewing machines. Bring an item that needs fixing, or come ready to experiment with provided materials and make something new. The idea is: use your hands and hearts to make new things from old materials—and imagine a more sustainable future, as the group creates.
Benevolent Objects celebrates one year of their creative partnership and business this February—congrats, ladies!
RSVP by messaging @benevolentobjects on Instagram. The suggested donation is $20, but it’s pay-what-you-can, and no one is turned away. No experience needed. There will be light snacks and beverages (feel free to bring your own, too). Space is limited, reserve your spot!
It didn’t feel right to write about anything else this week after the heartbreaking news that Mike Honan passed away.
I’ve known The Honans for 22 years. Their family welcomed me into Rockaway and were some of the first people I met here. They treated me like family. Mike Honan, an Irishman, married Fran Chiodo, an Italian, and I remember how comforting it felt to be with them, like I wasn’t the only Italian on the peninsula. If I needed to name an example of a beautiful marriage and a strong, loving family, the Honans are it.
I’ve shared many holidays with Mike, Fran, Katie, Rosanne, and Frank—most notably their family-famous St. Patrick’s Parade breakfast party.
Mike and Fran have been longtime supporters of the Beach 91st Street Community Garden—attending events, donating food, and contributing financially. This is a small example of Mike’s big community involvement.
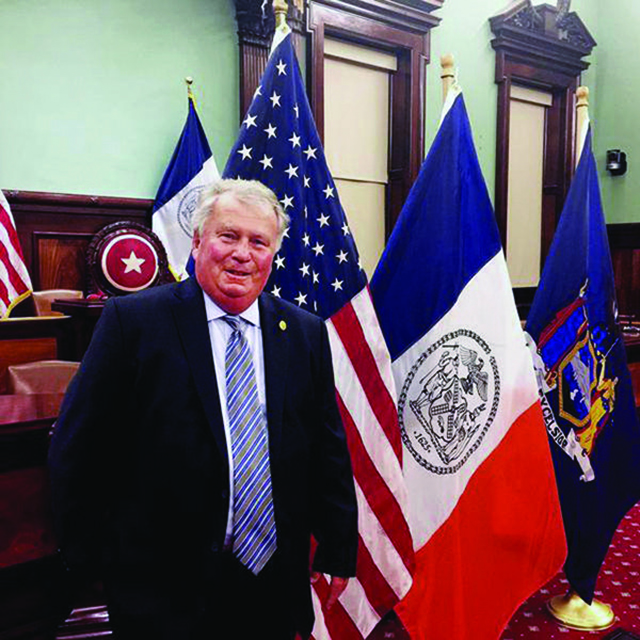
As you’ll read in this week’s paper, Mike was a veteran of the U.S. Navy, a seaman at heart—and he never stopped serving. In May 2015, I wrote a tribute to Mike when his work with veterans was honored at City Hall. He was presented with a proclamation for his service by NYC officials.
Mike worked with an organization that ensured indigent veterans were properly buried—riding in the hearse with a stranger’s remains and bringing the folded flag home in their memory. This still touches me when I think about it. If you had free time, this is what you chose to do? Incredible.
Mike, alongside the Belle Harbor Garden Club, was involved in the inception of Memorial Circle, the park that honors 33 local World War II veterans who gave their lives for our country. He also tirelessly organized parades for WWII veterans, securing antique cars so they could ride the route in style—just a few of the many ways he gave back.
Mike’s passing was sudden, and I’m still trying to understand that he’s gone. My heart is with Fran, Katie, Roseanne, Frank, Riordan, and the rest of this family. I’m saying a prayer for Mike, and for everyone mourning him. I’m grateful for his tremendous contributions, locally and far beyond Rockaway.
When I think of Mike, I will picture him sitting in the living room of his home with his beloved dog under his arm, smiling warmly, ear to ear, and welcoming, calling for Fran to offer me something to eat.
Mike’s wife, Fran Honan, has been and always will be a Tomato Gal, contributing to the blog long before I ever wrote for the paper. I wanted to share her “secret” brownie recipe with you, because we might all need some comfort food this weekend. Whether you’re mourning Mike or carrying your own personal loss, know that there’s no timeline for grief. And it’s okay to feel all that you do.
Fran’s “Secret” Brownies
What makes them “secret”: Use a mix of different name-brand brownie mixes (not store brands). The variety creates the best taste and texture.
What you’ll need:
- Several boxes of different name-brand brownie mixes (ex, 3 boxes for one pan)
- The exact eggs, water, and oil listed on each box (you’ll be adding them up)
- pan: 20″ x 12″ (fits 3 boxes of mix)
- Spray shortening
Instructions:
- Heat oven to the temperature listed on the brownie boxes. Grease a 20″ x 12″ pan with spray shortening.
- In a very large bowl, add all the eggs, water, and oil required for all the boxes combined. Whisk until fully blended. Put the whisk away. Switch to a wooden spoon.
- Add the dry brownie mixes one box at a time, stirring after each addition just until you no longer see dry powder. Do not overmix.
- Pour batter into the pan and gently spread evenly with a spatula.
- Bake about 25 minutes, then start checking. You’re aiming for slightly underbaked: Edges firm all around, Top glossy with some cracks, Center no longer jiggly (If the center still jiggles a lot, bake 8–10 minutes more, checking as you go.)
- Cool completely before cutting. Cut into squares, place on trays, and wrap tightly with clear plastic. Serve anyone who walks through the door.
by Paula D.
on February 3, 2026 5:20 pm in Holiday
I was never a big New Year’s Resolution person, but the last 3 years, I’ve set “flexible” goals. This year, I wanted to read the definition of “resolution.” It’s good to remind yourself of the words and to hear them out loud.
Resolution: a firm decision to do or not to do something. The quality of being determined or resolute.
I post to-do notes on my wall. The visual of it always helps me more than writing a list on a pad of paper that gets lost on the dining room table amongst the mail, packages, my work bag, coffee cups, lotto tickets, and a cat. I’ve also taped up words like “Discipline” and “Focus” when I need a push. I’m thinking this visual note-board method would also be good for my 2026 New Year’s Resolutions.
The definition of “resolution” is regimented. My goals for this year will be a little looser, with some percentages, to relieve the pressure. Set the bar low(er), and you have a better chance at succeeding! Maybe some of my new year goals will resonate with you…
Stop saying sorry for stupid things (80%). This was on my list last year, and it worked to an extent. I want to move more on it, and 80% feels right. Say sorry when it’s genuinely needed—but not sorry for things like canceling plans, asking a question, having an opinion, someone else’s mistake, taking too long, or your personal preferences.
Stop rushing into a public or work bathroom when someone knocks. At work, we have one bathroom that most women use, and I find myself rushing the second someone knocks on the door, saying, (yep) “Sorry! One min.” when I really need about five minutes. This behavior of mine drives me crazy. I resolve to take the amount of time I need and say, “Occupied.” Nothing excessive—just not rushing, which makes me anxious and frazzled.
People pleasing (40%). This one is deep for me, and for many, I imagine. Why do we people-please over our own physical and mental well-being? Fear of rejection, conflict, abandonment, low self-esteem, and past experiences is the short answer. I’m adding a percentage to this one because I can’t undo a lifetime of learned behavior in one year. I’m aiming to stop pleasing people by 40%.
A Monthly Adventure: New Experience and/or Travel. This is a fun one I saw posted on Facebook by an old college friend. She said her New Year’s resolution is to go to one new place a month. I want to do this too! I’m trying to be realistic, though. Is it a new place, or like travel, or can it be a new experience? What counts? I want it to feel fresh and exciting, meet new people, or to learn about a new place. Can I travel once a month with money and time being what they are? Does going to New Jersey count? I’m thinking it can be a day trip to a location I’ve been before, but it has to include a new experience, at least. Let’s see how this one plays out.
Quality time with the people I love. In my book, this shouldn’t be a resolution—it should be an absolute. I need the reminder, though, because life gets hectic and I lose touch with what my priorities are sometimes, smothered by anxiety and stupid life things that won’t matter when I look back in two months. I will spend quality time with my family and a few special friends this new year.
Do you know about the acronym SMART goals? Specific: means naming what you want/what is the objective, don’t be vague. Measurable: means seeing progress. I find setting mini-goals helps so much. I need these incremental rewards. It’s like training your cat not to jump on the table—you use treats. What will your treat-reward be at each milestone? Get a little notebook to track your progress. Achievable: means it fits the reality of your time, money, and energy. Be realistic—this is my percentages trick. Relevant: means it actually matters to you. Time: give it a timeframe, an actual calendar date (and milestones) so it doesn’t fade. Set a timer, for the short-term — to do the thing. You’re retraining your brain; with some goals, it will help to think of it scientifically. Remove some of the emotional attachment; you are a robot, or a Nike commercial: just do it.
What do your New Year’s resolutions look like? Maybe this column will inspire you to set some percentages. Either way, I hope 2026 brings you all that you wish for. Happy New Year from Tomato!
Christmas Day at my grandparents’ house had an order. Antipasto galore followed by “Sauce” Supper. When that finally “ended,” the nuts and fanuk (fennel) were set in a basket, on my grandmother’s beautiful Christmas table. This was the official “break” period before dessert came out — a pause that still involved… eating. It gave the women time to disappear into the kitchen, clean up, and pull out the nice dishes for the grand finale, while the men lit cigars, broke out the cards, started gambling, and cracked the nuts with those silver nut crackers.
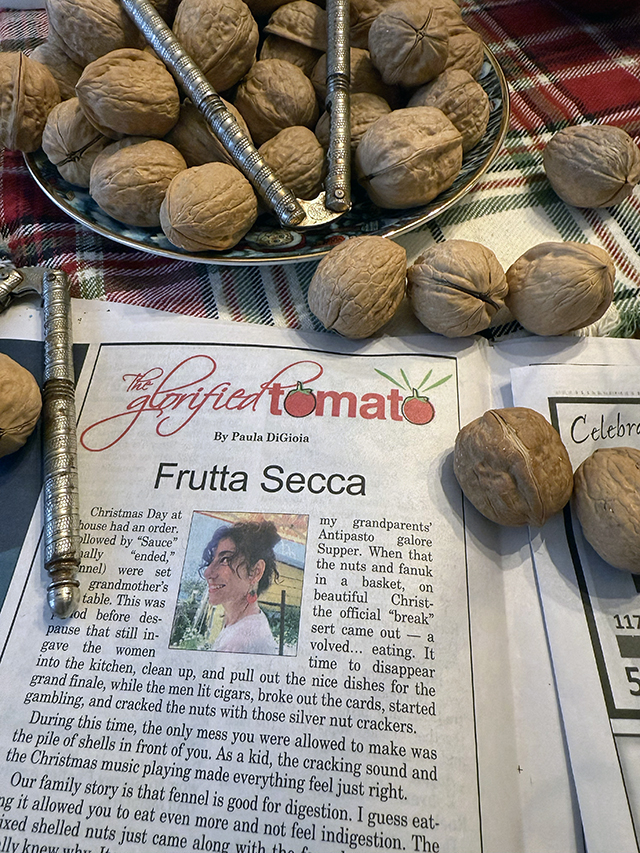
During this time, the only mess you were allowed to make was the pile of shells in front of you. As a kid, the cracking sound and the Christmas music playing made everything feel just right.
Our family story is that fennel is good for digestion. I guess eating it allowed you to eat even more and not feel indigestion. The mixed shelled nuts just came along with the fennel, and no one really knew why. It was a ritual – I remember us kids hunting for every last piece of walnut treasure after the big crack.
Recently, I learned the origin story behind this tradition. In Italian, this mix of nuts and dried fruit is called frutta secca—literally “dried fruit,” culturally the idea includes nuts, figs, dates, apricots, and raisins. Sweet dried fruits and nuts have deep roots in southern Italy and Sicily, where the land is rich and fertile enough to grow these foods. They also store well, travel well, and don’t cost anything if you grew them on the hills or cost very little if you bought them from your farmer neighbor.
I learned that frutta secca, in the old world, was the Christmas dessert (how interesting!) because my people didn’t have money for the ingredients or to buy cakes and pastries. That was for the richer and the aristocrats.
The days of Christmas at my grandparents’ house are long gone, but the basket of nuts still sits on my sister’s table and mine whenever we’re hosting a holiday. When you see the vintage nutcrackers and the frutta secca, it means: sit, stay a while, and relax. Be with your family and friends, cherish this time, love them, and make memories together.
Merry Christmas!
For more follow Paula on Instagram for recipes, traditions, and Rockaway life: @theglorifiedtomato


