Almost immediately, as the thin needles entered my body I felt a tingling that guided me into a state of calm. A wave of relaxation washed over the tight muscles of my body. I became the petals of a flower opening up in the spring sunshine. Moments passed and the medicine women reentered the room to place two more needles beneath my eyes. With each slow minute that passed, I sank deeper into a state of relief. The room was warm. Then a sensation passed through me. I was rising up, floating to the left. I kept the medicine woman’s chant in my mind while taking deep, rhythmic breaths.
She said I was yin depleted. I later learned this was a gentle way of saying, “Too much yang.” In my life naively, I’ve been turned off by the symbol – those ugly, bright tie-dye shirts with it or the gift shops in Woodstock, NY with a weed leaf. But now… I get it.
The yin-yang symbol embodies the philosophy of balance and harmony within Eastern medicine, depicting the interplay between complementary forces – yin (passive, feminine) and yang (active, masculine), essential for maintaining well-being.
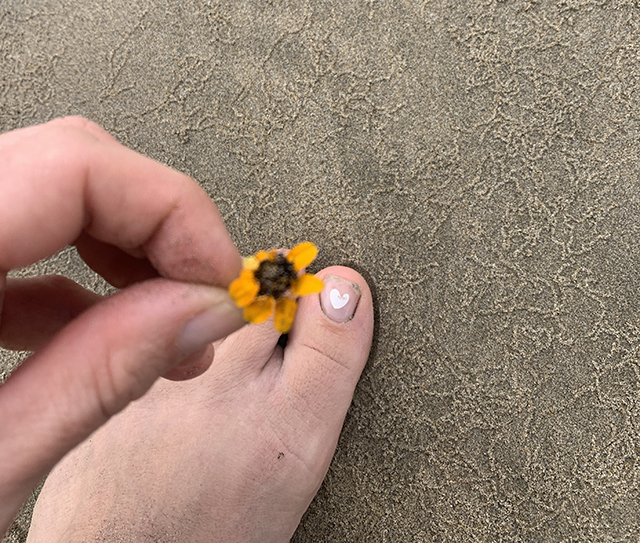
The Mexican sorceress put her fingers on my wrists. She closed her eyes and felt the blood moving through my veins. She looked at my tongue. She said it was oily and to stay away from fried fish. She said my toes needed to bleed and I let her. She asked if I was Jewish (no), and she asked if I had night sweats (yes). She said my fascia should be loosened. Initially, due to fear and seeing those girls on the beach with crop circles on their backs, I was apprehensive. But I chose to be open and proceeded with cupping. I was astounded by the feeling! She looked into my eyes and asked about my spiritual nourishment. For my physical sustenance, she suggested water with goji to replenish my body.
I was in Saladita Mexico a few weeks back, on an amazing surf trip. I met the mystical women on my board in the Pacific Ocean. She was missing one finger. Irene approached my friend Lauren after overhearing a conversation about Lauren’s surf incident (four stitches). Irene told us her finger was severed by her leash when she was 12 years old surfing in Taiwan. Irene gently mentioned she’s an acupuncturist and can help with trauma among other healings. Then she paddled away catching a soft wave.
My neck and back have been stiff. I’ve always had trouble. I work at a desk for many hours as a graphic designer. With surfing and a weak core, it has become almost chronic. Many friends have spoken highly of the eastern acupuncture treatment. Why did I wait so long?
Irene the medicine woman is also a M.D. She is a beautiful force and my brief time with her has made a lasting impact on my thinking towards physical and mental health. Dr. Irene Sanches-Celis works with individuals seeking healing therapies – acupuncture, women’s health, psychedelic therapy and she hosts transformation courses remotely. To learn more find Irene on Instagram – @irene.sanchezcelis. Website: irenesanchezcelis.com
And we have our very own healing sorcerer here in Rockaway. Her name is Rebecca Parker, L.Ac. MSOM. She is a licensed acupuncturist and herbalist practicing her craft since 2008. Rebecca’s natural health treatments reduce pain and relieve stress. Her tailored care, hones in on each of her patients’ individual needs. The community holds her in high regard. I’m eager to experience her therapeutic magic. Visit Rebecca’s IG account to learn more: @rockawayacupuncture. Website: rockawayacupuncture.com.

For those who are new to this, I encourage you to keep an open mind. By doing so, you may just embark on a transformative journey of physical and spiritual healing.
by Paula D.
on April 16, 2024 10:57 am in Food / Recipes
For the majority of my life, I associated beets as the giggly mass with ringed lines that only appeared once a year on the Thanksgiving table. And the taste of the gelatinous red form wasn’t appealing – sweetness doesn’t always equate to palatability.
As I evolved as a home cook, I felt compelled to explore foods that challenged me. Ahem, beets. I’ve tried incorporating the root vegetable in many meals over the years learning the flavor of fresh-cooked beets is quite good. In contrast to their canned counterpart, fresh beets offer a subtle sweetness, and their tanginess and earthy origin is unmistakable.
At this point, I was no longer a beet-hater. However, there’s the issue of mess. Cooked and boiled beets release a natural staining dye, making them a whole thing. So I tended to steer clear.
There are certain foods that are worth purchasing in their pre-prepared state, and beets rank at the top of that list for me. Nowadays, I opt for pickled beets. Whenever I’m on the mainland, at Whole Foods or specialty markets, I look for the fanciest brands. The pickled variety tends to have more acidity and that tanginess is just perfect for salads.
Beets are highly nutritious, and packed with vitamins, minerals, and antioxidants like folate, potassium, vitamin C, and betalains, which have anti-inflammatory and detoxifying properties. They are low in calories and high in fiber, making them a healthy choice for supporting digestive health.
Lastly, I need to mention that beets are sexy. They know how to turn up the heat in the kitchen with their seductive crimson hue. Beets bleed the color of love and passion! Their texture can be rough or sultry to the tongue. And the many health benefits mentioned above, no doubt contribute to improving blood flow and stamina (Yup, I said it).
Consider adding a side of beets to your romantic at-home dinner this weekend or for Valentine’s Day on Tuesday. Watch the romance root with this simple, seductive salad.
Sexy Beet Salad
Ingredients:
(Serves two lovers or haters)
1 bunch fresh spinach
4-6 whole, pickled beets
1 cup ricotta cheese
1 tablespoon Romano cheese
High quality EVOO
Fresh ground pepper and salt to taste
Directions: Combine the ricotta cheese, Romano cheese, and salt. Plate the spinach, then neatly center the ricotta mixture and top with beets. You may keep the beets whole or slice them in half. Carefully drizzle on some beet juice and then the extra virgin olive oil. Generously top with fresh ground pepper and a hint more of salt. Prepare just before serving for the best presentation.
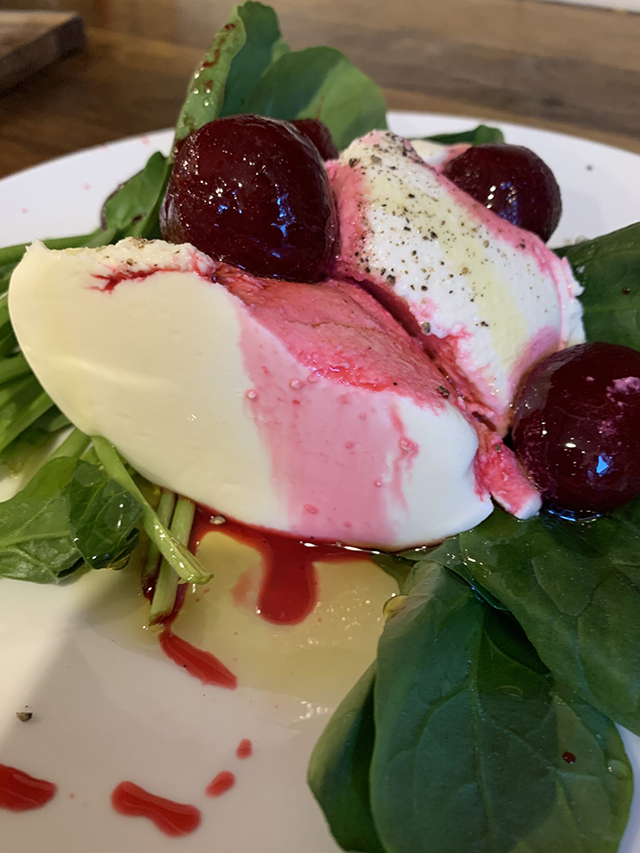
You can’t deny the beauty and charm of this dish. Deep reds to sweet soft pinks flow over a rich land of lovely green.
by Paula D.
on April 16, 2024 10:54 am in Drinks
I was cramping while surfing. My friend and incredibly skilled surfer, Kaori, pointed out that I’m probably dehydrated. Yup, this makes total sense. I told her I have a hard time “getting it down.” She said, cold water shocks your system, try warm water. I thought that was a little strange. Kaori explained it’s customary in China and most Asian countries to drink warm water in the winter and room temperature water in the summer. I was very curious about this.
“Everytime I’d see my great grandma, at some point, she’d pull me aside and give me a short speech of all the things I need to do – be nice to my sister, study hard, save money, help mom, and always drink nyun seoi (never cold or too hot) and she would gesture how the water would flow smoothly down.” Karoi recalls.
It is believed the warm water practice came about in the aftermath of communist China around 1949. It’s linked to concerns about tap water quality at the time.The government actively promoted the consumption of boiled water with boiler rooms in workplaces and towns providing hot water for health and hygiene. There were early-morning deliveries to households, again to emphasize the importance of boiled water for well-being.*
Additionally, I learned in Chinese medicine, achieving balance is primary. The use of warm water is essential to counterbalance cold and humidity and it supports blood circulation and releases toxins.
I was all in.
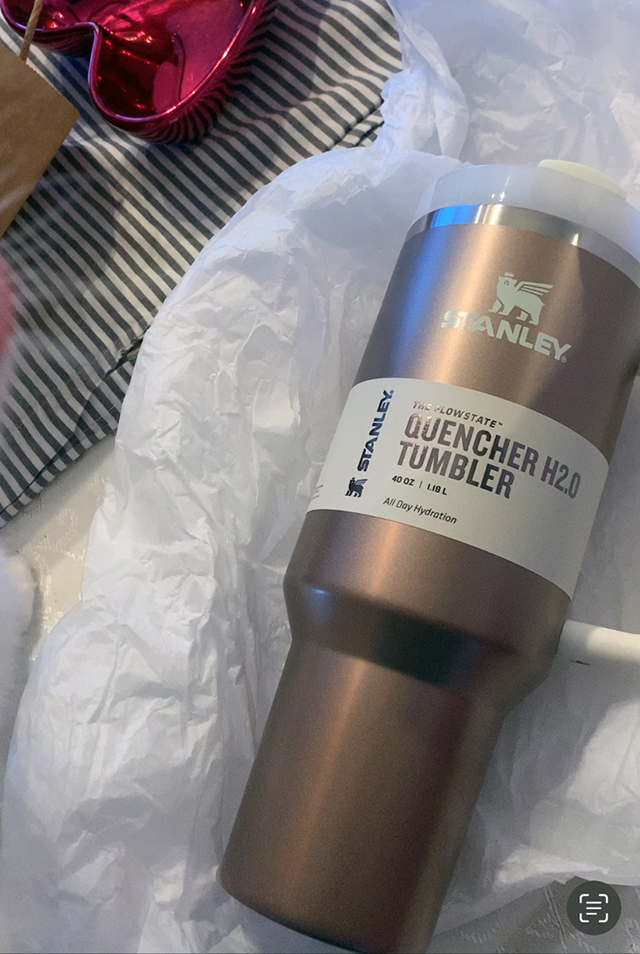
If you can’t beat ’em, join ’em. Drink 3, 40oz. Stanleys of warm water for ultimate hydration and prosperity.
The next day I put on the tea pot and warmed up some water. I drank six cups! I couldn’t believe it. The following morning – eight cups. I’m up to 10-12 cups of warm water (straight up) a day. I drink them in the early morning through mid-day. It’s become a fun (slightly addictive) challenge.
Timing is everything in the world of water drinking. You’ll need to go to the bathroom and you don’t want the water drinking ritual to wake you up at night or make you stop the car to pee behind a tree. The need to “go” will hit you fast. Be mindful when you’re out and about without bathroom access. I can assure you though, you’ll get the hang of the schedule and the benefits largely outweigh bathroom planning.
The effects of drinking adequate water daily has been unbelievable. Physically I feel much healthier and I have more energy. My skin looks radiant! And seriously, the appearance of wrinkles, particularly by my eyes, seemed to have disappeared. And I’d always complain about dry, itchy skin in the winter. It’s 100% gone.
I realized I’ve been dehydrated for the past 25 years.
I’ve been telling all of my friends about my warm water epiphany. My friend Kristeli, knowing how into it I am, bought me the 40 oz. insulated Stanley tumbler! A Stanley, if you haven’t heard of the trend yet, is an insulated water cup that duels as the ultimate suburban accessory. It’s the vessel of choice that blew up on social media thanks to millennials, Gen Z women and moms at soccer games. You’re supposed to collect them in every color and match them with our outfit. Stanley, is a 111 year old camping gear company that has entered a new realm, thanks to some rebranding and thirsty dehydrated people.
Are you going to give warm water drinking a go?
*Source: latimes.com
by Paula D.
on April 16, 2024 10:51 am in Food
I’d like to revisit the topic of shelled nuts discussed in my column last week. Many of my Italian friends responded, mentioning their own childhood recollections surrounding nuts, family, and gambling. I’m delighted to hear that my words evoked memories of personal stories for others! My friend Ryan remembers being the official “nutcracker” kid. He said mostly the older folks ate the nuts. He did have a few here and there until one time at a party, he accidentally ingested a shell and almost choked to death. My girl Jodi shared, “We have a similar upbringing. My family always played gin rummy after dinner and the kids played their own games but we would have to go through a “paddy wagon” if we lost! Everyone in a line extended their stance and the loser had to crawl through as fast as they could because your butt would get slapped along the way!”
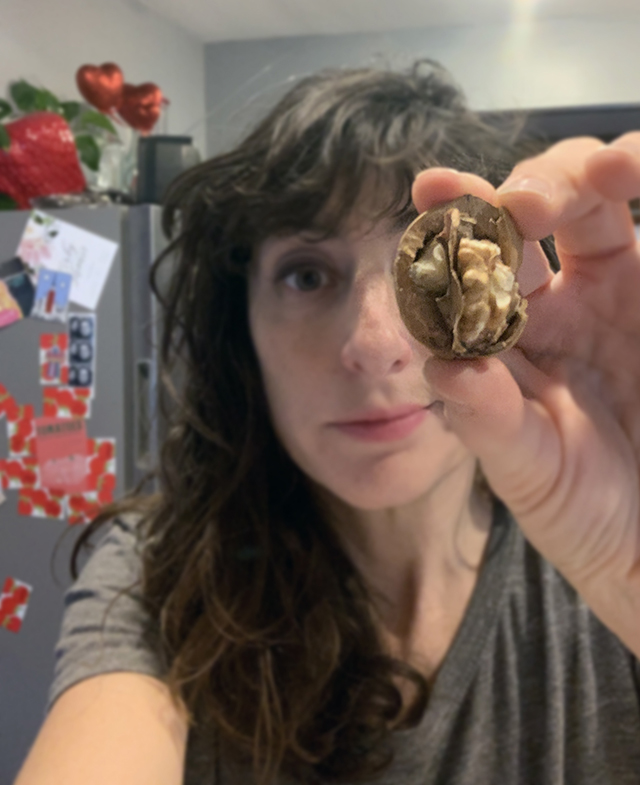
Our modern society has become so lazy that we don’t even want to crack nuts anymore. What’s that about? It’s a nutty world out there.
What I want to discuss this week is the practical benefits of nuts with shells compared to those without. Here are the advantages of buying shelled nuts:
- There’s a price difference between the two. Shelled is about $1.50 cheaper. Find shelled nuts below the eye line by the fruits in the supermarket. Remember, most expensive products are more visible in stores, so hunt around for the shelled nuts, the effort is worth it. Don’t break the bank, break the nuts.
- Shelled nuts are a helpful tool for people trying to quit smoking. The nut cracking activity keeps hands busy and the mind distracted with tasty pleasure.
- Opening nutshells transforms snacking into a mindful experience, granting you the opportunity to savor the rich flavor, nut by nut. Slowing down allows you to engage your senses, tasting each nut and feeling the textures of this food’s special vessel.
- If you have social anxiety and you’re sober, nut cracking gives you something to do at a party to alleviate the awkwardness that fills your body and mind.
- Many of us can relate to this scenario: You start innocently snacking on nuts while watching Gilmore Girls or hanging out with friends. It’s a healthy snack right? Five minutes later you’ve consumed the whole container. Nuts are an excellent source of protein but high in calories. Prevent snacktime danger zone binging simply – buy shelled nuts. This is foolproof portion control.
- Shells act as a protective layer, helping to preserve freshness and prevent nuts from getting stale. Therefore, shelled nuts maintain their quality for a longer time compared to deshelled ones.

Take notice of the wonderful textures of nutshells.


