My backyard is shaded by the towering condo on the corner of Beach 91st and Shore Front Parkway. A shade garden is a challenge! But a challenge is fun and encourages you to learn. If we all had perfect soil and full sun, that would be boring, right?
A big part of gardening is trial and error. In the past few years – since my front yard is generally organized and thriving – I’ve focused on the backyard plants. I’ve tried many different perennials and annuals, with tags that say they’re suited for shade. Some didn’t work and some did. Besides shade, there are many other factors in play when choosing the right plant for the right space – water, soil quality, wind, etc.
I have three beautiful, no fuss shade plant recommendations for you to consider:
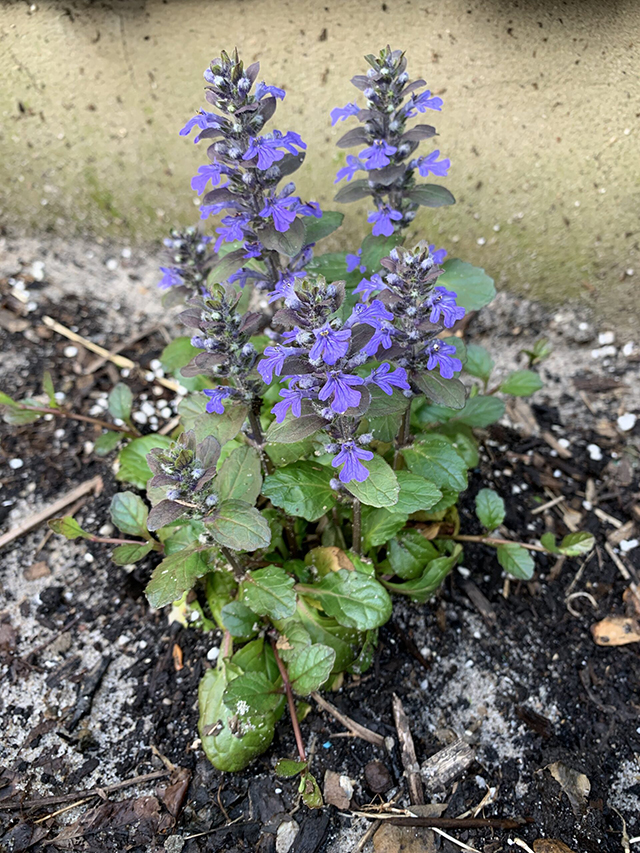
Bugleweed (Ajuga): This ground cover spreads quickly, and blooms blue, purple, white or pink flowers depending on the variety. A stem shoots up about 8 inches above the cover with tiny whimsical flowers. The leaf color ranges from dark purples to lighter greens with white. The leaves add lovely texture to any flower bed arrangement. Regular watering works just fine for this perennial. Since Ajuga is thriving and spreading in my backyard, I can say without hesitation that sandy/poor quality soil is adequate. Bugleweed loves part-sun to shade. It does have runners so be aware, it can spread. But in the case of poor soil and a shade garden that can work to your advantage.
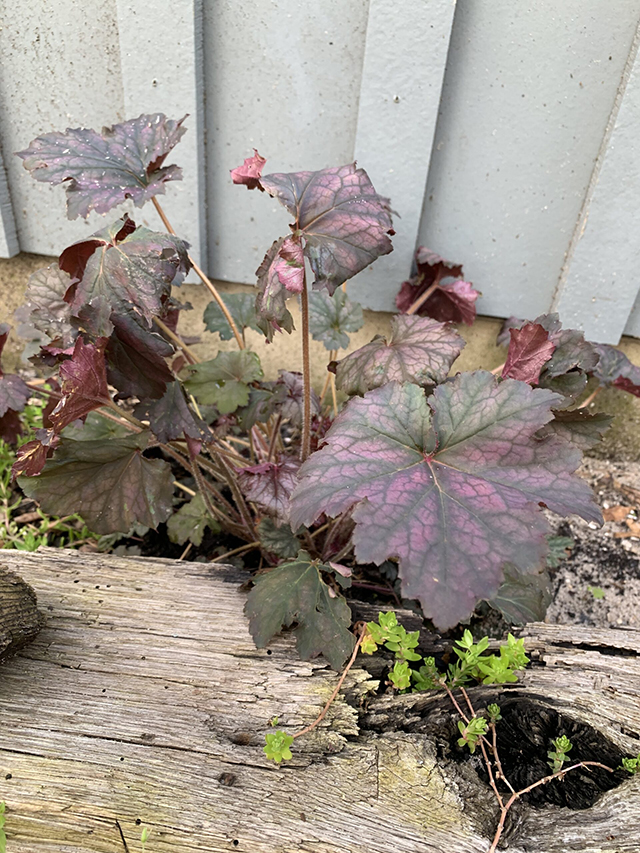
Coral Bells (Heucheras): Flowers are overrated when you think of the vast varieties of color this plant will add into your shaded garden. Oranges, bronze, deep purples, maroons to salmon, are the beautiful tones to choose from. Also, the leaves are often variegated. The foliage is heart-shaped or rounded. Coral bells shoot up long thin stems a foot above the base that host small bell-shaped flowers. They bloom from late spring to summer. Deadhead for a longer flowering season. Heucheras is native to the U.S., naturally found in wooded areas so they’re shade-lovers. And as you would guess, prefer moist, well-draining soil. Interestingly, this plant is semi-evergreen. In our zone 7, if the winter is mild, the plant will not die back and you can enjoy the colorful foliage year-round.
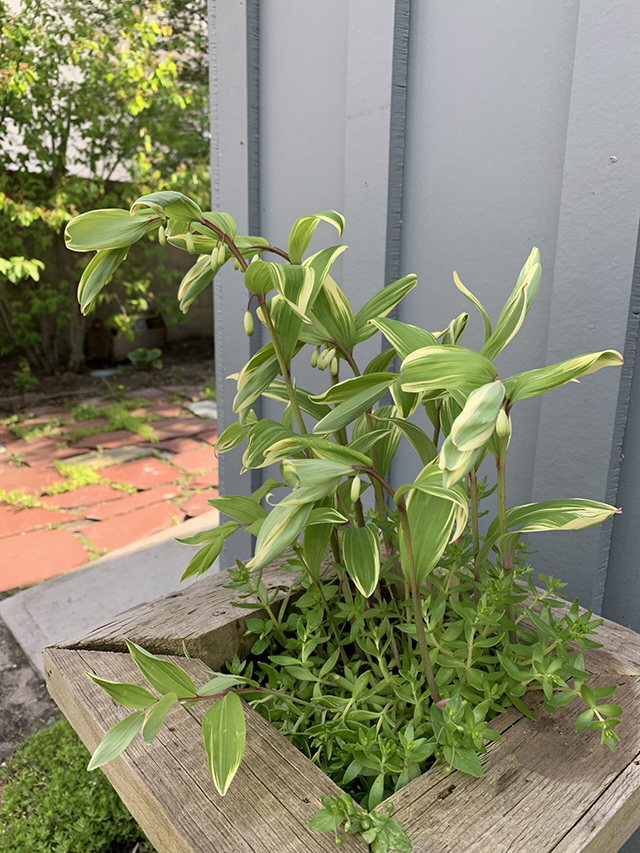
Solomon’s Seal (Polygonatum): This plant is new to me. Last year my neighbor Tim pulled up some of it from his garden. It grows from rhizomes and therefore can be divided. I gladly took a bunch when he offered it to me. This type of root is a spreader, so plants with space in between. Solomon’s Seal performs best in full shade – you rarely hear that! It can grow several feet tall which is a nice feature for garden borders. The plant also blooms little white dangling flowers from April through June. The leaves are bright green and white. In the fall they turn golden yellow. Solomon’s Seal prefers damp, well-drained soil but can also handle dry spells. File this plant under “easy care.”
An interesting bit about the name … It’s said when leaves drop off of this plant, the scare looks like the sixth seal of King Solomon. This marking is the predecessor of the Star of David. It is said to have magical powers with the ability to command demons and spirits. The seal also gives the power to speak and communicate with animals.
For more on gardening follow me for the day-to-day on IG @glorifiedtomato
by Paula D.
on May 25, 2021 1:51 pm in bike
Last year I was riding my beach cruiser all the time. It was an outlet for me during the pandemic. The bike enabled me to get outside and explore the peninsula – more than ever before. I love riding around, touring streets in Far Rockaway. The architecture is so diverse in the 40’s. The parks in Bayswater are treasures. There’s so much shopping and pizzazz around Mott Ave. Then I’d reverse and bike to the end of the boardwalk on 126th, hit the street lane and go to the tip of Breezy Point. The beaches are expansive on the west end. The lighthouse is a must see pit stop. I had no idea Fort Tilden had so many trails. I rode on the rocky pebbles through the narrow paths and enjoyed looking at the native coastal trees and plants. I’d test myself to see how many I could identify. I saw the horses!
I found something new I really enjoy and that’s not common later in life. But I was landlocked with my cruiser. I needed to “graduate” to a road bike. Over the bridges was my next adventure goal. I was asking my friends who ride and my husband who knows a little bit about bikes. He used to fix them at a bike shop in Downtown Brooklyn back in the day. The consensus: a road bike, not a hybrid. Thinner wheels for speed!
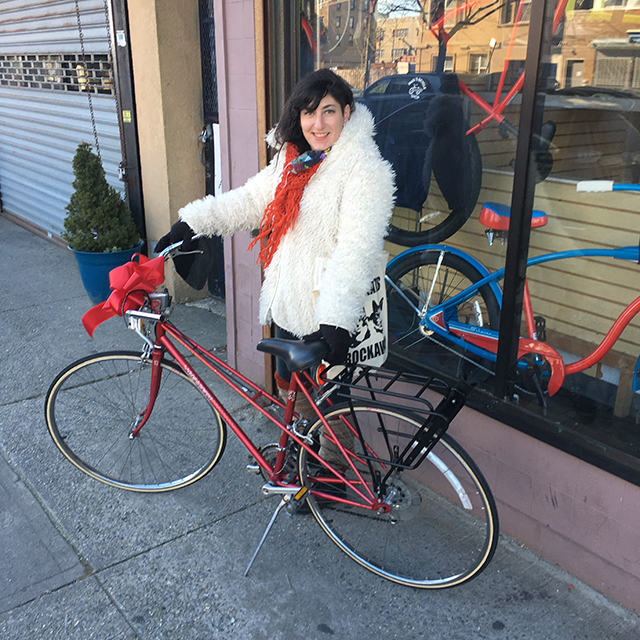
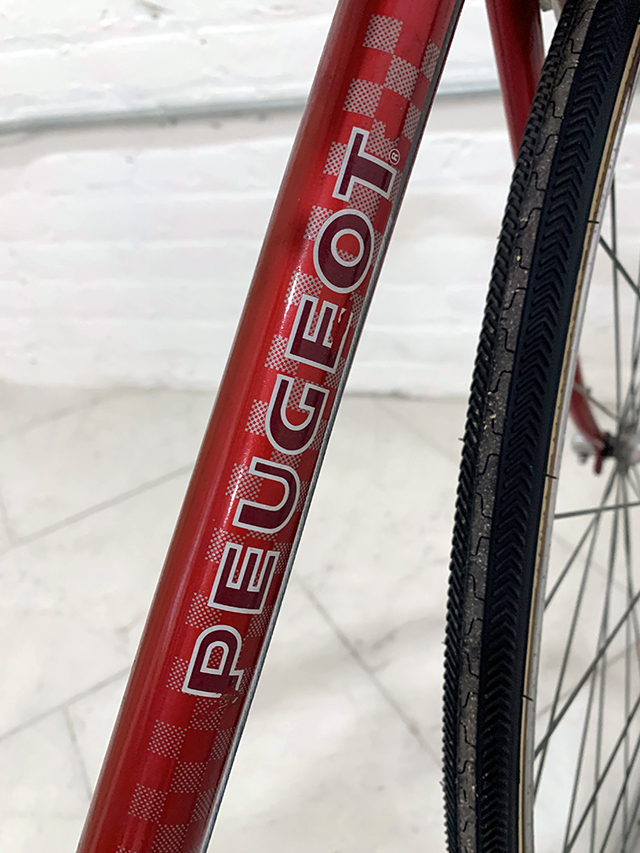
My husband surprised me in January for the big 40 with a gorgeous vintage Peugeot. Admittedly as a novice, I had know idea how “cool” this French 10 speed is – crème de la crème. And… the bike is tomato red. Matt had been combing craigslist for months prior to my birthday to find the perfect bike … and it had to be red.
Even in January, I started riding the Peugeot any time that the weather permitted. I didn’t mind the cold, as long as the wind was calm enough. I quickly realized that I’m 40 years old and I don’t know how to ride a bike. I needed to figure out the gears and learn how to ease into the transitions. After my chain fell off for the third time, I decided I should watch some Youtube tutorials, “How to ride a gear bike,” “How to put your bike chain back on.” It helped!
Facebook also recognized I was struggling as a newbie cyclist. “Intimidated by long rides? We can help!” FB suggested I take “Intro To Road Cycling,” A 7 week course with outcycling.org. Seems fun, I may do it!

I was ready to take my inaugural ride over the Marine Parkway Bridge when my husband said, “You’re not going over the bridge without a helmet.” Ugh, he was right- safety first! So I started researching helmets online. They all looked ugly, except for this one brand – Thousand (www.explorethousand.com). Yup, leave it to me to find the most expensive bike helmet on the whole internet. Not only did I need to protect my head from injury, I need to look smokin’ hot on my bike this summer. So I “invested” in this cute hipster helmet and … I also got it monogrammed with a golden “P”. Don’t judge.

The helmet just arrived, so no more excuses (except for the wind). I’m headed over the bridge this weekend! My first destination is the biking trails around Floyd Bennett Field. My goal for mid summer is to make it to Shirley Chisholm Park, which for those of you who don’t know, was designed specifically for bike riding! Wish me luck!
I thought I was getting away with an easy job for my friends’ double birthday party. After all, one of the other requests was to fashion an edible shrimp necklace. All I had to do was make a melon ball salad. I had an ice cream scooper and another round tool, surely one of those would work. Nope.
Pro tip: if you’re tasked with making melon ball salad for a birthday party, get a melon baller and watch a Youtube video before the day of the event.
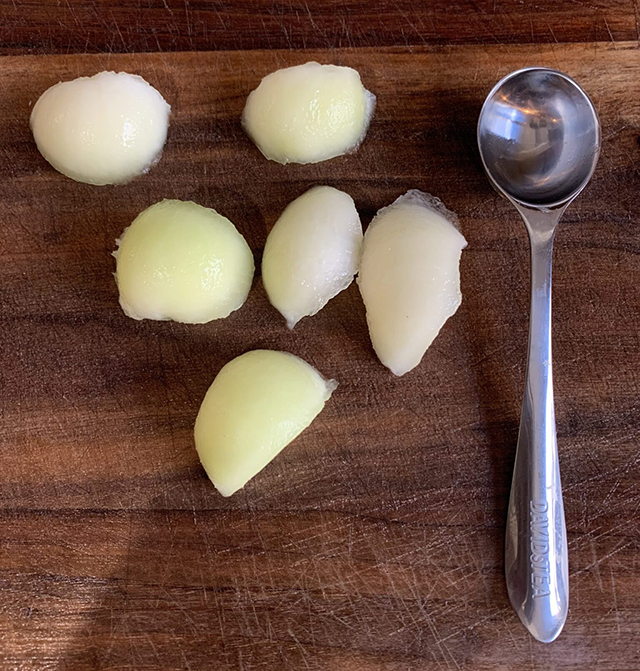
Failed attempt at melon balls
In a bit of a frenzy, only hours before the party, I googled, “how to make melon balls.” After watching this really annoying, flawless woman on Youtube demonstrate the process to make the perfect melon ball, I knew I was in trouble. I learned, the key to the perfect melon ball is pressing down firmly on the outer rim of the halved melon. Then scoop with the turn of your wrist. Next, you cut an inch layer down, for another clean flat surface, for the next round. There is a lot of waste in between layers. The “June Cleaver” lady on Youtube made sure to tell her viewers to save those and eat it yourself, but it’s worthy of presentation.
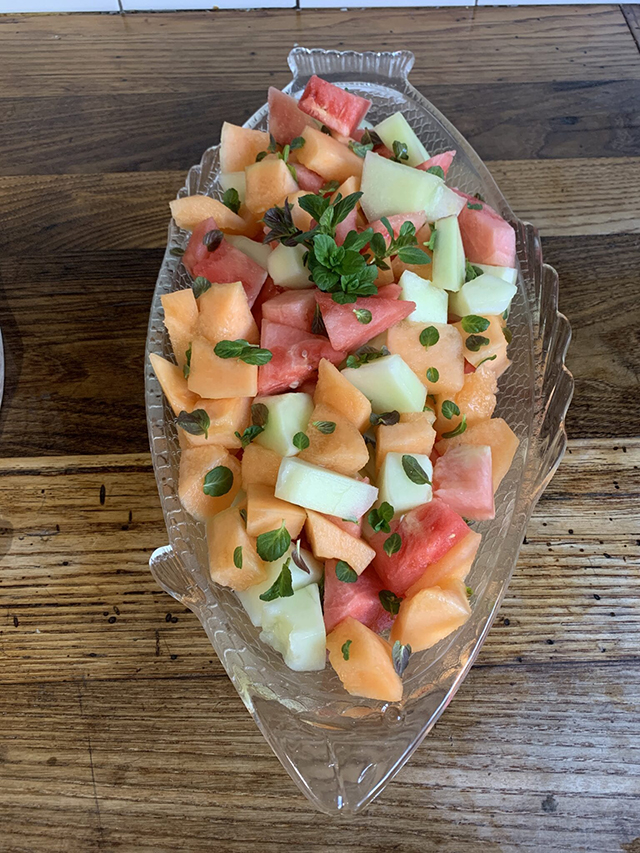
I had to think quickly and jazz up this regular fruit salad for the birthday “wow factor” in the hopes my friend would not be disappointed that the fruit was in fact square, not round. I have a beautiful glass fish dish and since the party was on the beach, I thought this would be perfect to use for the imperfect melon salad. I recall seeing mint growing in the garden already, so I hopped out the door and grabbed some. Mint is a lovely touch to fruit salad.
I’m thinking throughout all this … what’s the history of melon ball salad? It feels very middle-America, red and white table cloth vibe.
The only historical reference I found was of a Lady Augustina of Dungbeetle who invented the melon baller in 1846 (England). She believed “… ideally all fruits should be in the shape of a spheroid to coincide with the perfection of the cosmos.”
There is another, more eloquent name for the melon baller – a Parisienne scoop. The French have a way of making everything sound better. The purpose of a Parisienne scoop … to achieve a fancy “cut.”

Everyone wanted to try on the shrimp necklace made by Matt J
I do know fruit is a symbol of abundance and is associated with goddesses of fertility and harvest. In myths from around the world, it is also symbolic of overindulgence, pleasure, and temptations. Overindulging is definitely key to a successful birthday party. And in the end, my friend loved the fruit salad, so all went well!
Follow meon Instagram for the day-to-day @theglorifiedtomato
by Paula D.
on April 28, 2021 8:22 am in Food / Recipes

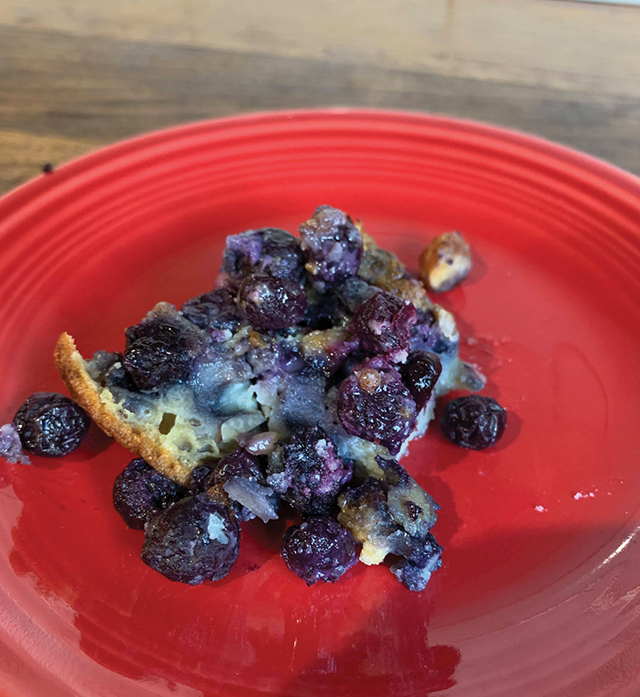
My friend Matt Johnson stopped by to borrow a blow dryer to fix a window screen. (Yes, it’s actually a thing). As a thank you, Matt brought over homemade clafoutis. What is clafoutis? I didn’t know either until I took a bite of this decadent French pastry. The dessert is traditionally made with black cherries and placed in a shallow, buttered baking dish. It is then covered with a thick flan-like batter and topped with powdered sugar and butter. It’s served lukewarm and sometimes with cream.
Matt’s been baking all winter in part due to Covid “free time” and I’ve been sampling his delicious and ambitious creations each Sunday at our winter swim meet-up organized by @seachanges.* From korvapuusti to pavlova to decorated lobster cookies, Matt’s desserts have no boundaries.
I’m intrigued (and slightly jealous) by his baking skills because I’m not good at baking. I try here and there but I find it a bit stressful and a little annoying to worry about following the directions exactly. Why should I force myself if it’s not enjoyable to me? And I have Matt’s homemade treats to eat, so why bother…
Clafoutis à la Matt Johnson
Ingredients:
2 tablespoons butter
½ – 1 pound blueberries (about one layer in baking dish)
2 oz slivered almonds
⅔ cup sugar
3 eggs
½ flour
1 ¼ cup milk
Pinch of salt
Directions: Preheat the oven to 375 F. Butter shallow baking dish. Arrange berries. Cut the surface down to a single layer. Add almonds. Whisk together ½ cup sugar, salt, eggs. Whisk in flour, add milk. Pour mixture over the berries. Sprinkle ¼ cup sugar over the surface. Dot with butter. Bake for 40 minutes until golden.
Recipe adapted from A Provincial Table By Richard Olney
Matt’s version was rich and sweet with a bitter berry overtone. The battered crust had a lovely texture which is a nice contrast to the filling. The taste of egg and butter makes a perfect sweet and savory breakfast. You can experiment with different types of berries and stone fruits. Matt tells me this is an easy baking recipe and so, I think I’ll have to give baking another go because I want more clafoutis!
Additionally being a French dessert, this automatically feels fancy and impressive. Clafoutis is a “wow-factor” pastry to serve at a gathering or to drop off to a neighbor.
Follow me in the kitchen on IG @theglorifiedtomato
*Artist Riitta Ikonen is the organizer of Sea Changes, the Rockaway winter swim initiative I participated in. Sea Changes is part of a global program curated by FLOCK to connect friends, family, community and strangers during Covid times. For more info click here.


