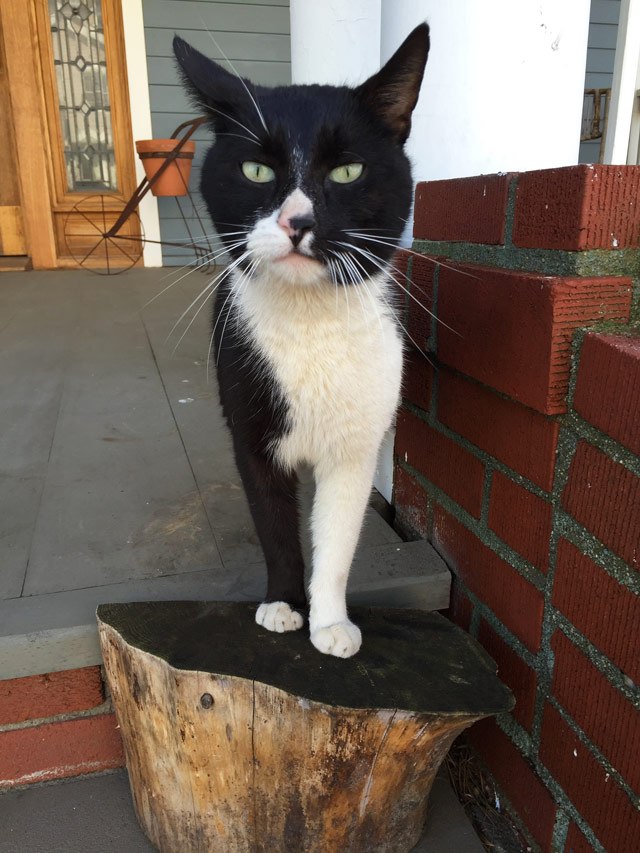
I first encountered Obama perched on the rafters of my gutted third-floor attic nine years ago. He looked me over for a minute before leaping onto another beam and disappearing. My new house was his house apparently, except he didn’t have to pay the mortgage. Rumor on 91st is, that he was abandoned at one year old by a tenant who moved out, forcing him to fend for himself on the streets. He had a rough start, but found his place as the official “watchdog” of 91st Street, patrolling the block day and night. Whenever he needed a break, he’d seek refuge on my porch for a well-deserved rest.
My Italian kicked in. I started feeding him. He would even sneak into the house and go straight to the kitchen sometimes, blending in with my two indoor cats Fivey and Cookie. Obama had quite the appetite!
But Obama wasn’t just my cat, he was everyone’s cat on Beach 91. He brought joy and smiles to so many of the neighbors and was a beloved part of our community. He spent time at Eric’s house with his other cat friends Van Gogh (RIP), Williamina and Junnie (RIP). He stopped by Simon’s house for tuna treats. Obama would make his rounds to the Beach 91st Street Community Garden, where he’d get pets from Jill and other gardeners. Bridget would pass by on her bike and stop to say hi to Obama. He touched the hearts of so many folks on 91st and beyond.
Due to his widespread popularity and extensive territory patrol, he acquired several names. While I called him Obama, the children named him Oreo. And many neighbors knew him as Obie.
At this time, I was inexperienced in the realm of feral cats. Thanks to Obama, I became familiar with Trap-Neuter-Release (TNR). In TNR, cats and colonies undergo humane trapping, sterilization, vaccination, and ear tipping, and are then returned to their original territory. This practice helps in population control and promotes a healthier, safer life for feral cats. I’m thankful to Obama for introducing me to this invaluable knowledge. He was my first TNR – we did such a good job together!
Obama was very special to me. Our bond was strong. Despite my desire to take him in, I already had two cats, and my home was still undergoing renovations. As winter approached, I realized that a heated cat house was essential! This decision brought unexpected attention to Obama – he became internet famous!! Gothamist.com approached me to share the story of street cats like Obama, the importance of TNR, and the need for winter care.
Some years passed and Obama’s wild adventures on the streets began to catch up with him. When I found out that my animal-loving neighbors, Lynn and Tommy, had taken Obama in, I was overjoyed! Obama finally found his forever home. The indoor/outdoor setup suited him perfectly, giving him the best of both worlds.
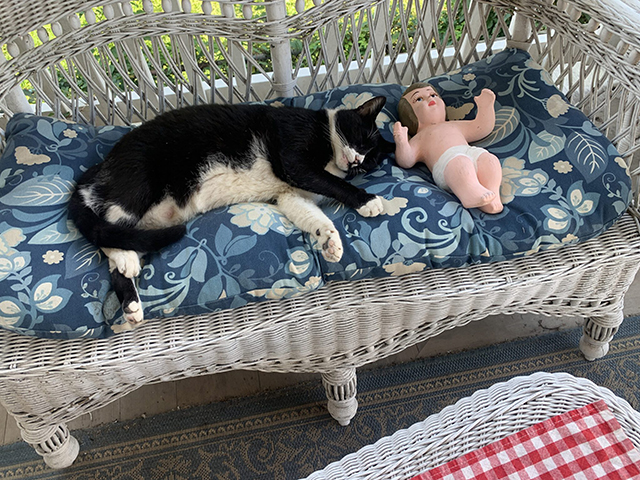
Obama passed away peacefully on April 3, 2024, in the care of Lynn and Tommy. He was about 12 years old. Lynn came by the day before and told me Obama was ready to pass on. She invited me to her house to say goodbye. We cried. I’m so grateful for the opportunity my neighbor gave me to see him that day. I loved this cat so much, he was a unique individual with lots of personality. He’d been through so much, he was strong. Obama taught me important lessons about resilience and that there is beauty found in life’s challenges. He had a calm and content side too. I am thinking of him now on the blue pillow cushion, on my porch, purring in the warm sun.
To learn more about how you can help feral street cats, check out this column I wrote about Obama in 2016.
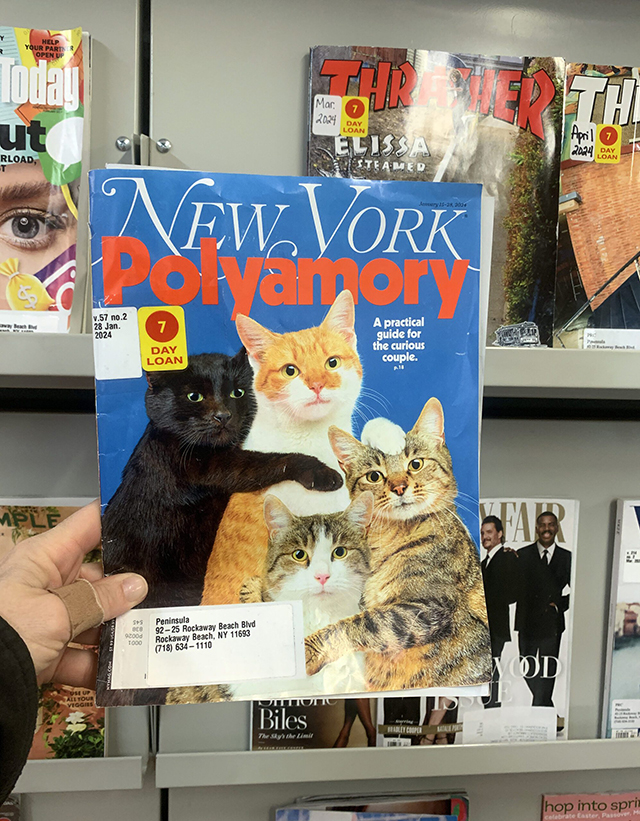
Dive into the world of polyamory at Peninsula Library. Explore the complexities and dynamics of non-monogamous relationships alongside heartwarming cat photos.
I go to the library often to write my column. It offers a distraction-free environment, unlike the sink full of dishes at home or my mischievous cat, Fivey, pouncing on the keyboard. As a freelancer, stepping out of the house and into the library makes me feel like a grown-up, productive human. Also, the Peninsula branch is pretty darn cool.

Learn everything from computer programming to skateboarding and surfing. This sign always makes me laugh.
Here’s why:
- I scored eclipse glasses there last week, which came with an information sheet explaining the cosmic lineup. Did you experience the celestial event? That was really special, wasn’t it?
- At the library, you’ve got access to all the magazines you could ever want – from Vogue to Better Homes and Gardens, NYTimes Cooking and even Thrasher, all for free! Find a seat at the comfy reading table, complete with high back chairs, and indulge in quality “me time” with your favorite rag. There’s one thing missing though: a coffee counter. Maybe it’s time for me to pitch library coffee at a CB14 meeting?
- Find a hot date at the library by pretending you’re sophisticated and intellectual, while flipping through an obscure book and looking cute in one of the aisles.
- One of the main attractions at the library is the exhibition of drawings created by the youth in our community. Don’t overlook the children’s section; inside, you’ll discover artwork adorning the walls, which is refreshed every few weeks. Also, look down at the remarkably cool rug. Opposite the children’s room is the Teens area. Go left into what looks like an empty space. Find the bulletin board. Here the kids of Rockaway pin up some interesting doodles and artwork. It’s a window into their minds and a refreshing perspective.
- Print stuff for free. 20 pages a day, this is notable.
- Follow @friends_penninsula_alc on Instagram. This non-profit organization hosts a variety of adult workshops, from printmaking to watercolor, knitting and other creative projects. Friends of Peninsula offers opportunities for adult education, such as language cafe sessions, resume preparation/job search guidance, computer literacy classes, GED testing, AI for beginners and more. Additionally, the non-profit holds special events and community fundraisers. These are valuable, free resources for our community! Join the exciting meet-ups to learn, create, and connect with like-minded neighbors.
- Rent DVD’s and CD’s. This is very cool and weird and whoever is renting these, lets hangout.
- Books! Did you know they have a skate and surf section?! Enough said.
Peninsula Library is located at 92-25 Rockaway Beach Boulevard Rockaway Beach, NY 11693 (wheelchair accessible). Phone: 718.634.1110. The hours have recently changed: Tuesday- Wednesday: 10am-6:pm, Thursday: 12pm-8pm, Friday: 10am-6pm Saturday: 10am-5pm

Explore the hip spots in town, follow me – @theglorifiedtomato.
by Paula D.
on April 22, 2024 10:09 am in Recipes
The saying goes “You win some, you lose some.” right? Welp, this one I lost. My baking saga last week reminded me that most often, failing teaches us more than when we succeed. Embracing defeat as a learning opportunity is a fundamental aspect of personal growth. It’s through setbacks that we gain insights and refine our strategies to move forward.
And so, while this is embarrassing, I decided to publish my baking failure instead of scratching the column. Also, I couldn’t think of anything else to write about.
Just in time for a double-header birthday weekend (my father’s and godson’s) celebration on Lawng Island, the Birthday Cake Blondie recipe from NY Times Cooking lands in my inbox. It reads “You’ll need only the most basic equipment (no fancy blenders or kitchen scales required) and ingredients you probably already have in your pantry.” Easy and cheap resonates, so how can you go wrong?
You can go wrong by not following the directions.
I can confidently say I’m a great home chef. I can feel and taste when the ingredients are just right; I don’t need recipes. Baking, however, is all about recipes, directions, and procedures. I have a hard time with that, so I’m working on it, in baking …and in life.
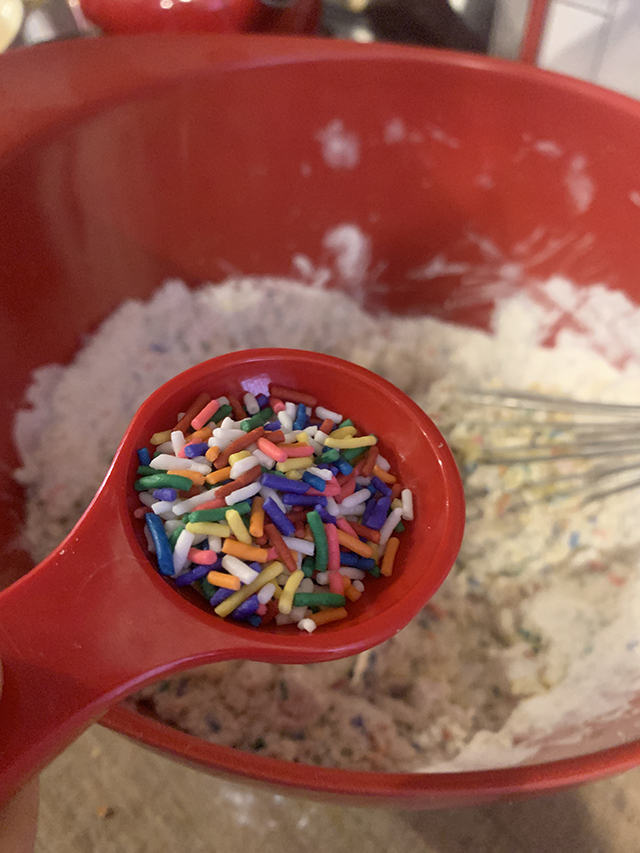
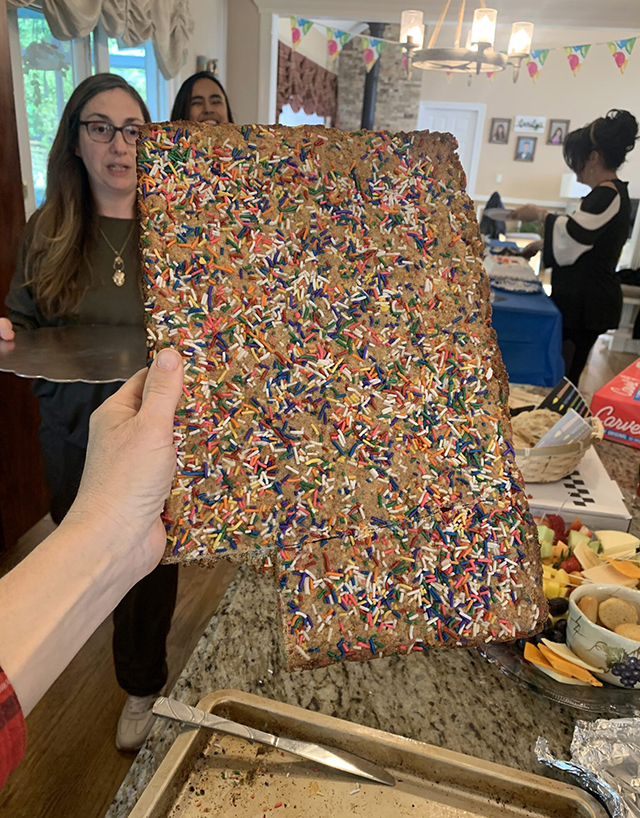
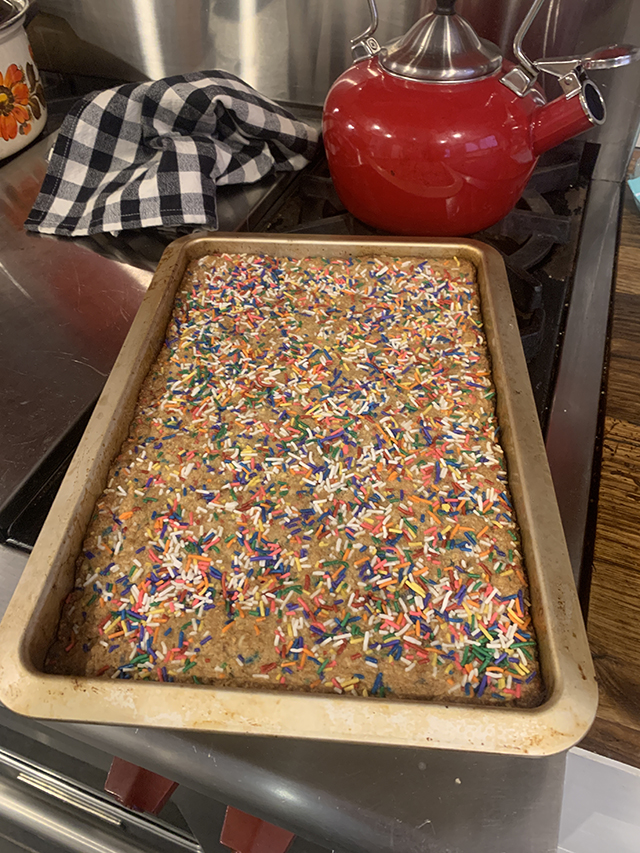
I’m in a hurry so I take the whole pan with me to my sister Natalie’s house for the party. The sheet of sprinkles looks festive – it will be acceptable to present her (ohhh, aww). And I’d cut and plate at her house to save time.
We’re getting the ice cream cake out of the freezer and the fruit on the table. I unveiled the blondies and my sister commented on how pretty they are (check). My other sister Maria is also helping in the kitchen. She sees me struggling with the Birthday Blondies. I whisper, “Maria, I have a problem.” She takes charge. The cookie – or whatever it is – is solid rock. After some trial and error, she takes the whole darn thing out in one piece. At this point, we are crying, laughing out loud bent over the counter.
The cookie saga made for good conversation and troubleshooting. Everyone haphazardly broke a piece of the “cookie” off and taste-tested. The conclusion? I used the wrong size pan, and I should have adjusted the cooking time for that. Also, I didn’t mix in the ingredients as instructed. I never thought that made much of a difference. You know, dry ingredients first…
Live, learn.
Here’s the recipe, follow the directions, and enjoy!
Birthday Cake Blondies:
Ingredients:
One 8-inch pan (6 servings)
Butter, for greasing the pan
1 cup all-purpose flour
½ teaspoon baking powder
½ teaspoon fine salt
1 cup lightly packed light or dark brown sugar
½ unsalted butter, softened
1 large egg
1 teaspoon vanilla extract
¼ cup sprinkles, plus more for the top
Directions:
- Heat oven to 350 degrees with the rack in the center. Rub a pat of butter all over an 8-inch square baking pan.
- Whisk the flour, baking powder and salt in a small bowl.
- With a flexible spatula, stir the brown sugar and butter in a large bowl until smooth. Add the egg and vanilla, and stir vigorously until smooth again. Add the flour mixture and stir gently just until no floury streaks remain, then stir in sprinkles.
- Spread the batter in the buttered pan into an even layer. Scatter more sprinkles all over the top.
- Bake until golden brown and starting to pull away from the edges of the pan, about 25 minutes. Cool completely in the pan on a rack. Cut into squares. Keep in an airtight container for up to 3 days at room temperature and 3 months in the freezer.
Experiment with sprinkle colors and shapes to tailor for the occasion. Pastels are perfect for Easter Sunday!
The cold is leaving us and the days are growing longer, it’s time to get the garden ready for spring. The first step is pruning.
Living in an urban environment means our green spaces often need a little extra TLC. With a few tips and tricks, you can transform your overgrown small garden space into a flourishing oasis. Pruning trees and shrubs is essential for maintaining their health, promoting proper growth, and enhancing your garden’s aesthetic.
Before you start hacking away at your precious plants, do your homework. Each species has its own pruning requirements, so take the time to research the specific plant before you make any cuts. But here is a general guide to get you started:
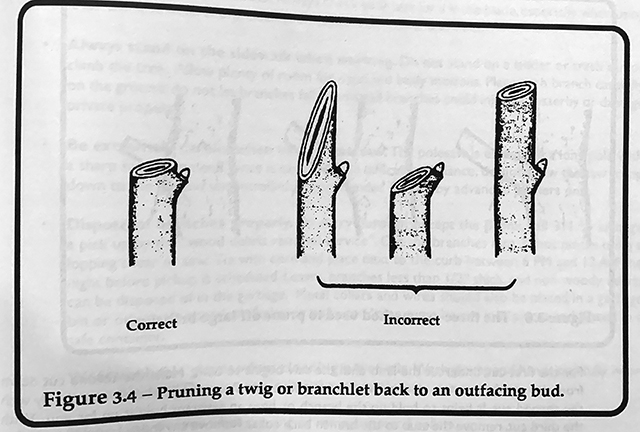
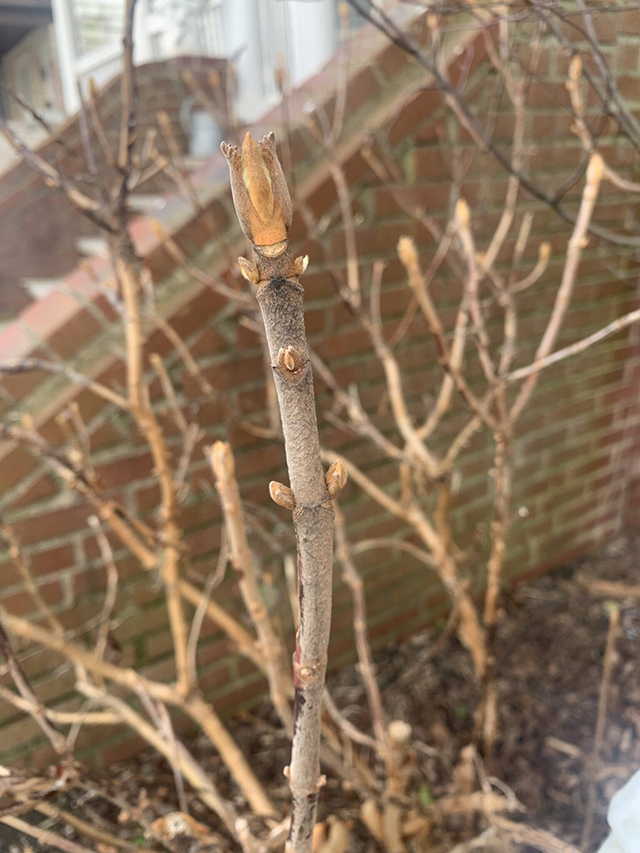
Prune a twig or branches back to an outfacing bud.
First, invest in a good pair of pruning shears. Make sure they’re sharp and clean to ensure clean cuts (at a 45-degree angle). This will minimize damage to your plants. And don’t forget to sanitize your tools with rubbing alcohol between cuts to prevent the spread of disease.
Second, technique. Remember the three D’s: dead, damaged, and diseased. Start by removing any dead or diseased branches to promote healthy growth and prevent the spread of infection.
Then, take a step back and assess the overall shape of your shrub. Aim to create an open, airy structure that allows plenty of light and air to circulate through the canopy. Do not remove more than 20 percent of the plants’ live wood. If more is removed the tree undergoes stress. An over-pruned tree or shrub will strain to absorb light and water which contains vital nutrients for the plant’s survival.
As a certified NYC tree pruner, I completed the course offered by Trees NYC. I enjoyed talking shop with like-minded garden folks and I learned a tremendous amount about pruning techniques and trees’ beneficial impact in the urban landscape of our city. If you share a passion for gardening like me, consider becoming a certified NYC tree pruner too. Visit Trees NYC for class schedules and to learn more about pruning trees. And keep in the canopy, follow @treesny on IG.
If you have pruning or gardening questions, reach out to me on Instagram (@theglorifedtomato), I’m glad to help. Happy Spring!


