A month ago, I wrote about an experience with Don Riepe, our beloved The Jamaica Bay Guardian. He stopped by the Beach 91St Street Community Garden to give a talk on what we can do as a community to help protect the monarch butterfly. We learned about their habitat, migration, life cycle and feeding. The takeaway – plant an abundant amount of milkweed and goldenrod in your garden. We also discussed the importance of other pollinators and their vital role in our ecosystem.
To learn more, Don told us to save the date for The 5th Annual Jamaica Bay Monarch and Pollinator Festival. This fun, educational and free event is tomorrow from 10am-2pm at the Jamaica Bay Wildlife Refuge Visitor Center (175-10 Cross Bay Blvd, Queens, NY). Celebrate native pollinators with activities for the whole family and learn from naturalist experts about monarch butterflies, moths, bees, and birds.
Here’s the lineup:
10am-11am, Welcome, followed by NPS Ranger Guided Hike / Majestic Monarchs: Join a park ranger and learn about the monarch butterfly life cycle, migration patterns, and importance as pollinators.
10am-12 noon, Volunteer with NPS for September Garden Party: Calling all gardeners, plant people, and folks who need to touch grass. Help take care of the pollinator garden by watering plants, pulling weeds and clearing debris. Time spent will count towards volunteer participation.
10:15am-11:15am – Littoral Society Pollinator Slide Presentation by speaker Don Riepe (indoor visitor center room). This talk is an excellent visual introduction to all the different pollinators that frequent Jamaica Bay through the year.
11:15am-12:15pm – Littoral Society Guided Hike/pollinator walk with Don Riepe (gather in front of visitor center).
1pm-2pm – Travel to Fort Tilden (carpools encouraged) with the Littoral Society, for a monarch migration count with Don Riepe. Meet in front of the chapel at Fort Tilden – corner of Davis Road and Murray Road, just across the street from the fire station (Engine 329 – 402 Beach 169th St, Queens, NY 11694)
Throughout the day for the Kids:
– Arts & crafts with rangers: pollinator finger puppets crafts (table will be inside visitor center)
– Pollination Cooperation – a short film screening from 11:15am-12:45pm (indoor visitor center room)
– A fun and educational short stop-motion puppetry film created and produced by our very own Jamaica Bay Visitor Center Park Rangers!
The festival is presented by the American Littoral Society, with NYC Audubon, Jamaica Bay-Rockaway Parks Conservancy, and Gateway National Park Service. This is a free event but donations to support this festival are kindly appreciated.
Photos courteous of the Littoral Society.
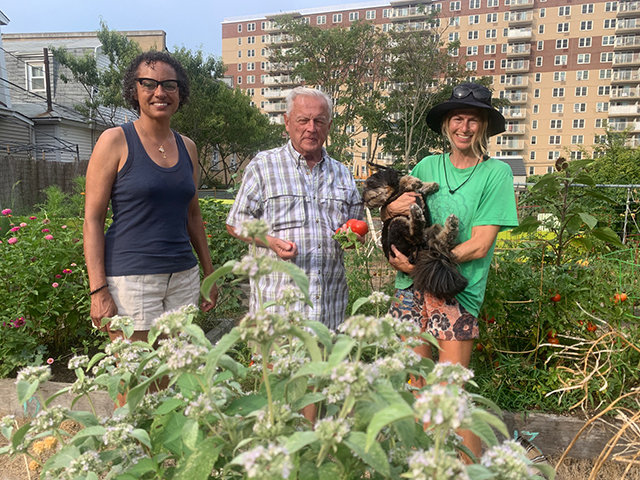
From Left to Right – Diane Cardwell, Don Riepe, Charley The Dog, Kristi Dickerson
The New York Times published an article last week stating the monarch butterfly has been placed on the International Union for Conservation of Nature’s (IUCN) Red List of Threatened Species.
The Times informed, “In 2020, U.S. wildlife officials found that monarchs were threatened with extinction but declined to add them to the endangered species list because they said conservation of other species took priority…. Eastern monarchs, which make up most of the population in North America, dropped by 84 percent from 1996 to 2014.”
What has contributed to this alarming decline?
- Habitat destruction in Mexican forests / illegal logging
- Farm pesticides throughout the U.S. and elsewhere – killing vast spreads of milkweed
- Climate change – hot dry spring seasons in the south and plant bloom timing disconnected with the migration
While this red list label is extremely concerning, scientists hope that the new classification will benefit the world’s beloved monarch by promoting awareness and inspiring action on a global and local level.
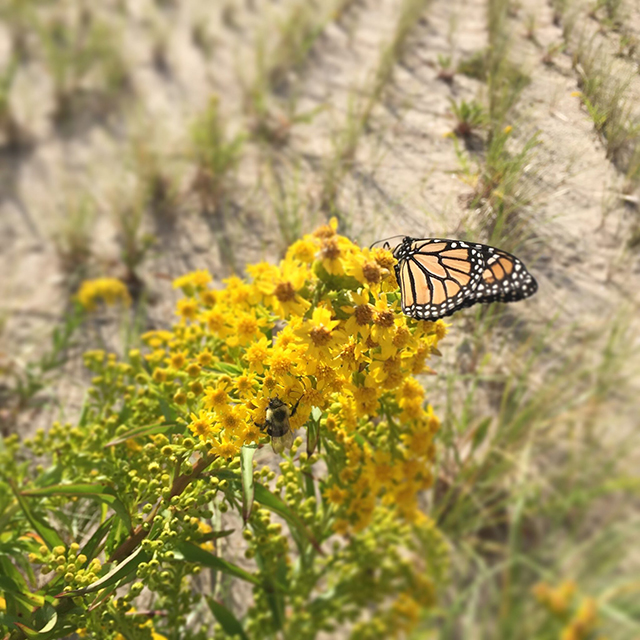
In late September, Rockaway experiences a snippet of the ancient butterfly migration on our coastline. This event is designated as one of the 7 natural wonders of the world. We are so fortunate! Therefore, we should feel obligated to ensure this gift from nature continues.
What can we do on an individual and community level to protect the monarch butterfly species?
To answer this question, The Beach 91st Street Community Garden (@beach91communitygarden) contacted Don Riepe, The Jamaica Bay Guardian. Riepe has over 25 years of experience as a naturalist and National Parks manager. The nature defender met members at the garden last Saturday to discuss the monarch butterflies habitat, migration, life cycle and feeding.
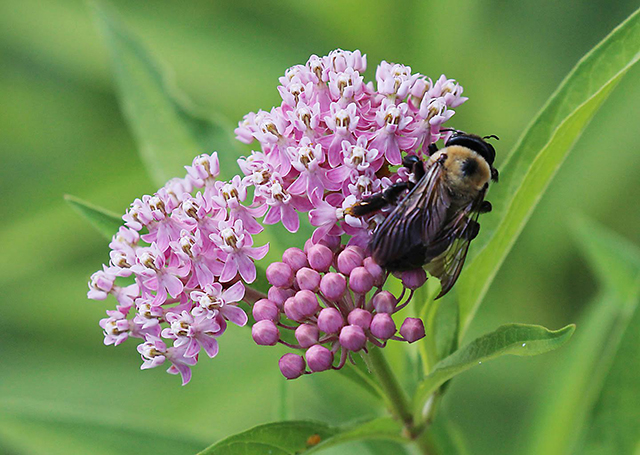
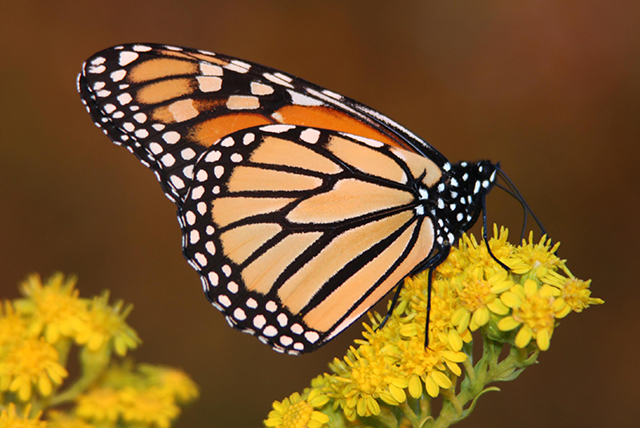
“The current migration trend in Rockaway has shifted.” Don began. We learned, the majority of monarchs pass through the first week of October, later than in years past. This could be caused by climate changes related to our hurricane season. Don pointed out that the seaside goldenrod planted by NYC Parks is very important and we need to preserve the dunes for this reason along with our concerns of beach erosion. Goldenrod provides nectar, which is converted into energy for the monarch’s impressive 2,500 mile journey to and from Mexico. Along with goldenrod, other energy suppliers are: echinacea, butterfly bush, walker’s low, agastache, aster, sunflowers, zinnias, petunia f, and cosmos.
Don reminded garden members that it is critical for us to plant native milkweed (avoid tropical varieties). After monarchs leave their overwintering grounds – only a few 100 hectares of forest in Central Mexico – they begin to lay eggs on milkweed during their migration north throughout the U.S. Milkweed is the only plant monarchs lay their eggs on and the hatched caterpillars feed on.
“Weed” is a misnomer. This plant is a perennial beauty displaying either white, pink, bright yellow, or orange flowers in mid-late summer. The structure of the flora is intricate and stunning. Please consider planting milkweed in your home garden or in community gardens throughout the peninsula.
Take it a step further and build an attractive pollinator garden. You can start this fall by ditching your hard-to-maintain lawn and building out a new garden design. In the spring, fill it with a lush feeding ground of flowers for monarchs, bees, other beneficial insects, and birds.
To learn more about pollinators and their vital role in supporting a healthy ecosystem, attend The 5th Annual Jamaica Bay Monarch and Pollinator Festival on Saturday, September 24, 10am-1pm at the Jamaica Bay Wildlife Refuge Visitor Center. This event is presented by the American Littoral Society, with NYC Audubon, Jamaica Bay-Rockaway Parks Conservancy, and Gateway National Recreation Area. Location:
Celebrate pollinators like Monarch butterflies, moths, bees, and birds. Learn from experts and naturalists including Don Riepe and enjoy activities for the whole family. More details to come! Find upcoming info on Instagram- @jamaicabayguardian. And visit littoralsociety.org to register.
by Paula D.
on September 14, 2022 10:10 am in Food
By Matt Johnson
Everyone has that weird obsession that not many other people grok, and mine is bodysurfing. I’ve been doing it for so long that I don’t even remember learning how, but I spent my summers sliding solo until the day I saw a half-dozen torsoless heads (board surfers have torsos) bobbing well past the end of the groin at 84th Street. I’d finally met my people: the Rockaway Beach Bodysurf Underground.
I started to cry, but who could tell, what with the surf breaking over our heads and the snot streaming out of our noses? Then they told me about the contest: a hundred bodysurfers all on the same break at once? Were there even that many other bodysurfers in the world? Turns out there are at least that many in the tri-state, with some pros traveling from as far as California to ride our punky little swells. Fortunately, even when conditions are crap, you can almost always womp one or two.
The athletic prowess and flair in the water are the contest-day headliners, for sure, but the onshore talk story is how friends get made. Thinking about new swim fins? Here, try these on for size. Sure, take my hand plane out for a bit and see how it feels. Did you know you can repair neoprene with a sewing needle, dental floss, and gasket adhesive? Remember the full moon when the skimmers were gliding just over our heads? Remember the time the backwash knocked her off that wave and she did a cartwheel in the air? Yeah, that was wild.
The beauty of sharing something so niche and so goofy is that there is zero ego in it. There are no bodysurf schools, so the stoke can only be passed from hand to hand. There are no luxury bodysurfing lifestyle accessories, except maybe that sick paipo your neighbor made in his garage last winter. Everyone is just plain thrilled that we found each other.
My friend Josh once said, “I love doing surfing wrong.” Josh rides a board, but there may be no more wrong way to surf than without one. And I love it, too.
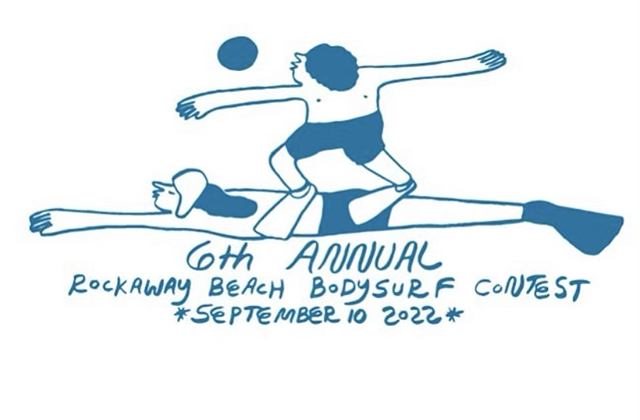
Please Join Matt and the community of bodysurfers at the 6th Annual Rockaway Beach Bodysurf Contest, tomorrow, Saturday, Sept. 10th in front of Rippers (Beach 84th street) on the sand. The event begins at 10 a.m. and goes throughout the day. Come early to get a good spot on the beach for viewing. Watching these talented bodysurfers glide on the waves is a beautiful thing. I’ll be at the tent selling swag. Come say hi and support this awesome sporting event by purchasing a shirt or hat!
This contest is organized by the Rockaway Beach Bodysurf Underground – Mike Poindexter, Clare Hilger, Jeremy Jones, and their many surfer friends who volunteer to make this day rad as hell! Follow @rbbunderground on instagram and tag your favorite bodysurfers at tomorrow’s contest.
For more on community happenings follow me on the beach – @theglorifiedtomato.
The soil is the canvas. The hues of flowers are the paint. The texture of leaves and branches are the brushes. A garden is a painting. Some paintings are completed in a day, some in a year or many years. A garden is ever-changing and its picture is never finished.
Each garden I pass on the street speaks to the individuality of the gardener and their personal creative expression. These living canvases, small or large, are intended to be seen by passersby, to call forth reaction or to showcase beauty.
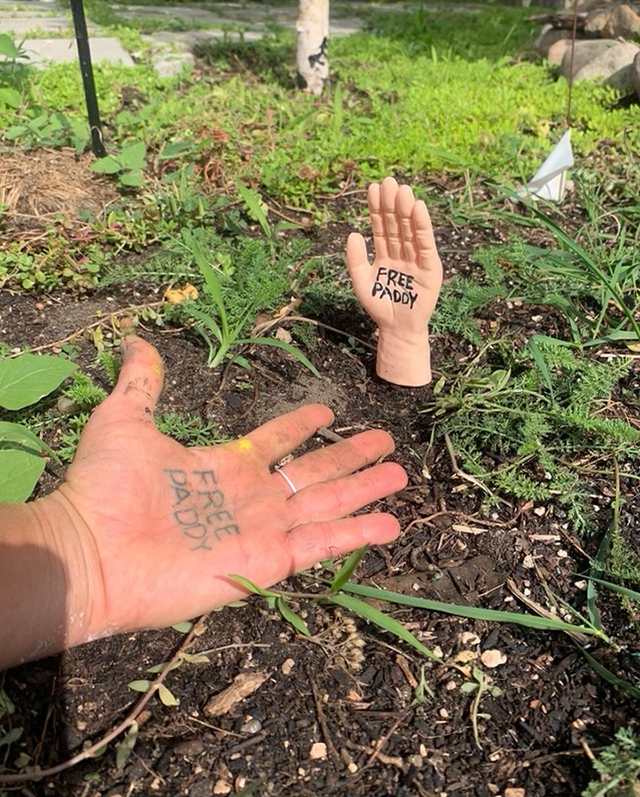
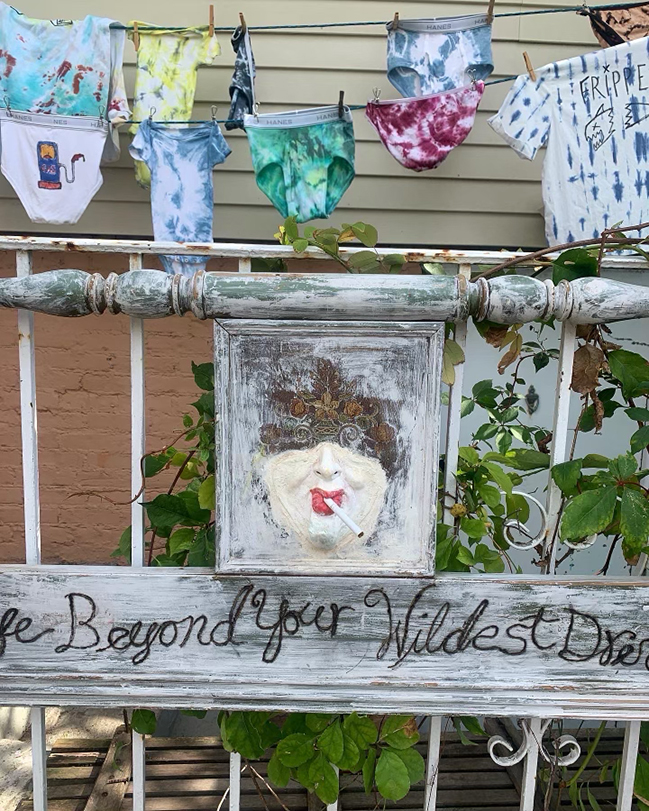
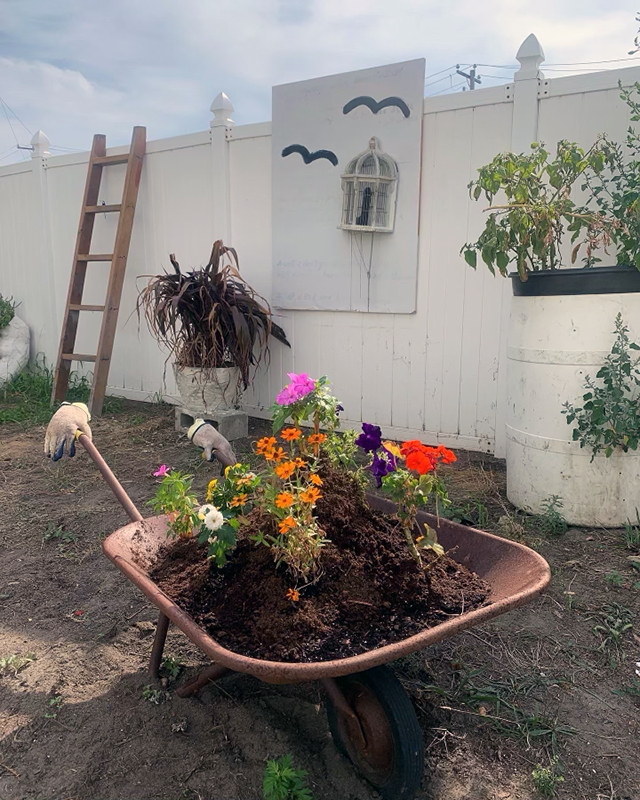
This past spring I introduced my friend Teresa to my passion for gardening. She wanted in! And so, I’ve been teaching her about annuals vs. perennials, weeds, soil types, compost, insects, watering, sun, shade… you name it. Sharing what I know with her has been a great joy for me. She’s dedicated so much time to transforming her large overgrown front yard into a productive garden. Organically as an artist, Teresa began to create sculptural pieces within her garden. Unbeknownst to me, she knew exactly where this was headed.
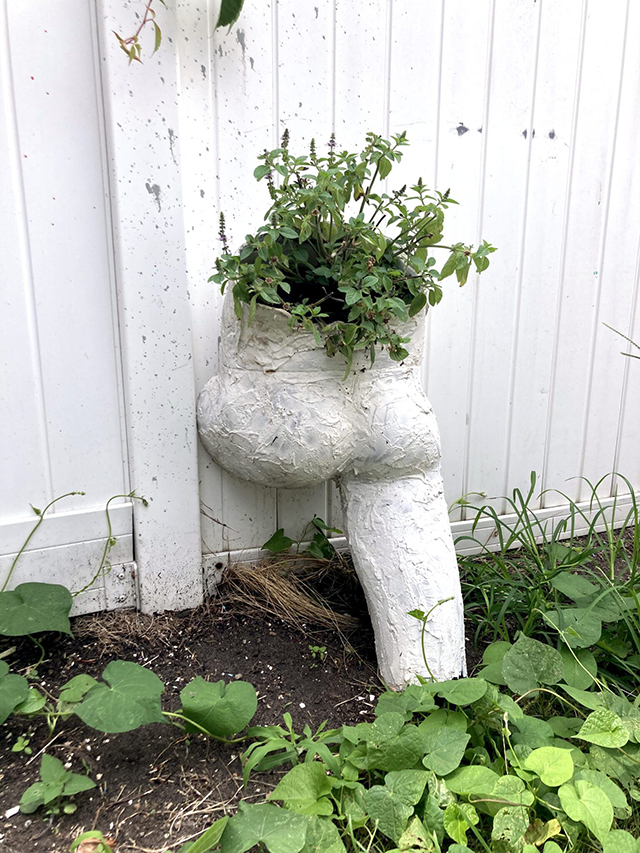
Long Distance Winner by Teresa Farrell
Tomorrow, Saturday, September 3rd, you’re invited to enter a three-dimensional garden painting pervaded with sculptural works by Teresa Farrell. This event is a free experience. All artworks are for sale. Electronic music performances by Aua de Gio and Magic Sandwich. The art show will be held from 3:11 p.m. to 7 p.m., located at Beach 97th Street and Rockaway Beach Blvd.
What to expect: The sculptures presented in this show are strategically integrated into the garden canvas. Living plants are meshed with found objects, paint, plaster, and other mediums. Original drawings, paintings, and wearable underwear will also be on display and for purchase.
For this exhibit, I’ve had the unique opportunity to witness Teresa’s art grow throughout the summer. My subjective feeling of the work is as such: The sculptures are reflective of physical and conscious changes in oneself. The art is unleashing bold. The sculptures peel away pretty and provoke the viewer to contemplate rawness. Truth is hard to look at. Perhaps that’s why Teresa’s work is soaked with comedy. The observer can dig as far as they’re mentally capable of – keep the perspective prudently comedic or allow yourself to shovel to the roots.
Teresa Farrell’s work has been showcased in galleries throughout the United States, London, and Switzerland. Closer to home, here in Rockaway, you may recall The Lot shows – a joint gallery/studio walkthrough space where music jams were held throughout the summer of 2021. Farrell is a Brooklyn native with Rockaway ties since childhood. She now lives on the peninsula full time pulling inspiration from your trash can and the temper of the sea.
Follow Teresa Farrell on Instagram – @tuh_nesta for a preview of what to expect tomorrow in the garden.