Fall is the best time to hike, walk, spy migratory birds, and embrace the changing leaf landscape. And we don’t have to make a trip up to Hudson to enjoy all that. NYC Parks offers us diverse natural and urban landscapes with endless exploring and learning opportunities. Would you guess we have over 1,700 parks, playgrounds, and recreation areas throughout the five boroughs? I was impressed to read that number.

I’d estimate a few hundred of those green spaces are in Rockaway. It’s fair to say we’ve all noticed the lovely new parks along the boardwalk – the labyrinth, the pickleball court, the adventure course (my favorite), the dog park, the parkway multi-purpose area with a volleyball court, stadium seating, the lawn and what about the new colorfully designed kids playgrounds – all of which are nestled within native gardens, cute seating and picnicking areas.
But there’s a sweet hidden gem a short bike ride away in Edgemere that has slipped through the community collective. Maybe it goes unseen because its perfectly native camouflage meshes seamlessly with the coastline. I’m talking about The Arverne East Nature Preserve. My Insta friend Gordon (a former Park Ranger, oh so cool!) reminded me of the park. We chatted about the lack of press around its opening which happened this past June. I’ve been meaning to “blow it up” in my column so here goes…
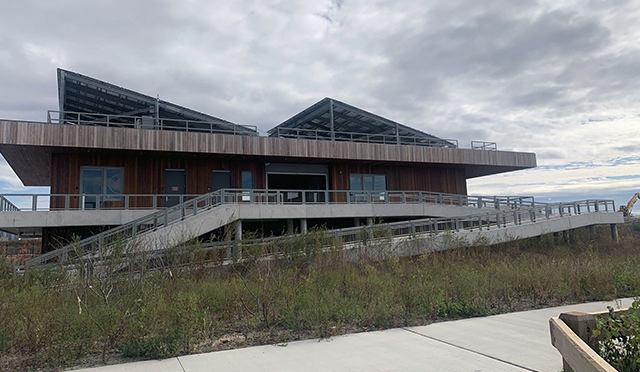
The Nature Preserve is an impressive 32 acres of native coastal vegetation with paths for walking and biking. The access points are located off the boardwalk at Beach 44th and Beach 56th streets. You can also enter via Edgemere Avenue at 44th where there is parking (ADA compliant). At this entry, you’ll see a modern building constructed of beautiful vertical wood slats (teak?). This will be a Parks Dept. base and a multi-purpose community center for activities, learning, events, and other purposes. I’m excited to see what happens there and how we as a community can utilize this space.
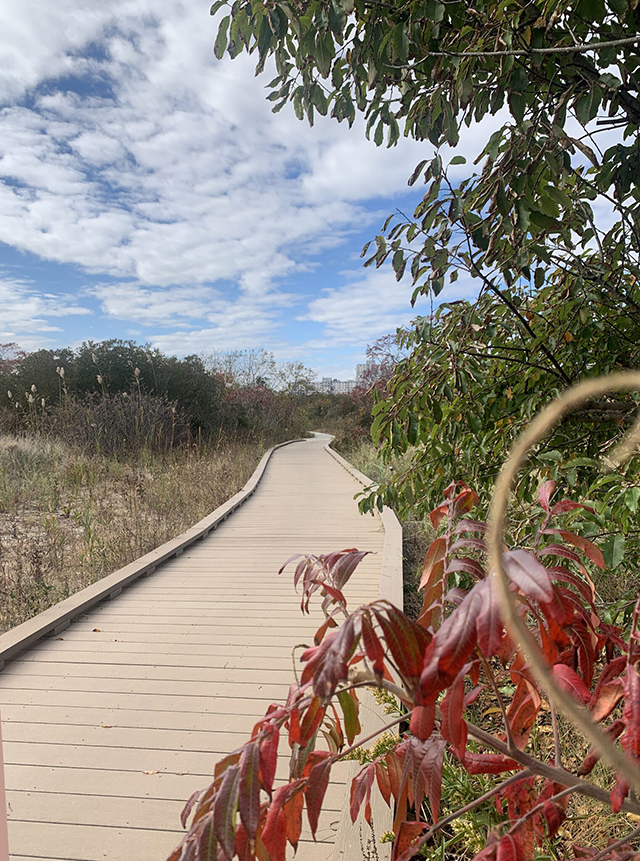
The paths blend harmoniously with the surrounding nature following the organic shapes of the environment. The material varies from synthetic boards to cement. The boards immediately brought me back to childhood memory – a field trip to Sunken Forest on Fire Island. I believe that is my first vivid memory of being immersed in nature. I remember the feeling of the boards under my feet, the multi-layered sounds of the birds, and the scents of the salt and soil. In Arverne East Preserve you will have a similar sensory experience with the unique addition of the urban world around you.
In the preserve, you will see pitch pines, goldenrod, aster, evening primrose, common marine grasses like bluestem, reed, and more. These plants create a canvas of bright yellow, burnt orange, warm browns, and calming green hues. The vegetation is strategically designed to be a green infrastructure to manage stormwater runoff and support storm projection.
Arverne East Nature Preserve was conceived as a part of the net-zero development in Edgemere which we are now calling Arverne East. The complex will be one of the most environmentally conscious developments in the United States, achieving net zero – meaning human-caused greenhouse gasses are balanced by human-caused carbon dioxide removals over a set time frame. Bravo Rockaway!
by Paula D.
on November 22, 2023 9:01 am in Food / Recipes
If you’re a regular reader of The Tomato, you know by now that I enjoy taking on creative food projects. And Halloween is a fine time to get weird in the kitchen. Last year I made funny little Frankenstein Avocado Toasts (recipe here). This meal is a cute activity for the kiddos and they get the enjoyment of eating their monster creatures for breakfast.
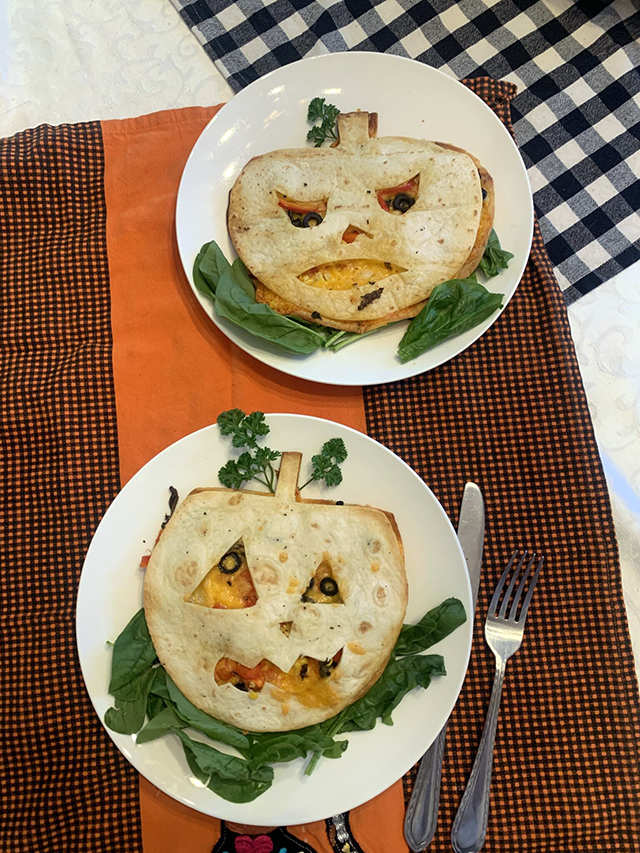
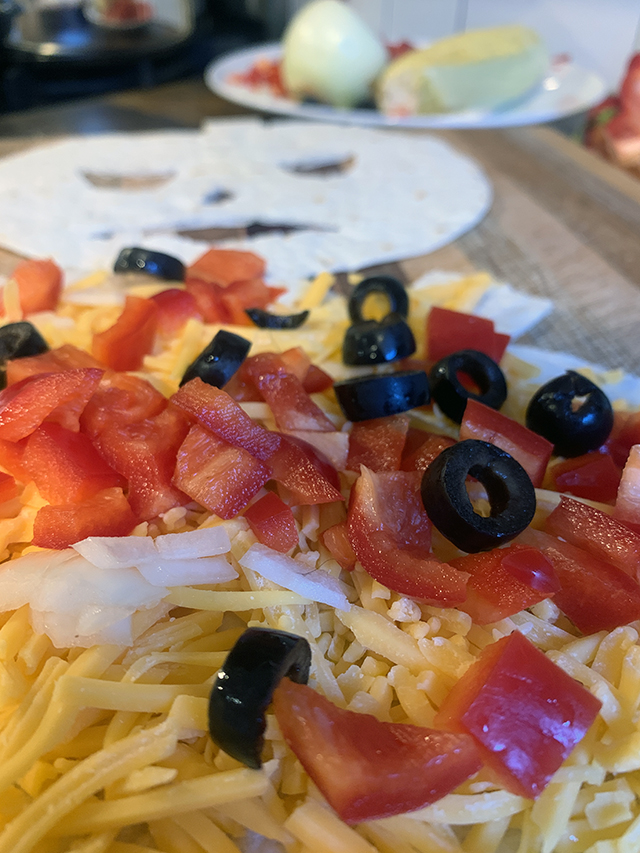
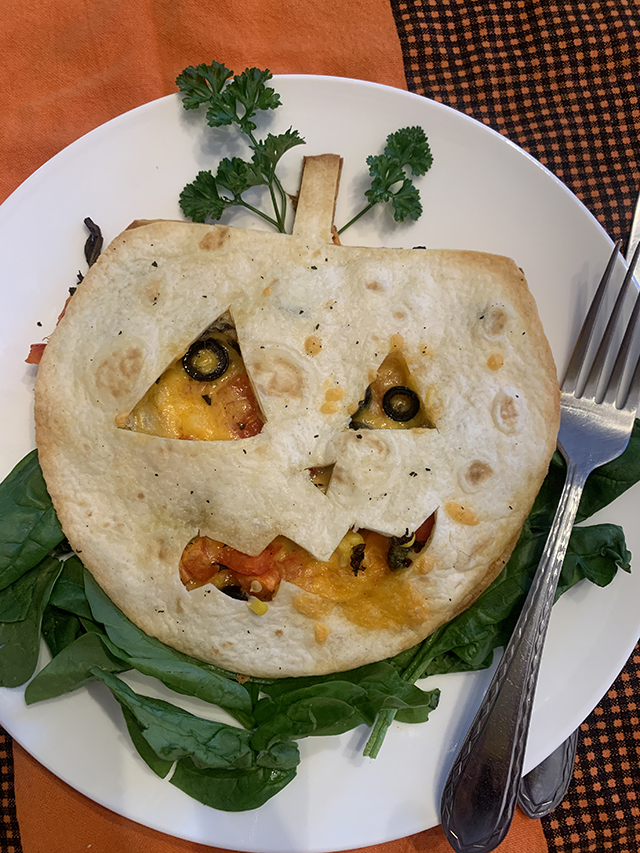
This Halloween weekend I challenge you to create Gooslish Quesadilla Pumpkins! I had a blast with this. Get wild with the Jack-o’-lantern expressions. The more cheese and veggies oozing out of the mouth and nose the better. Use corn for teeth and olives for eyes. Design your plate as a pumpkin patch by garnishing it with fresh greens and herbs. Here’s the recipe and instructions!
Ghoulish Quesadilla Pumpkins
2 quesadillas
Ingredients:
4 medium tortillas
½ cup cheddar cheese
About 2 ounces of each Vegetable:
Chopped peppers
Chopped onions
Corn
Sliced olives
Greens and herbs for garnish
Cilantro
Oil
Hot sauce
Salt and pepper to taste
Optional: sour cream or salsa
Directions:
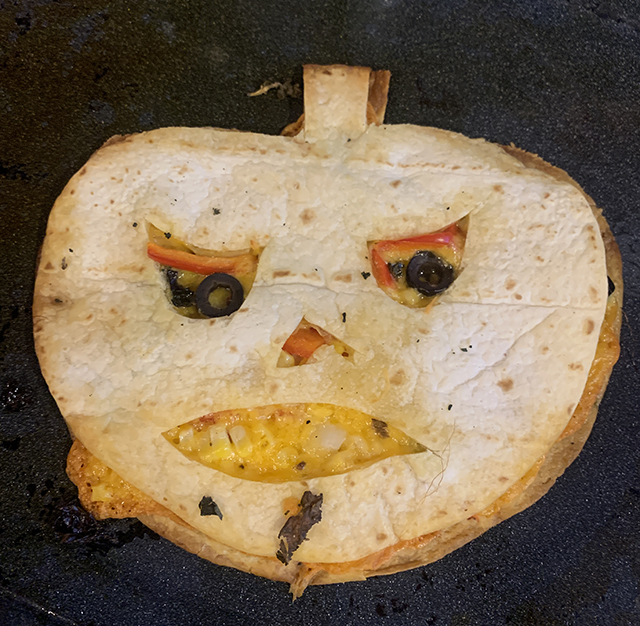
Shape: Using a knife (a butter knife for the kids is ok), cut a pumpkin face into one side of each tortilla. Shape the outer rim for detailed work or to fashion a stem.
Assemble: On a baking sheet, place a layer of cheese on the opposite side of the tortilla (the one without the face cut into it). Add the veggies, cilantro, and salt/pepper. Place the “face” on top. Add the finishing touches like a few chopped peppers hanging out of the mouth, corn for teeth, olives for eyeballs, etc.
Bake: baste the top face with oil. Place in the oven and bake for 10 minutes until the cheese is oozing and the tortilla is golden brown. Plate and adorn with greens for the pumpkin patch effect. Serve warm with a side of sour cream or salsa.
For me, working with food is an exciting challenge that pushes the boundaries of conventional culinary practices. It’s an opportunity to turn ingredients into a vibrant canvas for imaginative expression. The process is inherently fun! It encourages spontaneity and inventiveness, resulting in dishes that are not only visually interesting but also tasty and nutritious. From constructing edible sculptures (ahem, jello) to crafting colorful meals, food play transforms the kitchen into an artist’s studio. This offers me and I hope you, an exciting outlet for creativity that feeds your body and your imagination.
I’d like to share your cute or deranged quesadilla pumpkins on my Instagram feed. Tag me – @theglorifiedtomato. Let’s see how weird Rockaway can get with this. I’m betting real weird…

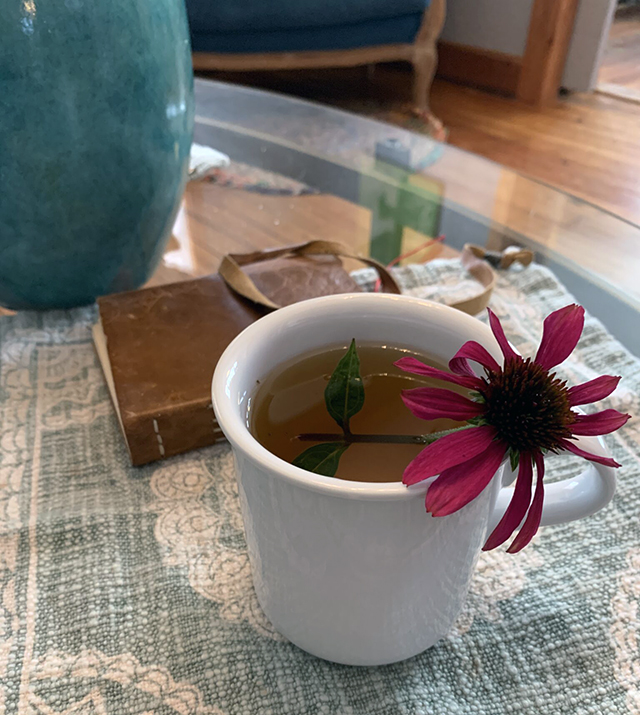
Sip echinacea tea on a chilly fall evening, taking a pause to enjoy a quiet moment.
I’ve been puttering around the garden. There’s so much to do, see, smell and enjoy in the fall. I’ve discovered a landscape of mushrooms under the oak hydrangea and other mushroom villages nestled below the brush. They indicate a healthy garden because mushrooms thrive in rich, organic soil. I’m not a mushroom expert but I take pleasure in investigating the funny little things. With the cool autumn season and consistent rain, the fungi appear to be honey fungus or milk cap. Both are cold-weather lovers and northeast natives. The underside characteristic is a smooth striped pattern. The mushrooms are yellow and light orange to brown. Honey fungus and milk cap are safe to eat and sadly not psychedelic. There are of course many poisonous look-alikes. Unless you’re a mushroom aficionado, enjoy wild mushrooms for their beautiful weirdness, not for nutrition.
I’m out front with some friends having lunch the other day and Juan notices two small birds bouncing through the front garden. At a closer look, we caught sight of a beautiful thing. The birds were also lunching, eating milkweed bug larvae off hardened stalks. These moments of nature are why I cherish gardening.
I thought the birds were a type of finch but later that day, I poked around the internet to learn they are more likely kinglets (maybe golden-crown) or North American vireos.
I need to point out that feeding birds is just one example of why you should not clear out your garden in the fall. Leave half of your perennials as is. What looks like a dead plant is in actuality beaming with life, hosting insects and housing seeds for the birds and other vital garden go-ers. The ecosystem of your garden lives year-round, let nature do its thing.
My neighbor Alex passes by as I’m propagating stonecrop. We chat and he asks what my favorite plant is in my garden. This is the most difficult question! He was looking for recommendations for his own space. I suggested the ever-giving echinacea plant with its vibrant pink flowers, long blooming season and hardiness. I should have guessed his next question, “Have you ever made tea with it?” I felt awkward having to tell him, no actually.
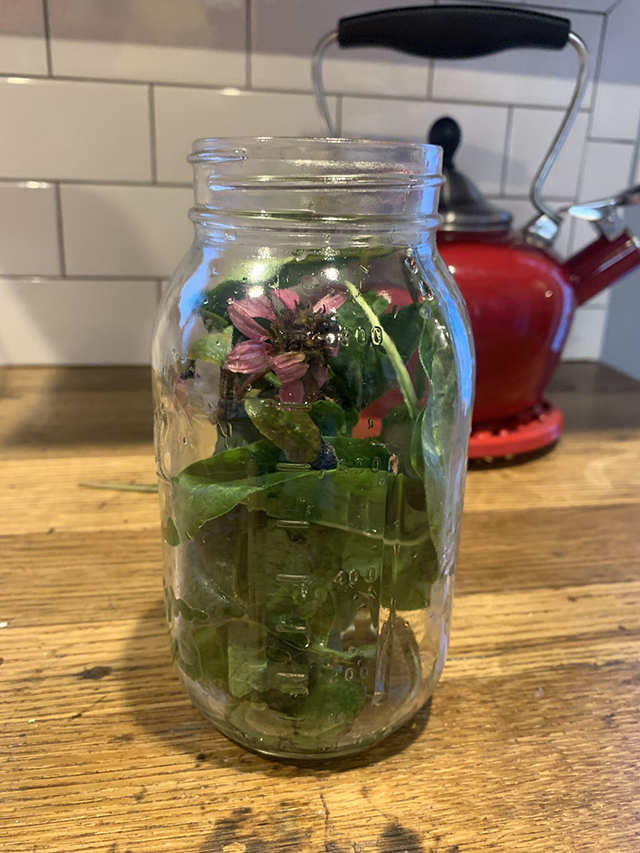
So here I am, with plenty of coneflowers still in the garden, I’m finally brewing homemade echinacea tea. What parts can be used for making the tea? All the parts including the roots! Here is a simple recipe!
Homemade Echinacea Tea
Makes 2 cup
Fresh Leaves – Rinse all plant parts thoroughly. Use 1 cup of fresh echinacea leaves, flowers, etc. Chop for a stronger tea, use whole for a milder version. Boil water and steep for 20 min.
Dried Leaves – Rinse well. Use rope to hang and sun dry outside for two days or dry inside hung in a warm, well ventilated room – about 5 days. Break the plant matter down into crumbles. Use 1⁄2 cup of the dried echinacea in a tea bag or use loose, steep then strain.
Pair with lemon, honey or sage for a multi-layered essence.
Echinacea tea is traditionally associated with medicinal benefits, including supporting the immune system and reducing the duration and severity of common colds. It possesses anti-inflammatory and antioxidants. Use this recipe to stay healthy during the approaching cold and flu season.
For more on edible gardens, visit theglorifiedtomato.com and follow Paula on IG for more – @theglorifiedtomato.
by Paula D.
on October 19, 2023 10:18 am in Art / Food
I was in London two weeks ago for my friend Amber and Jon’s wedding! I had time to explore the city’s vibrant culture and rich history. It was a wonderful experience and I am grateful.
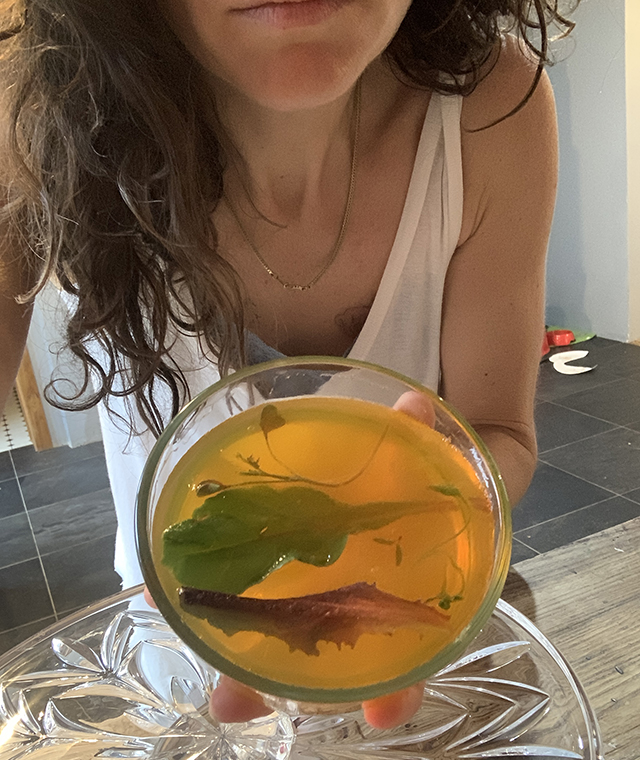
When I returned though, I sensed a big shift. I felt unmoored. All of a sudden, it was Fall and things had changed. But you know what Fall means… jello season. With the intensity of the summer behind me, I have time to focus on jello again. I started my jello journey last March…
“My interest in jello was triggered when I saw a vintage photo of a beautiful tower in “Better Homes and Gardens, New Cookbook, 1981.” Bold hues, structural shapes vs. organic forms, and the endless foods you can suspend within jello were so inspiring. I immediately saw jello as an art form. My mind was overwhelmed by possibilities.” (For the full story, click here.)
Since then, I’ve learned through practice so much about the craft of jello art. I’ve figured out the correct recipe to keep my sculptures firmly intact. Time and temperature also play a big role – it’s a science. I’ve learned how to successfully suspend foods and flowers in vegan jello. I’m experimenting with color and pushing the boundaries of shape.
I’ve gifted my jello creations to friends. For Kaori’s birthday, I created a tri-color, layered cake. The room was quiet as I unmolded the structure. At first release, all seemed well. But then – the sound of gasping suspense – seconds later, the top layer of jello slid off in a dramatic slow-motion fashion. Then loud laughter. I learned that night – jello brings joy!
Just last week I gifted another jello sculpture to my friend Frith. This time I had the keen idea to make it an interactive experience, letting Frith participate in the unmolding drama. She was a little nervous, but game. With a bit of jiggle, she successfully removed the mold and her jello gift stayed in form! Presenting jello sculptures into the world creates intrigue, suspense, and confusion and opens up a channel to engage people. For me as the creator, I relish in reading the room, observing people’s reactions, and listening to what they say under their breath.
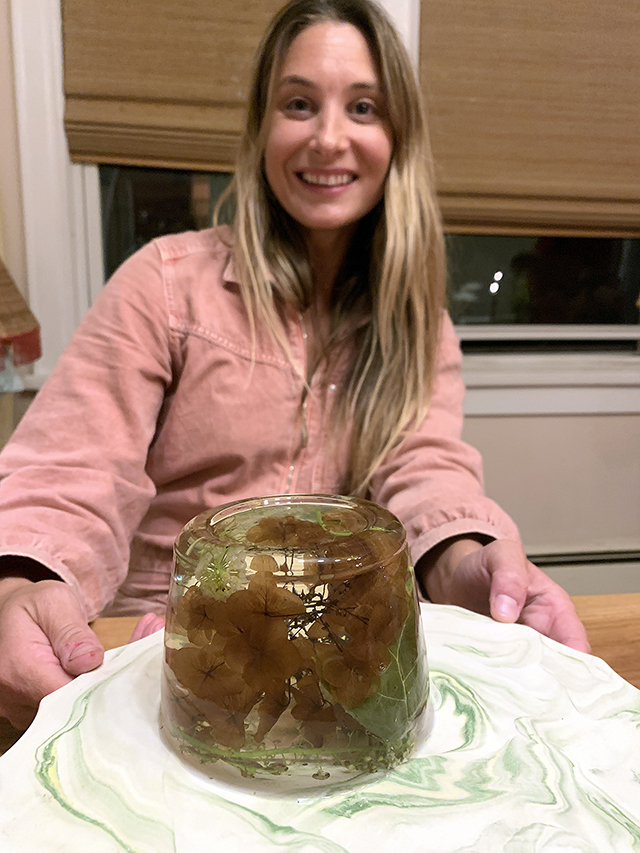
Frith on her birthday after unmolding her interactive jello sculpture gift!
The supportive response from my friends has been an unexpected reward. People are curious and they enjoy watching the unveiling of my works on social media. Jello sculpture is performative. I’m eager to continue my exploration of that part of the process through video.
My goal for this jello season is to make my structures taste good. The packaged vegan jello flavor is as you would expect – sugary cough syrup. Through my research, I’ve learned there are other gelling agents such as Agar-agar (made from red algae) that are tasteless. Instead of using water, you hydrate the powder with fruit juices.

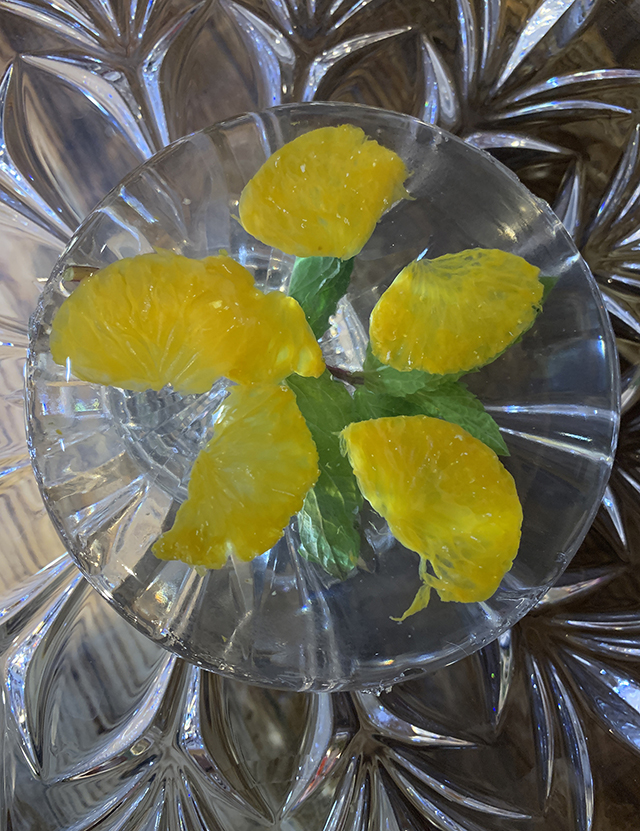
Dandelions are edible and make for a beautiful jello sculpture embellishment.
Aside from learning my craft, Jello sculpting continues to teach me skills like patience. Jello is organic and unstable, unlike the thousand-year-old sculptures I saw in the London museums. Jello is impermanent, a reminder that moments and mountains are in a constant state of change. And that the journey is most valuable.
To follow my jello journey, find her on Instagram: @theglorifiedtomato.


